Greco Clinch Setup
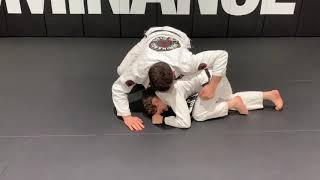
The instructor begins from a neutral Greco clinch position where both participants have pummeled to achieve one underhook and one overhook each, creating a balanced 50/50 control situation. The grip is maintained by holding the opponent's elbow, which remains difficult to break even when both athletes are sweating.
Achieving Double Underhooks
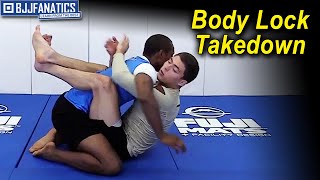
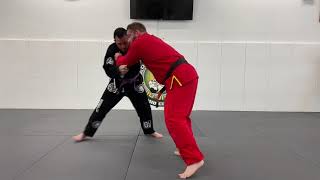
From the neutral clinch, the attacking wrestler pummels the free hand underneath to establish double underhooks while simultaneously inserting the same-side leg into the 'danger zone' between the opponent's legs. This configuration neutralizes most defensive options and provides complete control over the opponent's upper body.
High vs. Low Attack Angles
The instructor emphasizes that from double underhooks, the wrestler can attack either high or low, but should never attack the middle position. The high attack involves jacking the opponent upward and rotating them onto their back, while the low attack is demonstrated as an alternative depending on opponent height and positioning.
Grip Placement and Leg Positioning
Proper grip execution involves interlacing the fingers while maintaining the double underhooks in a low position. The placement of the knee in the danger zone prevents the opponent from executing head-and-arm throws or other judo-style attacks, neutralizing their offensive options completely.
Deep Penetration Against Tall Opponents
When facing taller opponents, the instructor demonstrates stepping in deep with the head positioned low rather than attempting a high attack. Deep penetration prevents the opponent from throwing the attacker and makes the takedown more efficient by reducing the distance the opponent must be rotated.
Core Engagement and Relaxation
The instructor emphasizes using core strength rather than arm strength to maintain control in double underhooks, and advises wrestlers to stay relaxed rather than tensing unnecessarily. This approach conserves energy and allows for smoother, more controlled takedown execution.
Defense Against Counter-Throws
The leg position in the danger zone specifically prevents opponents from executing head-and-arm throws. Even if the opponent attempts to counter by grabbing the attacker's head, proper foot placement and control of the danger zone renders the counter ineffective.
Finishing the Takedown
From the established double underhook position with proper leg placement and grip, the takedown is completed by rotating the hips and turning the opponent to the mat. The technique requires minimal explosive power once proper positioning is achieved, relying instead on controlled rotation and leverage.
M.G.C. Instr. #192: Double Underhooks The Best Body Lock Takedown 🔥
Key Takeaways
- •Greco Clinch Setup
- •Achieving Double Underhooks
- •High vs. Low Attack Angles
- •Grip Placement and Leg Positioning
www.modestograpplingclub.com Double Underhooks Body Lock Takedown
Related Techniques
Frequently Asked Questions
What does this video teach about body lock takedown?
This video covers greco clinch setup, achieving double underhooks, high vs. low attack angles. It provides detailed instruction from Modesto Judo Club.
How long does it take to learn body lock takedown?
The basic mechanics can be understood in a single session, but developing reliable execution requires consistent drilling over weeks of practice. This 8-part breakdown helps structure your training by isolating each phase of the technique.
What are the key details for finishing body lock takedown?
The leg position in the danger zone specifically prevents opponents from executing head-and-arm throws. Even if the opponent attempts to counter by grabbing the attacker's head, proper foot placement and control of the danger zone renders the counter ineffective.