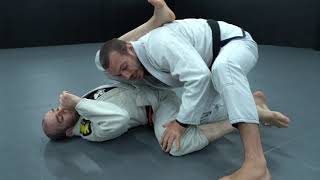
Stack Position Fundamentals
The stack pass begins with the passer positioned between the opponent's legs with both arms inside, creating a dominant control point. This position is advantageous because the defender must continuously work to reset their guard, while the passer can maintain pressure without expending excessive energy. The stack also prevents referee penalties since the passer can appear to be actively working without necessarily moving.
Defensive Posture and Choke Prevention
The passer must protect against triangle chokes and loop chokes by keeping the chin off the wrist and shrugging the shoulders to make the neck difficult to access. The jaw should be positioned to the side rather than exposed over the opponent's wrist. The passer must also be aware of spider guard setups and handle sleeve grip attempts before they become problematic.
Collar Control and Hip Connection
When establishing collar control, the passer's forearm must remain connected to the opponent's hip flexors rather than pressing directly on the neck, preventing the defender from opening their elbow and inserting their leg. The passer's head must stay below the knee line to prevent the defender from framing effectively. This connection between forearm and hips creates the stability needed to execute the stack and lateral movement.
Stacking Mechanics and Leg Placement
The passer executes the stack by using both legs behind the opponent's hips with knees off the mat, creating upward pressure. The passer can respond to the defender's resistance by bringing the knee either inside or outside the defender's arms. The modified Tori pass can be used as an entry point before jumping into the legs and establishing the full stack.
Handling Defensive Leg Positioning
When the defender brings their thighs down and over the passer's biceps to prevent collar access, the passer must lift one side of the opponent's body more than the other to reposition the legs. The passer maintains chest pressure against the opponent's lower back with knees off the mat while creating this asymmetrical lift. This uneven pressure allows the passer to reset the stack position despite the defender's resistance.
Knee Shield Breakage and Grip Breaking
Once the passer repositions the legs, they bring their shin over the defender's arm to create a wall that prevents the defender from escaping or regaining guard positioning. The passer then breaks the defender's grip and secures the collar grip away from the neck area while maintaining elbow tightness. This sequence frees one arm while trapping the other, enabling the final pass.
Completing the Pass and Transition
The passer pushes the opponent's hips to the floor by placing their side down rather than passing their head under the opponent's leg. The passer then secures control by hugging over the opponent's arm and, crucially, scooping their leg under the opponent's trapped arm to lock it in place. From this position, multiple submissions become available including north-south chokes, Kimuras, triangles, and armbars.
Sequence Summary and Arm Trapping Alternative
The complete stack pass sequence involves: modified Tori entry, jumping into the legs, lifting one side to establish the stack, driving the chest down, placing the shin over the opponent's arm, breaking the grip, securing the collar, and scooping the leg to trap the arm. When the defender over-commits with arm pressure, the passer can grab the wrist, drive it under the opponent's body, step over it, and use the hamstring and calf to trap the arm. Both paths require maintaining connection and avoiding premature neck pressure.
Variations Without Sleeve Grip
When the opponent is not holding the sleeves, the passer must hide their neck through proper posture and lift before committing to collar control. The passer can then attack the collar directly and choose to pass either inside or outside the opponent's arm. The shin, rather than the knee, serves as the critical control point on the opponent's arm throughout these variations.
Basic Stack Pass to Flow Pass - Andre Galvao
Key Takeaways
- •Stack Position Fundamentals
- •Defensive Posture and Choke Prevention
- •Collar Control and Hip Connection
- •Stacking Mechanics and Leg Placement
Discovery of the full power of this technique with parts 2 and 3, now accessible on Atos BJJ on Demand! Part 2- https://live.atosbjjondemand.com/videos/basic-stack-pass-to-flow-pass-part-2 Part 3- https://live.atosbjjondemand.com/videos/basic-stack-pass-to-flow-pass-part-3 NOW 35%OFF your first year - ALL ACCESS: https://live.atosbjjondemand.com/checkout/subscribe/purchase?code=LEVELUP35&plan=yearly 7-day free trial. Cancel anytime! Try Our Merch: https://shop.atosjiujitsuhq.com SUBSCRIBE OR WE TAKE YOUR BACK ╔═╦╗╔╦╗╔═╦═╦╦╦╦╗╔═╗ ║╚╣║║║╚╣╚╣╔╣╔╣║╚╣═╣ ╠╗║╚╝║║╠╗║╚╣║║║║║═╣ ╚═╩══╩═╩═╩═╩╝╚╩═╩═╝ ---------------------------------------------------------------- follow all of these or we will choke you • Facebook - https://www.facebook.com/galvaobjj • Twitter - https://twitter.com/galvaobjj • Instagram - https://www.instagram.com/galvaobjj • About Andre Galvao - https://www.andregalvao.com --------------------------------------------------------------------
Related Techniques
Frequently Asked Questions
What does this video teach about stack pass?
This video covers stack position fundamentals, defensive posture and choke prevention, collar control and hip connection. It provides detailed instruction from Atos Jiu-Jitsu HQ | World's Best BJJ Academy - Home Page.
How long does it take to learn stack pass?
The basic mechanics can be understood in a single session, but developing reliable execution requires consistent drilling over weeks of practice. This 9-part breakdown helps structure your training by isolating each phase of the technique.
What are the key details for finishing stack pass?
The complete stack pass sequence involves: modified Tori entry, jumping into the legs, lifting one side to establish the stack, driving the chest down, placing the shin over the opponent's arm, breaking the grip, securing the collar, and scooping the leg to trap the arm. When the defender over-commits with arm pressure, the passer can grab the wrist, drive it under the opponent's body, step over it, and use the hamstring and calf to trap the arm. Both paths require maintaining connection and avoiding premature neck pressure.