Basic Double Leg Takedown
0
Standard Double Leg From Cage·Absolute MMA St Kilda - Melbourne
Full Course Playlist → https://youtube.com/playlist?list=PLDrQXekZsfYZfV1QZ4T5UkxLwFwQ12EbP Find the Introduction course…
Translation: standard double leg from cage
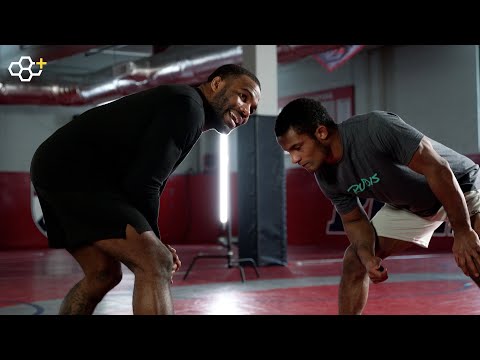
The Standard Double Leg From Cage executes the fundamental cage-wall double leg where the attacker drops level from a clinch position, wraps both arms around the opponent's thighs, and drives upward and forward to lift or trip the opponent to the mat. [1] The attacker typically uses an underhook or collar tie to control the opponent against the wall, then drops the level by bending the knees and shooting the arms to the legs in a single motion. [1],[2] The wall prevents the opponent from sprawling, so the primary defence becomes hip position and underhook fighting. [2] The finish involves lifting the opponent's legs while driving the chest forward to topple them. [2],[3]
The double leg from the cage (or wall) is one of the most effective takedowns in MMA because the cage prevents the opponent from retreating, eliminating the primary defence against double-leg shots. [1] The cage wall acts as a backstop, allowing the attacker to pin the opponent and work for the takedown with sustained pressure. [1]
The standard cage double leg is the fundamental cage-wrestling adaptation of the open-mat double leg takedown. [1]
No images yet for this technique.
Sign in to suggest an image.
Full Course Playlist → https://youtube.com/playlist?list=PLDrQXekZsfYZfV1QZ4T5UkxLwFwQ12EbP Find the Introduction course…
Refined and perfected over a decade, 6x World and Olympic Champion Jordan Burroughs breaks down the Double Leg Takedown …
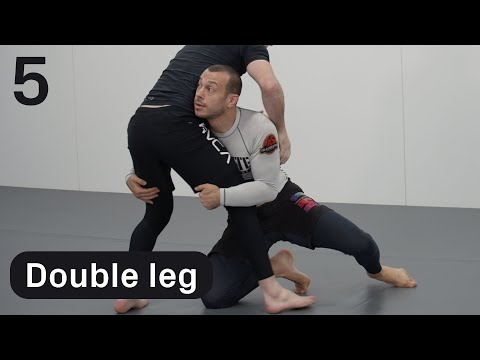
Top 5 Wrestling Moves is back! Here I go over my top 5 double legs you can do. Check out the Patreon! https://www.patre…
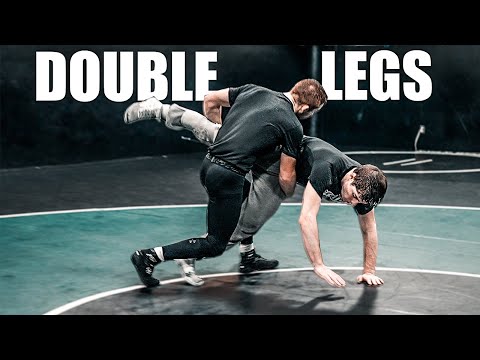
The standard double leg from cage is executed through a coordinated sequence of positioning, level change, and explosive penetration. Cayden Henschel emphasizes the importance of foot placement and finish mechanics, noting that the shooter should step deep, place the front knee to the mat, and drive through the legs while hooking or securing the opponent, finishing by stepping through to establish control. Jordan Burroughs, as detailed by RUDIS, breaks the technique into five progressive steps: post (using one heavy hand to create imbalance), club (heavy hand strikes to maintain pressure), circle (footwork to square the opponent's stance), level change (releasing the opponent's head and dropping underneath their hands), and penetration (explosive hip drive through the opponent's body). Absolute MMA St Kilda emphasizes fundamental range management, dropping level to move underneath the opponent's hands rather than attacking directly at the legs, leading with the front leg, placing the front knee deeply to the ground to maintain proper posture, and driving to the side to finish in side control. All three instructors agree on the critical importance of dropping level before shooting, the explosive drive through the hips, and maintaining good upper body posture to prevent sprawl. They differ in emphasis: Henschel provides multiple setup variations (drag, blast, JB double, pass, pick), Burroughs focuses on the methodical five-step breakdown with hand control preceding the shot, and Absolute MMA prioritizes beginner-friendly mechanics and common mistakes for MMA/jiu-jitsu contexts.
Synthesized from 3 instructors
No instructional courses yet for this technique.
Sign in to suggest a course.
Risk of injury to the person this technique is applied to
Cage/wall-assisted takedowns; controlled descent against structure
Skill level needed to execute this technique reliably
Whether this technique is allowed under major competition rule sets
Japanese MMA standard terminology
Japanese MMA standard terminology
Mixed Japanese-Western terminology — combines traditional Japanese terms with katakana loanwords
Katakana transliteration used in Japanese MMA/Shooto
explosive lower body power, level change speed, forward drive
stocky build with strong legs and low centre of gravity
quadriceps, glutes, hamstrings, core, shoulders
You want to be just outside striking/reaching range. Check your distance by extending your arm straight—if you can't reach your opponent, they can't reach you. You don't want to be so far that you have to cover too much ground, but close enough that they can't block or strike you as you come in.
You want to drop your level before you shoot in, moving underneath your opponent's arms which are the main thing that will block you. Keep good posture with your upper body tall as you drive through.
Lead with your lead leg (front leg), not your trail leg. This is faster because your leg is already forward and covers ground quicker. Make sure you step deep so your knee goes to the ground and you maintain good posture with your upper body tall.
According to Jordan Burroughs, you want to bring one hand up as a heavy post to knock your opponent off balance while keeping your other hand at home to protect and defend your legs. This makes your opponent uncomfortable and out of position before you finish the takedown.
The Standard Double Leg From Cage executes the fundamental cage-wall double leg where the attacker drops level from a clinch position, wraps both arms around the opponent's thighs, and drives upward and forward to lift or trip the opponent to the mat. The attacker typically uses an underhook or collar tie to control the opponent against the wall, then drops the level by bending the knees and shooting the arms to the legs in a single motion.
The cage double leg became a foundational MMA wrestling technique during the sport's development in the late 1990s and 2000s. Fighters with folkstyle and freestyle wrestling backgrounds were the first to adapt their double-leg mechanics to the cage environment.
IJF: banned — Banned since 2010 leg grab prohibition — direct hansoku-make for touching opp…; IBJJF: legal — Legal at all belt levels, scored as takedown (2 points); UWW: restricted — Legal in freestyle (2-4 points), banned in Greco-Roman (no attacks below waist); Unified MMA: legal — Legal takedown technique; ADCC: legal — Legal, scored 2-4 points in second half of match; FIAS Sport Sambo: legal — Legal — all takedowns permitted; FIAS Combat Sambo: legal — Legal; NCAA Folkstyle: legal — Legal, scored as takedown (2 points)
Danger rating 4/10. Moderate — cage/wall-assisted takedowns; controlled descent against structure
The standard setup chain: Setup with Strikes or Feint → Level Change → Penetration Step → Head in Chest → Lift and Drive.
Standard counters include: Sprawl — drop hips back and drive weight down to stuff the takedown attempt / Sprawl and Cross-Face — combine hip drop with head push to flatten the attacker / Guillotine Choke — wrap the head during the shot attempt and apply front headlock pressure / Knee Strike — time a rising knee to meet the incoming level change.
Common variants: Blast double (high-impact forward drive through the opponent without ch…); Snatch double (pulling both legs together and driving laterally); Run-the-pipe double (running through the opponent in a linear drive); Low double (deep penetration step attacking below the knees).
Cage double legs are among the most frequently completed takedowns in UFC competition. Khabib Nurmagomedov's cage wrestling, which included extensive use of wall-assisted double legs, contributed to his undefeated 29-0 record and UFC lightweight championship reign (2018-2020).
Top errors to watch for: Dropping to the knees during the level change, killing your driving power / Wrapping the legs separately instead of clasping behind both thighs / Not stepping away from the fence after the lift, ending up tangled against the cage / Head buried too low in their stomach, losing the ability to see and react.
The Standard Double Leg From Cage is also known as Daburu Reggu (Kēji kara), Cage Double TD, Wall Double Leg Takedown, Fence Double.