How I Escape EVERYONES Side Control
0
Side Control Escape·CrashAndFlowBJJ
I escape everyone’s side control using clean mechanics and high-percentage technique. This video shows my live rounds wi…
Translation: Side control escape
The Side Control Escape family within the Bottom Escape group covers the fundamental techniques for escaping from underneath side control — the most commonly encountered bad position in BJJ and the position from which the most escapes are attempted in competition. [1] The two primary side control escapes are the hip escape (shrimp) to guard recovery and the bridge-and-roll reversal, with the hip escape being the most important single escape in all of grappling. [1],[2] Side control escapes rely on three fundamental principles: framing (creating skeletal structure barriers with the forearms against the opponent's neck and hip), hip movement (shrimping to generate lateral space), and timing (executing the escape when the opponent shifts weight or transitions between positions). [2],[3] Saulo Ribeiro's 'survival posture' concept — protecting yourself before attempting to escape — provides the modern framework for side control escape methodology. [3]
Side control escapes are fundamental to all grappling traditions — judo's methods for escaping yoko shiho gatame and wrestling's bottom escapes from cross-body rides both contributed to the modern BJJ escape system. [1] Saulo Ribeiro's systematisation of escapes in Jiu-Jitsu University (2008) provided the modern framework, introducing the 'survival posture' concept that prioritises self-protection before escape attempts. [1],[2] The hip escape (shrimp) — originally called the 'camarão' in Portuguese — was developed as a fundamental BJJ movement and is now considered the single most important ground movement in grappling. [2],[3]
Side control escapes are essential survival skills — the hip escape to guard recovery is the most commonly used escape in all of BJJ and MMA competition. [1] Elite grapplers like Marcelo Garcia and Demian Maia have demonstrated the ability to escape side control against the world's best, showing that even top-level control can be overcome with proper technique and timing. [2] In MMA, effective side control escape ability has saved countless fighters from ground-and-pound stoppages. [3]
No images yet for this technique.
Sign in to suggest an image.
I escape everyone’s side control using clean mechanics and high-percentage technique. This video shows my live rounds wi…
Join Ebsayz Jiu Jitsu for 1 on 1 coaching to accelerate your progress and guaranteed results! https://www.skool.com/ebsa…
No instructional courses yet for this technique.
Sign in to suggest a course.
Risk of injury to the person this technique is applied to
Escaping side control carries risk of being submitted during the escape (the opponent may attack armbars, kimuras, or chokes as you create space), and in MMA, escaping exposes the face to ground-and-pound during transitions
Skill level needed to execute this technique reliably
Whether this technique is allowed under major competition rule sets
Jiu-Jitsu University (Saulo Ribeiro, 2008)
Description sources — [1] Jiu-Jitsu University (Ribeiro, 2008) on escape hierarchy and survival posture [2] Marcelo Garcia escape demonstrations [3] The hip escape in grappling history
History sources — [1] Judo and wrestling escape traditions [2] Ribeiro's systematisation [3] BJJ movement fundamentals
hip mobility (shrimping is the primary movement), frame strength (maintaining forearm frames under pressure), core strength (bridging), cardio endurance (escape attempts are exhausting)
flexible hips, strong forearms (frame maintenance), explosive bridging
hip flexors (shrimping), forearms (framing), glutes (bridging), core (connecting bridge and shrimp), quadriceps (supporting frame structure)
Every move, in any martial art, shares a few universal traits. Mix and match below to pinpoint the right tool — or compare equivalents across styles.
The Bridge And Roll Side Control subfamily covers side control escapes where the defender bridges explosively and rolls the opponent over, reversing from bottom to top position. [1] The bridge and roll from side control is more difficult than from mount because the opponent's weight distribution is different, but it remains effective when the opponent's weight is high or they are reaching for submissions. [1,2] The roll direction is typically toward the opponent, using the bridge momentum to tip them over the defender's body. [2,3]
The Frame And Reguard subfamily covers side control escapes that use defensive frames to create space, then leverage that space to reinsert the legs and recover a guard position. [1] The frame and reguard approach focuses on incremental space creation through proper frame placement, followed by the critical step of reguarding before the opponent can collapse the space. [1,2] This escape method is considered more reliable than the bridge and roll because it doesn't require explosive timing — it uses systematic frame placement and hip movement. [2,3]
The Hip Escape Side Control subfamily covers side control escapes that primarily use the hip escape (shrimp) movement to create the lateral space needed to reinsert the legs and recover guard. [1] The hip escape from side control is the most fundamental and frequently drilled escape in BJJ, forming the basis of most side control escape sequences. [1,2] Variations include the standard hip escape (shrimp to recover guard) and the ghost escape (a dynamic hip escape that slides underneath the opponent). [2,3]
The Underhook Side Control Escape subfamily covers escapes where the defender establishes an underhook on the near side from bottom side control, then uses the underhook to create a frame and generate the space needed to escape to the knees or recover guard. [1] The underhook from bottom side control provides inside position that allows the defender to drive into the opponent and create upward force, rather than relying solely on hip escaping away. [1,2] The underhook escape can lead to single-leg takedowns, back takes, or simple positional improvement to the knees. [2,3]
Side control escapes rely on creating frames (forearms against the opponent's neck and hip) to create space for hip movement. The shrimp-to-guard recovery is the primary escape method. (Ribeiro, Jiu-Jitsu University)
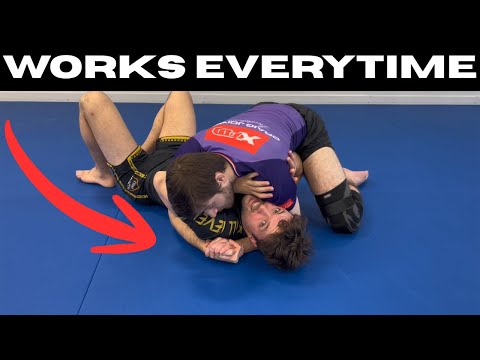
According to Ebsayz, the biggest mistake is hugging your opponent or trying to frame in the wrong direction. Instead, you need to avoid hugging and focus on creating proper frames with correct body positioning.
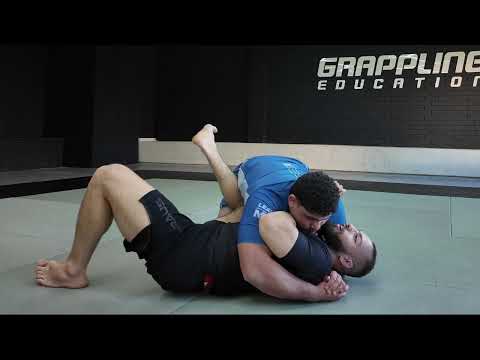
CrashAndFlowBJJ emphasizes that you must first address the cross face by getting your hand inside to prevent your opponent from turning you over, since the body follows the head and you need to be able to turn into your opponent to execute the escape.
CrashAndFlowBJJ recommends defaulting to a power strip position, which he describes as super valuable and reliable for getting your side guard escape every time, even against tight positioning.
Ebsayz outlines that step one is to not hug your opponent, then you need to establish two frames with proper positioning (more than 90 degrees and lined up to the elbow), create separation, get a leg between you and your opponent, and move into counter-attacks.
The Side Control Escape family within the Bottom Escape group covers the fundamental techniques for escaping from underneath side control — the most commonly encountered bad position in BJJ and the position from which the most escapes are attempted in competition. The two primary side control escapes are the hip escape (shrimp) to guard recovery and the bridge-and-roll reversal, with the hip escape being the most important single escape in all of grappling.
Side control escapes are fundamental to all grappling traditions — judo's methods for escaping yoko shiho gatame and wrestling's bottom escapes from cross-body rides both contributed to the modern BJJ escape system. Saulo Ribeiro's systematisation of escapes in Jiu-Jitsu University (2008) provided the modern framework, introducing the 'survival posture' concept that prioritises self-protection before escape attempts.
Unified MMA: legal — Legal defensive/transitional technique; IBJJF: legal — Legal; IJF: legal — Legal; ADCC: legal — Legal; UWW: legal — Legal, escape scores 1 point (freestyle), reversal scores 1 point; FIAS Sport Sambo: legal — Legal; NCAA Folkstyle: legal — Legal, escape scores 1 point, reversal scores 2 points
Danger rating 4/10. Moderate — escaping side control carries risk of being submitted during the escape (the opponent may attack armbars, kimuras, or chokes as you create space), and in MMA, escaping exposes the face to ground-and-pound during transitions
The standard setup chain: Survive → Frame → Create Space → Hip Escape → Insert Knee → Recover Guard → Consolidate.
Standard counters include: When on top in side control: drive heavy chest pressure to prevent framing / Follow the hips — when the bottom player shrimps, follow with your hips to maintain chest contact / Crossface — drive the forearm across the face to turn the head and prevent guard recovery / Knee insert — drive the near-side knee into the space between the bottom player's elbow and hip to block guard recovery.
Common variants: Hip escape (shrimp) to guard recovery (the most fundamental and commonly used escape; shrimping …); Bridge and roll (explosive bridge to reverse when the opponent has poor base); Underhook escape (fighting for the near-side underhook and coming to the kn…); Running escape (turning away and coming up in a running motion; a Marcelo…); Ghost escape (framing against the opponent's hip while sliding the body…); Sit-up escape (sitting up into the opponent while attacking an underhook…); Stiff-arm escape (fully extending the near arm to create maximum frame dist…); Knee-elbow escape (a compact version where the knee and elbow connect to cre…).
Side control escapes are the most commonly attempted escapes in BJJ and MMA competition. The hip escape to guard recovery is performed thousands of times in every major tournament.
Top errors to watch for: Pushing with arms instead of framing — pushing is weak and tires quickly; frames use skeletal structure (bone against… / Shrimping without frames — the opponent simply follows the shrimp if no frames prevent them from re-closing the distance / Lying flat and accepting the position — side control escapes require active effort from the first moment / Bridging straight up — bridges must be at a specific angle to create usable space; straight-up bridges are easily ridden.
The Side Control Escape is also known as Saido Kontorōru Esukēpu, Side Control Escape, Side Mount Escape, Kesa Gatame Escape.