Video 8 - Side Control Escape Bridge and Roll Series
0
Bridge And Roll Side Control·Brazilian Jiu Jitsu Incorporated
Side Control Escape Bridge and Roll Series 1- Bridge and Roll 2- Figure 4 the Leg 3- Bridge and hop Over 4- Bridge to Sc…
Translation: bridge and roll side control
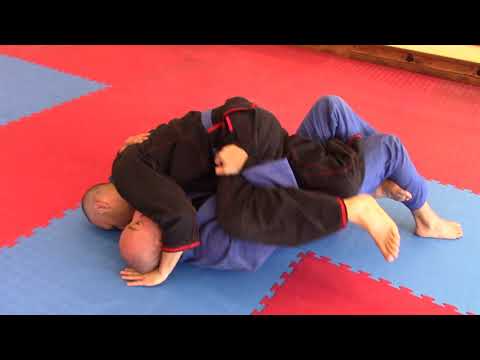
The Bridge And Roll Side Control subfamily covers side control escapes where the defender bridges explosively and rolls the opponent over, reversing from bottom to top position. [1] The bridge and roll from side control is more difficult than from mount because the opponent's weight distribution is different, but it remains effective when the opponent's weight is high or they are reaching for submissions. [1],[2] The roll direction is typically toward the opponent, using the bridge momentum to tip them over the defender's body. [2],[3]
The bridge and roll from side control uses an explosive bridge combined with an underhook to reverse the position. [1]
A fundamental escape technique in BJJ and judo. [1]
Used in BJJ and MMA competition. [1]
No images yet for this technique.
Sign in to suggest an image.
Side Control Escape Bridge and Roll Series 1- Bridge and Roll 2- Figure 4 the Leg 3- Bridge and hop Over 4- Bridge to Sc…
No instructional courses yet for this technique.
Sign in to suggest a course.
Risk of injury to the person this technique is applied to
Bottom escapes from mount/side control; bridge and hip escape mechanics (Ribeiro 2008)
Skill level needed to execute this technique reliably
Whether this technique is allowed under major competition rule sets
Jiu-Jitsu University (Saulo Ribeiro, 2008)
Alias sources — [1] Jiu-Jitsu University (Saulo Ribeiro, 2008) [2] Kodokan Judo (Jigoro Kano, 1986) [3] Brazilian Jiu-Jitsu: Theory and Technique (Renzo Gracie & Royler Gracie, 2001)
Effectiveness sources — [1] Mastering Jujitsu (Gracie & Danaher, 2003)
Mixed Japanese-Western terminology — combines traditional Japanese terms with katakana loanwords
Alias sources — [1] Jiu-Jitsu University (Saulo Ribeiro, 2008) [2] Kodokan Judo (Jigoro Kano, 1986) [3] Brazilian Jiu-Jitsu: Theory and Technique (Renzo Gracie & Royler Gracie, 2001)
Effectiveness sources — [1] Mastering Jujitsu (Gracie & Danaher, 2003)
explosive hip bridge power, shrimping ability, timing
strong glutes and hip extensors for powerful bridges
glutes, hip extensors, core, quadriceps
Every move, in any martial art, shares a few universal traits. Mix and match below to pinpoint the right tool — or compare equivalents across styles.
Bridge towards 11 o'clock or 5 o'clock rather than straight to 9 o'clock and 3 o'clock, as this provides better leverage for the escape. Moving your bicep from the neck to the crown of the head adds more pressure to help initiate the bridge.
Turn to your side, flare your foot up, lift, then apply figure-4 leg locks twice while anchoring on your opponent's side. Adjust your body position first before lifting—grabbing the foot prematurely gives your opponent opportunities to prevent the escape.
Bring your elbow to the mat and try to drive their knees together, though you may only be partially successful. If needed, slide your own body up slightly to compensate and create more escape opportunity.
The Bridge And Roll Side Control subfamily covers side control escapes where the defender bridges explosively and rolls the opponent over, reversing from bottom to top position. The bridge and roll from side control is more difficult than from mount because the opponent's weight distribution is different, but it remains effective when the opponent's weight is high or they are reaching for submissions.
The bridge and roll from side control is a fundamental grappling escape technique present in both judo and BJJ ground work curricula. It represents the most direct reversal option from the side control position.
Unified MMA: legal — Legal defensive technique; IBJJF: legal — Legal — escapes and sweeps are fundamental to BJJ, sweep from bottom scores 2…; IJF: legal — Legal; ADCC: legal — Legal, sweep scores 2 points (4 from mount/back); FIAS Sport Sambo: legal — Legal; FIAS Combat Sambo: legal — Legal
Danger rating 3/10. Moderate — bottom escapes from mount/side control; bridge and hip escape mechanics (Ribeiro 2008)
The standard setup chain: Frame Defence → Trap the Arm → Bridge Explosively → Roll to Top.
Standard counters include: Heavy Hips — maintain low hip pressure and wide base to absorb the bridge / Grapevine — hook legs inside opponent's thighs to neutralize hip movement / Post Hand — post arm on the mat in the direction of the bridge to maintain balance.
Common variants: Bridge and roll (upa) (explosive bridge trapping arm and leg to reverse position); Elbow-knee escape (framing and shrimping to recover guard); Foot drag escape (dragging the opponent's foot with the heel to create spac…); Combination escape (bridging to force a reaction, then shrimping when the opp…).
Used in BJJ and MMA competition.
Top errors to watch for: Bridging without trapping the arm and leg — the bridge is wasted if the opponent can post / Trapping the far arm instead of the near arm — the near arm is the one that creates the rolling fulcrum / Bridging straight up instead of over the trapped side — the bridge direction must create rotational momentum / Using a weak bridge — the bridge must generate enough height and force to flip the opponent.
The Bridge And Roll Side Control is also known as Burijji Kaeshi Yoko-shiho, Side Control Reversal, Yoko Shiho Upa, Side Mount Roll.