Introduction & Core Principles
The Figure-Four submission is executed through three foundational principles: Two-on-One (controlling both wrist and elbow), Under-and-Over (positioning the arms for a secure frame), and Lift-and-Drag (applying the finishing pressure). These three catch phrases form the complete technical framework for the technique across all top positions.
Two-on-One Control
The practitioner establishes control by placing one hand on the opponent's wrist and the other on their elbow. Both of the practitioner's elbows remain flat on the floor while body weight pins the opponent's arm downward. The controlling elbow is tucked tightly against the opponent's neck to prevent escape.
Under-and-Over Frame
The second hand passes underneath the opponent's arm and over the practitioner's own arm, creating a locked frame with wrist-to-wrist contact. The practitioner's hand controls the opponent's wrist while the other hand secures their own wrist. This configuration creates the tight mechanical advantage necessary for the submission.
Mount Position Application
From the mount position, the practitioner establishes two-on-one control with a flat base on top. After securing the under-and-over frame, the practitioner lifts the opponent's elbow while dragging the wrist backward. This alignment of the wrist beneath the elbow completes the submission.
Knee Ride Transition
The knee ride is a transitional position used to advance to the next top control position. The practitioner's trapped arm is already controlled, allowing immediate under-and-over framing. From here, the practitioner transitions to cross-body position while maintaining arm control.
Cross-Body to North-South
The practitioner rolls the opponent over from cross-body into north-south position. The hand placement remains consistent with wrist-to-wrist contact in the under-and-over configuration. The lift-and-drag finishing sequence applies with equal effectiveness from this angle.
North-South & Return to Side Body
From north-south position, the practitioner transitions back to side body control by stepping around while maintaining arm control. The same three-step sequence—two-on-one, under-and-over, and lift-and-drag—applies seamlessly. This demonstrates the technique's versatility across the complete top control circuit.
Summary & Key Takeaways
The Figure-Four submission is a high-percentage technique applicable from mount, knee ride, cross-body, side body, and north-south positions. Success depends on consistent application of the three core principles: Two-on-One control, Under-and-Over framing, and Lift-and-Drag pressure. Regular practice of these elements across all top positions builds technical proficiency and submission timing.
The Figure Four Submission
Key Takeaways
- •Introduction & Core Principles
- •Two-on-One Control
- •Under-and-Over Frame
- •Mount Position Application
Building on my post The Top Circuit, this post teaches you the details and the catch words for The Figure Four Submission, from the different positions of The Top Circuit. By Catch Word 1. Two on One 2. Under & Over 3. Lift & Drag
Related Techniques
Frequently Asked Questions
What does this video teach about figure-four?
This video covers introduction & core principles, two-on-one control, under-and-over frame. It provides detailed instruction from BlackBeltBasics.
How long does it take to learn figure-four?
The basic mechanics can be understood in a single session, but developing reliable execution requires consistent drilling over weeks of practice. This 8-part breakdown helps structure your training by isolating each phase of the technique.
What are the key details for finishing figure-four?
From north-south position, the practitioner transitions back to side body control by stepping around while maintaining arm control. The same three-step sequence—two-on-one, under-and-over, and lift-and-drag—applies seamlessly. This demonstrates the technique's versatility across the complete top control circuit.
Related videos

Centurion Wrestling: Figure Four Series: Getting to Leg from Breakdown w/ Two Turns!
Centurion Wrestling
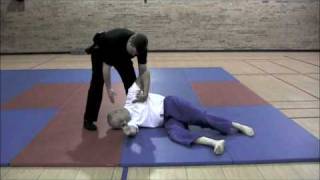
Figure Four Throw
SpartanCops
10 Elbow Locks Every Martial Artist Must Know.
Straight Circle Martial Arts
10 Elbow Locks Every Martial Artist Must Know.
Straight Circle Martial Arts
10 Elbow Locks Every Martial Artist Must Know.
Straight Circle Martial Arts