Introduction to the Figure-Four Transition
The figure-four technique addresses a critical vulnerability in the straight-arm bar takedown. When an opponent resists by dropping their elbow, this transition allows the instructor to control one arm using both hands, creating mechanical advantage regardless of size or strength differential.
Initial Arm Positioning and Grip
The instructor secures a shallow grip on the opponent's arm, positioning the grabbing hand just past the forearm where the thumb begins to curve inward. This shallow positioning prevents the opponent from generating escape leverage and maintains tightness throughout the technique.
Wrist Positioning and Forearm Levering
The instructor uses their right forearm as a lever to push the opponent's shoulder forward while simultaneously moving the wrist behind the shoulder. This biomechanical action places the opponent in a mechanically unsound position, eliminating their structural strength.
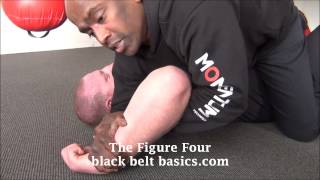
Securing the Arm Position
Once the opponent's arm is positioned on the instructor's shoulder and chest, the elbow becomes immobilized and cannot be extracted. This barrier prevents the opponent from pulling their arm free and maintains control throughout the takedown sequence.
The Takedown Mechanics
The instructor pivots on their left foot and simultaneously drives the opponent to the ground using minimal upper body pressure. The opponent's pre-compromised balance makes the actual takedown require minimal force beyond the mechanical disadvantage already established.
Pin Execution at 45-Degree Angle
Rather than applying the shin perpendicular to the body, the instructor approaches at a 45-degree angle to the neck. This angle prevents shoulder blocking, ensures deep penetration of control, and maintains stability while pinning the opponent's head and neck to the ground.
Control Without Injury
The technique securely immobilizes the opponent through positional control rather than harmful pressure. Once pinned, the opponent experiences significant difficulty escaping, demonstrating the effectiveness of mechanical advantage over force.
Application in Tactical Contexts
The figure-four technique functions effectively whether the opponent is empty-handed or armed with weapons. The commitment level and speed of execution ensure the instructor maintains control regardless of the threat level or equipment the opponent possesses.
Critical Error: Grip Depth
Wrapping the arm too deeply creates excessive space and allows the opponent to extract their arm while breaking free. A shallow grip placement ensures tight control and eliminates the escape vector that deep wrapping provides.
Figure Four Throw
Key Takeaways
- •Introduction to the Figure-Four Transition
- •Initial Arm Positioning and Grip
- •Wrist Positioning and Forearm Levering
- •Securing the Arm Position
Related Techniques
Frequently Asked Questions
What does this video teach about figure-four?
This video covers introduction to the figure-four transition, initial arm positioning and grip, wrist positioning and forearm levering. It provides detailed instruction from SpartanCops.
How long does it take to learn figure-four?
The basic mechanics can be understood in a single session, but developing reliable execution requires consistent drilling over weeks of practice. This 9-part breakdown helps structure your training by isolating each phase of the technique.
What are the key details for finishing figure-four?
The figure-four technique functions effectively whether the opponent is empty-handed or armed with weapons. The commitment level and speed of execution ensure the instructor maintains control regardless of the threat level or equipment the opponent possesses.
Related videos
The Figure Four Submission
BlackBeltBasics

Centurion Wrestling: Figure Four Series: Getting to Leg from Breakdown w/ Two Turns!
Centurion Wrestling

10 Elbow Locks Every Martial Artist Must Know.
Straight Circle Martial Arts
10 Elbow Locks Every Martial Artist Must Know.
Straight Circle Martial Arts
10 Elbow Locks Every Martial Artist Must Know.
Straight Circle Martial Arts