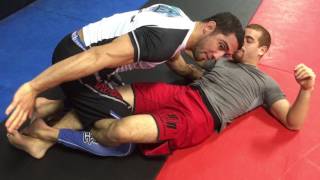
The Half Guard Dilemma: Underhook Pressure
When trapped in half guard with an opponent controlling the underhook and applying heavy top pressure, the bottom player faces significant offensive disadvantage. The underhook is the primary control point in half guard, allowing the top player to flatten their opponent and advance toward a passing position. Without establishing their own underhook, the bottom player remains defensive and vulnerable to further pressure.
Why Standard Escapes Fail Under Heavy Pressure
Traditional half guard techniques like the hip shovel motion rely on creating space through upward pressure, but this approach fails when an opponent applies heavy smashing pressure and maintains a tight position. Against such pressure, the bottom player must employ a different mechanical strategy that works with the opponent's force rather than directly against it.
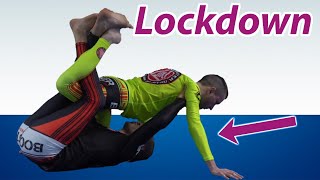
The Lockdown: Setup and Safety Considerations
The lockdown entangles both of the bottom player's legs around the opponent's leg, with the outside leg hooking the opponent's leg and the inside leg securing underneath. The grip is established by flexing at the ankles while maintaining knee pressure, rather than extending forcefully—a critical distinction to prevent knee injuries from shearing forces. Many practitioners mistakenly extend with maximum force, which can cause meniscus tears if the top player simultaneously extends their own leg.
The Lockdown Whip: Initiating Off-Balance Movement
From the locked position, the bottom player brings their knees toward their own body and then explosively whips their hips to the side, generating lateral momentum. This motion forces the top player to post their hand to avoid falling, creating the opening the bottom player needs. The whip works with gravity and the opponent's natural reaction, rather than relying on direct strength.
Capturing the Underhook During the Whip
As the opponent posts to prevent falling, the bottom player immediately shoots their hand underneath the opponent's posted arm to establish the underhook. The opposite hand then moves into the opponent's pocket area, securing the underhook position. This timing is essential—the underhook must be captured while the opponent is still off-balance and committed to their post.
Creating Additional Space: Face Frame and Armpit Pressure
To maximize space creation during the whip, the bottom player can employ two supplementary techniques: palming the opponent's face to control their head position, or pushing into the opponent's armpit to further destabilize their balance. Either approach provides additional leverage and prevents the opponent from immediately resetting their top position. These details significantly improve the technique's effectiveness against experienced opponents.
Regaining Positional Control with the Underhook
Once the underhook is secured, the bottom player rocks back to their side while maintaining the grip, returning to an offensive half guard position. The bottom player can now pummel their hand deeper into the pocket position as needed, keeping the top player off-balanced and preventing them from re-establishing pressure. With the underhook secured and proper body positioning, the bottom player transitions from defensive to offensive half guard play.
Transition Options from Recovered Half Guard Position
From the newly secured half guard position with underhook control, the bottom player has multiple productive options including deep half guard transitions, low half guard sweeps, toe tucks, and classical sweep techniques. The primary objective—escaping flattening pressure and establishing offensive control—has been accomplished through the lockdown sequence. The bottom player can now dictate the engagement rather than absorb pressure.
How To Use Lockdown to Escape a Tight Half Guard Smasher in BJJ
Key Takeaways
- •The Half Guard Dilemma: Underhook Pressure
- •Why Standard Escapes Fail Under Heavy Pressure
- •The Lockdown: Setup and Safety Considerations
- •The Lockdown Whip: Initiating Off-Balance Movement
If you've played Half Guard long enough then I'm sure you've experienced the situation where you get smashed by the person on top squeezing you. It happens to all of us. Well, in today's BJJ technique video I'm going to show you how to escape a tight half guard position and get unstuck by using the Lockdown position (most commonly known from 10th Planet) to get the person off balance. I'm also sharing this position in part because I know a lot of beginners in BJJ (White and Blue Belts) find themselves in this position naturally and don't know how to use it. Hopefully the off-balancing technique is useful to you and helps you be more effective from Half Guard with your Brazilian Jiu-jitsu. Thanks for watching the video. -Chewy P.S if you're into lockdown or 10th Planet stuff check out my buddy BMac's channel: https://www.youtube.com/c/brandonmcninja ----------------- Free Ebook: http://www.chewjitsu.net/focused-jiu-jitsu-13-page-ebook/ Video Courses and Products: http://www.chewjitsu.net/products T shirts: http://www.chewjitsu.net/shop/ http://www.Facebook.com/Chewjitsu http://www.instagram.com/Chewjitsu http://www.twitter.com/Chewjitsu Intro/Outtro Music : https://bknapp.bandcamp.com If you’d ever like to train with the team and I. Check out my gym Derby City MMA in Louisville,KY.
Related Techniques
Frequently Asked Questions
What does this video teach about lockdown half guard?
This video covers the half guard dilemma: underhook pressure, why standard escapes fail under heavy pressure, the lockdown: setup and safety considerations. It provides detailed instruction from Chewjitsu.
How long does it take to learn lockdown half guard?
The basic mechanics can be understood in a single session, but developing reliable execution requires consistent drilling over weeks of practice. This 8-part breakdown helps structure your training by isolating each phase of the technique.
What are the key details for finishing lockdown half guard?
Once the underhook is secured, the bottom player rocks back to their side while maintaining the grip, returning to an offensive half guard position. The bottom player can now pummel their hand deeper into the pocket position as needed, keeping the top player off-balanced and preventing them from re-establishing pressure. With the underhook secured and proper body positioning, the bottom player transitions from defensive to offensive half guard play.
Related videos
How To Easily Break The Lock Down Half Guard
Matt Arroyo Jiu Jitsu
Half Guard: The Lockdown becomes even more effective with these tips!
Wim Deputter BJJ
The main sweep to know from half guard (Lachlan Giles)
Absolute MMA St Kilda - Melbourne
29 Regular Half Guard Techniques In Less Than 12 Minutes (Part 1) by Jason Scully
Jiu Jitsu In Minutes by Jason Scully
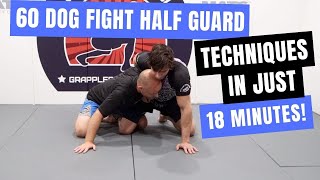
60 Dog Fight Under-Hook Half Guard Techniques In Just 18 Minutes by Jason Scully - BJJ Grappling
Jiu Jitsu In Minutes by Jason Scully