Introduction to Knee-on-Belly Position
Despite common misconceptions that knee-on-belly is an unstable position prone to escapes, it is actually a highly advantageous control point when executed with proper weight distribution and understanding. The position becomes safe and dominant through intelligent positioning rather than rigid strength, allowing the practitioner to respond effectively to any opponent movement.
Transition from Side Control
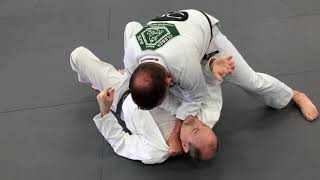
The transition to knee-on-belly begins from side control using a controlled, methodical approach rather than an explosive movement. The instructor maintains hip control with the forearm while keeping the knee on the ground, then subtly places the shin against the opponent's hip—avoiding the common mistake of jumping into position in one motion, which creates dangerous space for escape.
Proper Shin Placement and Weight Distribution
The control point is maintained through shin contact rather than true knee placement on the belly. Weight must be distributed primarily through the toes and ball of the foot, never fully committed to the opponent's body, as excessive weight transfer allows the opponent to control and manipulate the top player's balance.
Maintaining Balance for Offensive Options
By keeping weight in the feet rather than on the opponent, the practitioner remains mobile and capable of executing strikes without compromising stability. This weight management allows immediate adjustment when the opponent moves—the top player floats slightly, then plants firmly once the opponent's movement stops, maintaining both control and striking capability.
Foundation Drill: Reactive Movement
The foundational drill involves the bottom player repeatedly attempting hip escapes while the top player maintains shin contact and responds fluidly to each movement. This surfing-like motion—smooth and continuous without explosive repositioning—teaches the top player to feel and flow with the opponent's base while maintaining control.
Cause and Effect Strategy
The knee-on-belly position operates on a cause-and-effect principle: the top player initiates movement through strikes or positional adjustments, forcing the opponent to react defensively. These reactions create opportunities for submissions, back-takes when the opponent turns away, or transitions back to side control when the opponent turns toward the top player.
Multiple Finish Options
From knee-on-belly, practitioners have access to numerous offensive paths including ground-and-pound strikes, submissions such as armbars, and positional advancement toward more dominant positions. The position creates constant forward momentum with no genuine loss of control, as any adjustment simply resets the top player to side control for renewed pressure.
Weight Mastery and Position Longevity
Success in knee-on-belly fundamentally depends on the practitioner's ability to trust their own base and weight distribution rather than relying on muscular control. Once the top player develops confidence in maintaining proper weight in the feet and responding dynamically to opponent movement, the position becomes sustainable indefinitely.
Training Progression Drill
The recommended training method involves partners drilling for two-minute intervals with purposeful stop-start intervals rather than continuous motion. This deliberate pacing allows the top player to consciously monitor weight placement and reinforces the principle that maintaining control depends entirely on foot-based weight management, not commitment to the opponent's body.
Knee-on-Belly: How to Dominate in this Position
Key Takeaways
- •Introduction to Knee-on-Belly Position
- •Transition from Side Control
- •Proper Shin Placement and Weight Distribution
- •Maintaining Balance for Offensive Options
In today's tutorial, BJJ black belt Erin Herle teaches how to properly transition into and keep a dominant 'Knee-On-Belly' position for BJJ & MMA. Many consider this to be an unstable position, but Erin explains the subtle details of weight distribution to ensure dominance and show available options for transitions and submission attacks. Erin Herle's IG►https://www.instagram.com/erinherle Subscribe to FIGHTTIPS►http://bit.ly/1APnzvw FOLLOW: Facebook | http://bit.ly/fightTIPSFacebook Twitter | http://bit.ly/fightTIPSTwitter Instagram | http://bit.ly/fightTIPSInstagram
Frequently Asked Questions
What does this video teach about near side knee on belly?
This video covers introduction to knee-on-belly position, transition from side control, proper shin placement and weight distribution. It provides detailed instruction from fightTIPS.
How long does it take to learn near side knee on belly?
The basic mechanics can be understood in a single session, but developing reliable execution requires consistent drilling over weeks of practice. This 9-part breakdown helps structure your training by isolating each phase of the technique.
What are the key details for finishing near side knee on belly?
Success in knee-on-belly fundamentally depends on the practitioner's ability to trust their own base and weight distribution rather than relying on muscular control. Once the top player develops confidence in maintaining proper weight in the feet and responding dynamically to opponent movement, the position becomes sustainable indefinitely.