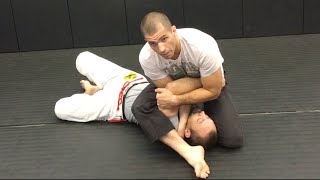
Asymmetrical Mount Positioning
Rather than maintaining a centered position in full mount, the instructor advocates for asymmetrical positioning to limit the opponent's escape options. By controlling the opponent's head to one side and placing shoulder pressure higher rather than on the throat, the attacker restricts bridging escapes to a single direction. This forces the opponent to commit to trapping the base arm when attempting to bridge, creating vulnerability to follow-up submissions.
Arm Triangle Entry from Mount
From the asymmetrical mount position with the opponent's head turned to the side, the attacker walks the opponent's arm up the body and positions their own head on the opponent's elbow. The critical detail is placing the head on the elbow rather than lower on the shoulder, as this prevents the opponent from circling out when pushing back. This positioning initiates the arm triangle choke submission.
Back Take Transition
Rather than finishing the arm triangle, the attacker catches the opponent's armpit with the free hand and lifts the opponent's torso off the mat. Using this leverage, the attacker transitions to an S-mount position by bringing their knee high and sliding underneath with the other arm to secure the opponent's wrist. The attacker then falls back while hooking the opponent's far leg, establishing back control with the potential for further submissions.
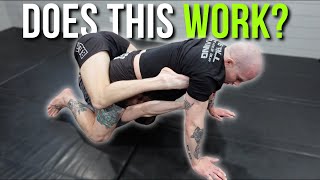
Armbar Alternative When Back Take Fails
If the far-side wrist cannot be caught during the back take transition, the attacker shifts to an armbar attack. The key principle is elevating the opponent's shoulder off the mat before securing leg positioning, preventing the opponent from placing their elbow flat and escaping. The attacker pushes the opponent's face away with the elbow while getting the leg over, then completes the straight armbar submission.
Integrated Attack Flow Summary
The complete submission sequence from full mount comprises three primary attacks applied conditionally: arm triangle as the initial threat, back take as the preferred transition when the opponent defends, and armbar as the fallback option when the back take wrist control is unavailable. This hierarchical approach allows the attacker to seamlessly flow between submissions based on the opponent's defensive responses, maximizing submission opportunities from mount position.
Full mount SUBMISSIONS
Key Takeaways
- •Asymmetrical Mount Positioning
- •Arm Triangle Entry from Mount
- •Back Take Transition
- •Armbar Alternative When Back Take Fails
Full mount SUBMISSIONS There are many great submission options from the full mount positions; attacking the limbs, choking or upgrading to the back are all great. In this video we will dive into the concept of chaining submissions together from full mount into a coherent attack system. I hope you guys enjoy! Chapters 0:00 - Start 0:31 - Concepts 2:29 - Flow 1 3:32 - Flow 2 ! Remember to put on notifications to receive an update anytime we drop a new video ! For more content, videos, solo drills and behind the scenes click on this link: https://www.patreon.com/Energia_martialarts?fan_landing=true Visit BJJ Fanatics for our top instructionals: https://bjjfanatics.com/search?q=tum To check out our gear go to: https://energia-martialarts.com/energia-fight-wear/ Instagram: @Tumenergia Instruction: Tum Energia Assisting: Frank Lemmen Music: Mr. Ortiz #leglock #falsereap #judo #submissions #counters #rearnakedchoke #bjj #submission #energiamartialarts #strangle #submissiongrappling #mma #brazilianjiujitsu #UFC #anklelock #leglock #rearnakedchoke #choke #mma #guard #backtake #chokes #berimbolo #mount
Related Techniques
Frequently Asked Questions
What does this video teach about full mount?
This video covers asymmetrical mount positioning, arm triangle entry from mount, back take transition. It provides detailed instruction from Energia Martial Arts.
How long does it take to learn full mount?
The basic mechanics can be understood in a single session, but developing reliable execution requires consistent drilling over weeks of practice. This 5-part breakdown helps structure your training by isolating each phase of the technique.
What are the key details for finishing full mount?
If the far-side wrist cannot be caught during the back take transition, the attacker shifts to an armbar attack. The key principle is elevating the opponent's shoulder off the mat before securing leg positioning, preventing the opponent from placing their elbow flat and escaping. The attacker pushes the opponent's face away with the elbow while getting the leg over, then completes the straight armbar submission.