S Mount Armbar
0
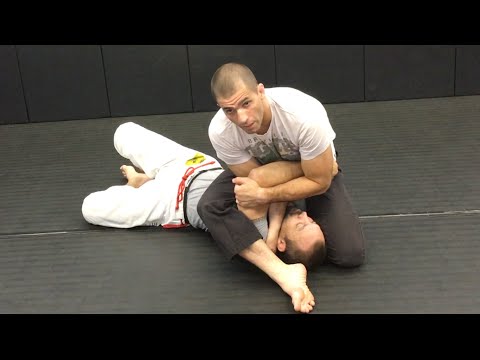
S-Mount·MMA Leech
Watch our Special FREE Tutorials at http://www.mmaleech.com/free-stuff/ Go to our Facebook page for the latest trends in…
Translation: S-mount
The S-Mount subfamily covers the modified mount position where the top fighter swings one leg up alongside the opponent's head while keeping the other knee by the hip, creating an S-shaped body configuration that provides ideal armbar positioning. [1] The S-mount is specifically designed as a submission platform for the armbar — the leg by the head is in position to clamp over the face, and the hip positioning provides the correct angle for armbar execution. [1],[2] The S-mount represents one of the highest-percentage armbar set-up positions in grappling. [2],[3]
The S-mount provides an optimal platform for armbar attacks from mount by positioning one knee near the opponent's head, creating the angle needed for armbar completion while maintaining mount control. [1] The position maximises the attacker's leverage for arm isolation while minimising escape opportunities. [2]
S-mount positions the attacker with one leg under the opponent's head and the other controlling the hip, creating extreme armbar and choke opportunities; developed in advanced BJJ. [1]
S-mount is used at the highest levels of BJJ competition for armbar finishes. [1]
No images yet for this technique.
Sign in to suggest an image.
Watch our Special FREE Tutorials at http://www.mmaleech.com/free-stuff/ Go to our Facebook page for the latest trends in…
No instructional courses yet for this technique.
Sign in to suggest a course.
Risk of injury to the person this technique is applied to
Top positions enable pressure and striking; rib compression risk under heavy pressure
Skill level needed to execute this technique reliably
Whether this technique is allowed under major competition rule sets
Mastering Jujitsu (Renzo Gracie & John Danaher, 2003)
Alias sources — [1] IBJJF Rules (2024) [2] Jiu-Jitsu University (Ribeiro, 2008) [3] Mastering Jujitsu (Gracie & Danaher, 2003)
Effectiveness sources — [1] Jiu-Jitsu University (Ribeiro, 2008) [2] Mastering Jujitsu (Gracie & Danaher, 2003)
Standard katakana transliteration of Western martial arts terminology (外来語) — used in Japanese MMA, boxing, and BJJ communities
Alias sources — [1] IBJJF Rules (2024) [2] Jiu-Jitsu University (Ribeiro, 2008) [3] Mastering Jujitsu (Gracie & Danaher, 2003)
Effectiveness sources — [1] Jiu-Jitsu University (Ribeiro, 2008) [2] Mastering Jujitsu (Gracie & Danaher, 2003)
base stability, heavy hips, ride ability
heavier build with strong hips for pressure
hip adductors, core, glutes, quadriceps
Every move, in any martial art, shares a few universal traits. Mix and match below to pinpoint the right tool — or compare equivalents across styles.
According to MMA Leech, start by threatening a choke and controlling the opponent's neck and shoulders. As you drop your forearm and elbow toward the mat with choke pressure, your opponent must defend by opening their arms—even slightly. This small opening is enough to begin isolating and extending their elbow, which you can exploit to transition into the armbar.
MMA Leech explains that if you cannot push their arm all the way across, catch their elbow with your chest instead. Drive your chest behind their arm and use your body weight to apply pressure and separate it, then proceed with the leg positioning for the S-mount.
MMA Leech emphasizes that you must block your opponent's head to prevent them from moving around and driving their elbow back to the ground. Once you secure head control, you can bring your leg underneath their arm; if they defend tightly, you can switch to controlling their arm directly instead while maintaining the same goal of lifting and isolating it.
MMA Leech states that in the final S-mount position, the opponent's shoulder and arm should be trapped directly between your legs or in your crotch area, with close control to prevent escape.
The S-Mount subfamily covers the modified mount position where the top fighter swings one leg up alongside the opponent's head while keeping the other knee by the hip, creating an S-shaped body configuration that provides ideal armbar positioning. The S-mount is specifically designed as a submission platform for the armbar — the leg by the head is in position to clamp over the face, and the hip positioning provides the correct angle for armbar execution.
The S-mount was developed as a specialised mount variation for armbar attacks, refined by BJJ competitors who sought to create the optimal mount configuration for finishing armbars from the top. It is now a standard part of the mount armbar attack system.
IBJJF: legal — Legal, mount scores 4 points — highest-scoring position; IJF: legal — Legal, osaekomi (pin) — 10-19 seconds scores waza-ari, 20 seconds scores ippon; ADCC: legal — Legal, mount scores 2 points; Unified MMA: legal — Legal dominant position; UWW: legal — Legal, back exposure scores points, pin ends match by fall; FIAS Sport Sambo: legal — Legal, pin scores points
Danger rating 3/10. Moderate — top positions enable pressure and striking; rib compression risk under heavy pressure
The standard setup chain: Pass the Guard → Settle Weight → Control Arms → Threaten Submissions.
Standard counters include: Bridge (Upa) — explosive hip elevation to off-balance the top player / Elbow-Knee Escape (Shrimp) — create space by driving elbow to knee and hip-escaping / Frame — establish forearm frames to prevent the top player from settling weight.
Common variants: Low mount (hips heavy on the opponent's belly, grapevines in for sta…); High mount (knees under the armpits, arms isolated for submissions); S-mount (one knee high under the armpit, other leg across for arm …); Technical mount (one leg hooked, one knee posted, modified for back-take t…).
S-mount is used at the highest levels of BJJ competition for armbar finishes.
Top errors to watch for: Not pinning the head with the near knee — the knee must press against the opponent's head/ear to prevent escape / Posting the far foot too far from the hip — the foot should be close for base and control / Not isolating the arm before transitioning to the armbar — the arm must be controlled from S-mount before falling back / Rushing from S-mount to the armbar — establish the S-mount control first.
The S-Mount is also known as S Maunto, S-Mount, Technical Mount, Armbar Mount.