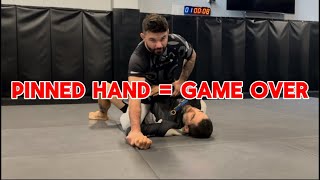
Bridge and Roll: Setup and Hand Trapping
The bridge and roll is the foundational mount escape for beginners. The practitioner traps both of the opponent's limbs on one side of the body, then executes a bridge and backward roll motion. Hand trapping options include pinning the hand with the elbow collected on the back, using both hands, or applying an overhook if the opponent has established head control.
Bridge and Roll: Foot Positioning and Leg Trap
Proper foot placement is critical for an effective bridge and roll escape. Rather than trapping from the center where the opponent can hide their foot, the practitioner should shift their hips laterally, turn their knees inward, and pull their heel to their buttock to establish a solid leg trap. The trap only needs to be maintained long enough to generate momentum toward the top position.
Bridge and Roll: Execution and Timing
The escape is executed by looking back over the shoulder and bridging in that backward direction rather than rolling sideways. Beginners should focus on combining the bridge and roll into one fluid motion rather than two separate movements, as this significantly increases the success rate of the technique.
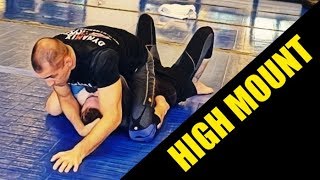
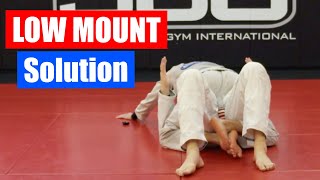
Knee-Elbow Escape: Framing and Weight Distribution
The knee-elbow escape is effective as practitioners progress in skill level. The escaper must shift their upper body, tuck their elbow inside to prevent arm exposure, and establish frames on both the opponent's opposite hip and inside position. Critical to the setup is keeping the opponent's weight elevated, which lightens their leg and creates the opportunity for the escape.
Knee-Elbow Escape: Hip Movement and Foot Positioning
Since the opponent may hide their leg position, the escaper must move their hip away laterally to flatten their leg between the opponent's legs. Once this positioning is achieved, the practitioner slides their foot under the opponent's ankle and is ready to execute the knee-elbow escape. The escape is completed by pulling the knee and elbow back together while dropping into half guard with a ready underhook.
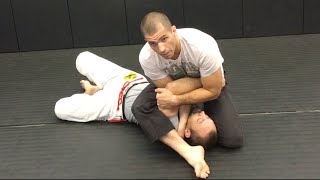
Hip Bump Escape: Structure and Frame Maintenance
The hip bump escape differs from the traditional version performed with both hands on the hips. Instead, the practitioner maintains the same survival posture used in other escapes: a frame across the opponent's far hip and an elbow positioned on the inside. The hidden underhook prevents the opponent from transitioning to an arm triangle submission.
Hip Bump Escape: Execution and Follow-up Options
The hip bump escape begins with the bottom knee bumping the opponent forward while the practitioner attempts to roll backward over their shoulder and pull one knee to the inside, reestablishing guard position. Depending on the space created, the bottom player can either establish double butterfly hooks for an offensive advantage or transition to attacking the opponent's legs.
The First 3 Mount Escapes You Need To Know in BJJ
Key Takeaways
- •Bridge and Roll: Setup and Hand Trapping
- •Bridge and Roll: Foot Positioning and Leg Trap
- •Bridge and Roll: Execution and Timing
- •Knee-Elbow Escape: Framing and Weight Distribution
When you first start Jiu Jitsu, you're gonna be getting stuck in the bottom of mount. A lot. Even by people who aren't very good yet lol Take these 3 simple movements and add them to your game so you can give yourself a better chance of getting back to a winning position. If you need more in depth instruction and coaching, on this topic or any other in BJJ, from myself and a team of killer black belts visit https://bit.ly/3PqO348 Join this channel to get access to Members Only Perks such as: - Members Only Chat - Exclusive Members Only Videos - Custom Badges and Emojis and more! https://www.youtube.com/channel/UCr7VU0Cnef4AhQk7Pe_9nTA/join
Frequently Asked Questions
What does this video teach about standard high mount?
This video covers bridge and roll: setup and hand trapping, bridge and roll: foot positioning and leg trap, bridge and roll: execution and timing. It provides detailed instruction from Brandon Mccaghren.
How long does it take to learn standard high mount?
The basic mechanics can be understood in a single session, but developing reliable execution requires consistent drilling over weeks of practice. This 7-part breakdown helps structure your training by isolating each phase of the technique.
What are the key details for finishing standard high mount?
The hip bump escape differs from the traditional version performed with both hands on the hips. Instead, the practitioner maintains the same survival posture used in other escapes: a frame across the opponent's far hip and an elbow positioned on the inside. The hidden underhook prevents the opponent from transitioning to an arm triangle submission.