Introduction to the Guillotine Choke
The guillotine choke is a fundamental submission with numerous variations. This guide covers the essential mechanics and positioning required to execute this technique effectively from the front-headlock position.
Establishing Front-Headlock Control
Control begins by securing the opponent's chin to prevent backward escape while pressing the shoulder downward on the neck to stop forward movement. The second hand grips the opponent's lat, further restricting their ability to create distance and exit the position.
Hand Connection and Grip Formation
Create a fist with the hand encircling the neck, then secure it with the opposite hand in a clasped grip. This connection forms the foundation for applying pressure throughout the submission.
The Weakness of Bicep Curl Pressure
Attempting to finish the choke through upward bicep curling is the weakest approach, as opponents can easily counter by pulling against your hands. This mechanical disadvantage makes the position vulnerable to hand-fighting defense.
Optimal Hand Placement and Pressure Application
The strongest finish requires positioning the hands high on the chest, allowing the shoulders and elbows to close inward and downward. This configuration creates maximum pressure while minimizing the opponent's defensive options.
Elevating the Head to Create Space
Pull the opponent's head high and slightly past your ribs by falling forward. This elevation creates the necessary space to drive the elbow deeper and transition the hands to a higher chest position.
Rib-Cage Alignment and Elbow Depth
Slide the opponent's head along the side of your ribcage, positioning their neck and trapezius against this contact point. This alignment permits deeper elbow penetration and allows the hands to rise further on the chest for a superior finishing position.
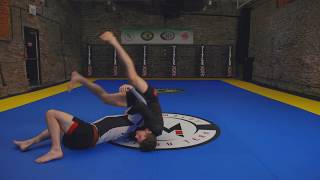
Executing the Transition to Guard
After establishing the choke grip, sit back into guard while maintaining pressure. Awareness of directional escape routes is critical—the opponent's body position relative to their head determines which side is advantageous for the practitioner.
Preventing Lateral Escape
Block the opponent's ability to walk around the choke by either establishing closed guard or placing a hook on the far side. Allowing the opponent to circle creates space and permits escape.
Defending Against Rolling Escapes
Step the leg over the opponent's back and capture their far hip to prevent rolling away or performing a forward flip. Securing the far hip ensures the practitioner can follow the opponent's movement and maintain choke pressure throughout any directional escape attempt.
Guillotine Choke
Key Takeaways
- •Introduction to the Guillotine Choke
- •Establishing Front-Headlock Control
- •Hand Connection and Grip Formation
- •The Weakness of Bicep Curl Pressure
The guillotine is the main option to look for when in the front headlock learn more about the front headlock position here: https://submeta.io/@lachlangiles/courses/front-headlock
Related Techniques
Frequently Asked Questions
What does this video teach about guillotine choke from front-headlock sprawl?
This video covers introduction to the guillotine choke, establishing front-headlock control, hand connection and grip formation. It provides detailed instruction from Absolute MMA St Kilda - Melbourne.
How long does it take to learn guillotine choke from front-headlock sprawl?
The basic mechanics can be understood in a single session, but developing reliable execution requires consistent drilling over weeks of practice. This 10-part breakdown helps structure your training by isolating each phase of the technique.
What are the key details for finishing guillotine choke from front-headlock sprawl?
Block the opponent's ability to walk around the choke by either establishing closed guard or placing a hook on the far side. Allowing the opponent to circle creates space and permits escape.
Related videos

How To Do The Perfect Guillotine From The Front Headlock by Giancarlo Bodoni
Bernardo Faria BJJ Fanatics

Power Guillotine
Stealth BJJ Madrid

High Elbow Guillotine from the Front Headlock
Rich Castro
Front Headlock Choke Series: Sweep to Arm In Guillotine
Robby Malof
The High Elbow Guillotine by John Danaher
Bernardo Faria BJJ Fanatics