Setup: Parrying the Double Jab
The defender begins by parrying both incoming jabs, controlling the attacker's line and creating distance. This dual parry establishes safety and positions the defender to transition into the takedown. The key is maintaining active hand placement while staying off-center.
Entry Options After Second Parry
After the second parry, the defender has two choices: continue parrying or immediately enter with a body lock. The transition from defense to offense happens on the same beat, combining a parry, slip, and level change into one fluid motion.
Closing Distance with Head Movement
The defender drops the rear hand to get off the centerline while simultaneously driving forward. This head movement pulls the defender out of range while the forward momentum closes the distance needed for the body lock entry.
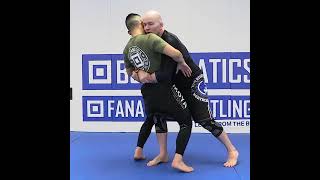
Establishing the Body Lock
Once in range, the defender immediately secures a tight gable grip around the attacker's torso at the ribcage. The grip must be firm and high enough to control both the upper body and prevent arm escape as the takedown initiates.
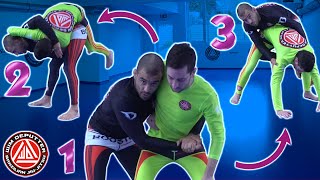
Executing the Takedown
With the body lock secured, the defender extends through the attacker's hips while driving their forehead into the chest. The defender's leg position—foot placement on the far side—creates leverage to trip the opponent directly to the ground.
Maintaining Control and Ground Position
As the opponent falls, the defender maintains the body lock and follows them to the ground, staying tight to their body. This prevents the attacker from creating space or rolling away during the transition to top control.
Ground and Pound Conclusion
From top position, the defender can land controlled strikes while the opponent is grounded and defending. This finishing element ensures the technique concludes with positional dominance and offensive pressure.
Defense Counters: Frame and Stand Up
If the takedown is executed, the grounded opponent should immediately frame away with the near-side arm, pushing against the defender's neck or shoulder to create separation. The opponent then drives their hips back and uses their legs to regain their feet and escape the position.
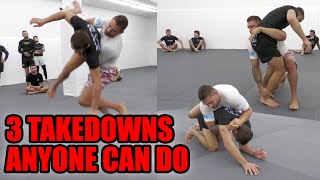
How To Defend Double Jab: Body Lock Takedown To Ground & Pound
Key Takeaways
- •Setup: Parrying the Double Jab
- •Entry Options After Second Parry
- •Closing Distance with Head Movement
- •Establishing the Body Lock
The double jab punch combination is one of the most effective punching attacks to setup the cross or other strikes. Learning how to defend the double jab, especially when your opponent is pressuring is an important skill for MMA and self defense. In a self-defense situation, the double jab could be an attacker trying to grab you. Develop your double jab skills and entering skills with our FREE 3-Part TRITAC Intro Course: https://tritaccombat.com/intro-course In this TRITAC / MMA video, you will learn how to defend the double jab attack with parries, then a parry, slip & enter into body lock control. Once you establish the body lock, you will go for the takedown called Kosoto Gake in Japanese Jujitsu or Judo, or simply called the body lock takedown... a very effective takedown for MMA, BJJ and Self-Defense. After you finish the takedown, you will then finish your opponent with some ground and pound. But since this is a TRITAC / MMA training flow, the person on the bottom fights his way back to his feet with a technical stand-up. To get more TRITAC Flows check out of FREE 3-Part TRITAC Intro Course: https://tritaccombat.com/intro-course
Related Techniques
Frequently Asked Questions
What does this video teach about body-lock takedown to back?
This video covers setup: parrying the double jab, entry options after second parry, closing distance with head movement. It provides detailed instruction from TRITAC Martial Arts.
How long does it take to learn body-lock takedown to back?
The basic mechanics can be understood in a single session, but developing reliable execution requires consistent drilling over weeks of practice. This 8-part breakdown helps structure your training by isolating each phase of the technique.
What are the key details for finishing body-lock takedown to back?
From top position, the defender can land controlled strikes while the opponent is grounded and defending. This finishing element ensures the technique concludes with positional dominance and offensive pressure.
Related videos

How to Takedown From a Rear Bodylock | #Wrestling for #JiuJitsu
Etienne Duchesne | Victimweight Jiu Jitsu
Back Bend Takedown by John Danaher
BJJ Fanatics

THE KING OF ALL TAKEDOWNS: THE BODY LOCK TAKEDOWN FOR ALL GRAPPLING SYSTEMS.
Kata Jiu Jitsu
3 Simple Takedowns from Rear Body Lock | Nicky Rod B-Team Technique
The B-Team
Hip Throw Setup And Back Take Combo From Body Lock
Wim Deputter BJJ