The Hip Connection Problem
Most jiu-jitsu practitioners maintain a defensive posture with their hips back and head forward, making it difficult to establish proper hip connection for throws. All successful hip throws require close hip positioning to function effectively. The instructor addresses this fundamental issue as the foundation for the technique.
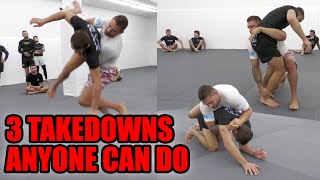
Body Lock Setup and Head Positioning
From a body lock position, the instructor places their head inside the opponent's neck while securing a double-grip around the waist. This positioning creates the necessary connection to execute hip-based throws while maintaining control. Head placement inside the neck prevents the opponent from creating distance.
Avoiding the Leg Entanglement Risk
When executing this technique, keeping the legs in front creates vulnerability to scissors attacks (kani basami). The instructor demonstrates controlled takedown mechanics to prevent rough execution that could result in face plants or loss of control. Maintaining upper body connection while managing leg positioning is critical.
The Forward Circle and Controlled Descent
From the body lock, the instructor circles forward while keeping their head low and hands tight around the opponent's waist. The opponent is guided backwards gradually rather than thrown explosively. Maintaining grip connection throughout the movement prevents the opponent from regaining position.
Hip Connection and the Triangle Base Principle
The instructor emphasizes the importance of establishing a tight hip connection using the triangle base concept—three points of stability where the fourth point (the opponent) cannot escape. Without proper hip positioning, the opponent can walk around the defender and reset the position. This principle guides all hip throw mechanics.
Arm Transitions During the Throw
As the opponent steps backward, the instructor transitions their grip arm from around the waist to over the opponent's shoulder to drive their head down. This movement must happen in coordination with the hip rotation for the throw to execute properly. The arm placement controls the opponent's upper body throughout the takedown.
Hand Positioning and Avoiding Counter Throws
If the arm extends too far from the body, the opponent can execute their own hip throw in response. The instructor demonstrates keeping the arm close while maintaining the waist grip to prevent this counter-attack. Proper hand positioning balances offensive pressure with defensive security.
Transitioning to Back Control
After the throw lands, the opponent may place their hand on the floor to prevent a complete face plant, creating an opportunity to transition to back control. The instructor immediately moves to an elbow base position and rotates away from the opponent's legs to secure the back. This transition prevents the opponent from catching the legs and escaping to guard.
Position Maintenance and Finishing Options
Once on the opponent's back, the instructor maintains distance from the opponent's legs while controlling their upper body through elbow control. From this secure position, multiple finishing options are available including chokes or transitions to other attacks. This back control position is versatile and difficult for the opponent to escape.
Hip Throw Setup And Back Take Combo From Body Lock
Key Takeaways
- •The Hip Connection Problem
- •Body Lock Setup and Head Positioning
- •Avoiding the Leg Entanglement Risk
- •The Forward Circle and Controlled Descent
Hip Throw Setup And Back Take Combo From Body Lock - In this video I go for over some options from the Body Lock position. I show an easy setup for a Hip Throw and a Standing Back Take Entry To The Truck. Hip Throws are often hard in Jiu Jitsu. To execute a proper Hip Throw, you need hip connection first. This is quite hard to achieve, given the fact that most BJJ Practicioners (at least on BJJ training and competition) prefer a bent over posture and often pull guard before a meaning full hip connection can be established. Because of this, it is often hard to train hip throws. Much harder at least than the more common Wrestling Take Downs that work from Headcontrol and / or Single and Double Legs. What I offer with this video, is a very functional, logical and rather easy setup for a Hip Throw or a Standing Back Take in case (entry to Standing Truck to be more precise) the Hip Throw doesn't work. The video assumes we already established the Body Lock. I'm not going over ways to get to the Body Lock. This might be the topic of another video, in case there is demand for it. This particular Hip Throw Setup And Back Take Combo has been part of my game for many years. I hope it may help you out as well and give some incentive to train a very often underdeveloped part of many a Brazilian Jiu Jitsu practicioner's game. I started a BJJ blog recently. It already has a good number of articles out. You can check it here: https://www.wimdeputter.com/blog If you want to stay up to date on video's, articles and future surprises, feel free to join my email list: http://www.wimdeputter.com/subscribe If you like my video's and find them a good contribution to your training, please consider subscribing to my Patreon: https://www.patreon.com/wimdeputter As always, I'm open to questions and suggestions for future video's! 00:00 Introduction 00:20 Problem With Hip Throws 00:45 The Body Lock Tackle 01:20: Take Down With Control 02:10 Hip Throw Setup 03:04 Triangle Principle 03:30 Hip Throw 04:28 Back Take Setup 05:19 Enter The Truck 05:43 Front Headlock Setup 06:19 Outro #WimDeputter #TheMirroringPrinciple #OffensiveDefense #HipThrow #BackTake #WrestlingTakeDown #JudoTakedown #HipToss #TakeDowns #BJJ #BrazilianJiuJitsu #JiuJitsu #BodyLock
Related Techniques
Frequently Asked Questions
What does this video teach about body-lock takedown to back?
This video covers the hip connection problem, body lock setup and head positioning, avoiding the leg entanglement risk. It provides detailed instruction from Wim Deputter BJJ.
How long does it take to learn body-lock takedown to back?
The basic mechanics can be understood in a single session, but developing reliable execution requires consistent drilling over weeks of practice. This 9-part breakdown helps structure your training by isolating each phase of the technique.
What are the key details for finishing body-lock takedown to back?
After the throw lands, the opponent may place their hand on the floor to prevent a complete face plant, creating an opportunity to transition to back control. The instructor immediately moves to an elbow base position and rotates away from the opponent's legs to secure the back. This transition prevents the opponent from catching the legs and escaping to guard.
Related videos
How to Takedown From a Rear Bodylock | #Wrestling for #JiuJitsu
Etienne Duchesne | Victimweight Jiu Jitsu
Back Bend Takedown by John Danaher
BJJ Fanatics
THE KING OF ALL TAKEDOWNS: THE BODY LOCK TAKEDOWN FOR ALL GRAPPLING SYSTEMS.
Kata Jiu Jitsu
How To Defend Double Jab: Body Lock Takedown To Ground & Pound
TRITAC Martial Arts
3 Simple Takedowns from Rear Body Lock | Nicky Rod B-Team Technique
The B-Team