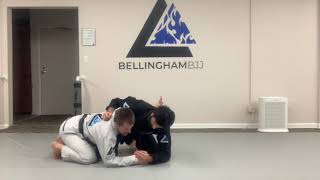
Recognizing Opponent Pressure Patterns
The top player will employ one of two primary pressure strategies: maintaining elevated hips while driving chest weight forward, or smashing the hips down while methodically working hand control to free the trapped leg. Understanding these distinct pressure patterns is essential for determining the appropriate defensive response.
Hip Smash Pressure and Hand Control Variables
When the opponent commits to hip smash pressure, their hand placement becomes the critical variable. The defender must monitor whether the opponent's knee remains policed—if the knee escapes the frame, the defender should immediately threaten to pull guard. Maintaining low framing pressure prevents the opponent from climbing into a dominant chest-to-chest position.
When NOT to Bridge: Low Pressure Positions
Bridging is counterproductive when the opponent maintains low hip pressure with their abdomen sealed against the defender's hips. In this configuration, there is insufficient space for the arm to achieve an underhook, rendering the bridge ineffective. Instead, the defender should prioritize escaping their hips through shrimping.
When to Bridge: High Chest Pressure
The bridge becomes the optimal response once the opponent's pressure rises above the defender's sternum line, signaling the transition toward chest-to-chest control. At this moment, the defender executes the bridge with the elbow leading, creating the necessary space to thread the underhook before being completely flattened.
Managing Arm Control and Knee Pressure
When the opponent achieves superior arm position while policing the defender's knee, the defender must identify the remaining avenue of escape. The opponent's support leg position often creates vulnerability—if the opponent cannot establish a solid base with their far leg, the defender can use this moment to shoot their underhook and bridge into the open space.
Fundamental Defensive Principles Summary
The core defensive strategy depends on pressure location and intensity: low hip smash pressure requires shrimping; high chest pressure allows for bridging and underhook entry; unpoliced knees present guard pull opportunities. The defender must continuously assess the opponent's structure and base to select the appropriate escape method.
Half Guard #1: When To Bridge vs. When To Shrimp
Key Takeaways
- •Recognizing Opponent Pressure Patterns
- •Hip Smash Pressure and Hand Control Variables
- •When NOT to Bridge: Low Pressure Positions
- •When to Bridge: High Chest Pressure
Get the full series, The Pillars: Half Guard Bottom 5-vol. course When you learn this simple but highly effective breakdown of half guard, you’ll be able to adapt your game to every type of top pressure or passing style… And you won’t need to compensate for technical inefficiencies with physical attributes like grip or leg strength, flexibility, or explosiveness. Get it here: https://bit.ly/2F6pBTO
Frequently Asked Questions
What does this video teach about standard bridge and roll?
This video covers recognizing opponent pressure patterns, hip smash pressure and hand control variables, when not to bridge: low pressure positions. It provides detailed instruction from 40 Plus BJJ.
How long does it take to learn standard bridge and roll?
The basic mechanics can be understood in a single session, but developing reliable execution requires consistent drilling over weeks of practice. This 6-part breakdown helps structure your training by isolating each phase of the technique.
What are the key details for finishing standard bridge and roll?
When the opponent achieves superior arm position while policing the defender's knee, the defender must identify the remaining avenue of escape. The opponent's support leg position often creates vulnerability—if the opponent cannot establish a solid base with their far leg, the defender can use this moment to shoot their underhook and bridge into the open space.
Related videos

Third Law BJJ Naples, Florida Bridge and Shrimp techniques
Team Third Law Academy #2

The First 3 Mount Escapes You Need To Know in BJJ
Brandon Mccaghren

Using the UNDERHOOK to Escape Side Control
The Grapple Lab
Fundamentals: Underhook escape from side control
Bellingham BJJ
The Easy Way to Learn Side Control Escape
JonThomasBJJ