Introduction & Positional Framework
This sequence explores a hybrid approach to leg entanglement entries, combining both outside and inside positioning strategies. Rather than favoring one approach exclusively, the instructor demonstrates how integrating both methods provides superior tactical options and adaptability.
Butterfly Guard Defense & Grip Establishment
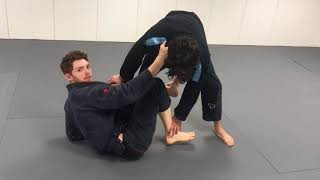
When the opponent attempts to establish body line control for a pass, the defender drops to their hip, shields with the knee, and secures a toe grip on the opponent's extended leg. This grip is exceptionally strong for maintaining the split, though limited in offensive applications until converted to a more versatile scoop grip.
Shin-On-Shin Positioning & Knee Shield Mechanics
To counter the opponent's defensive knee insertion, the defender establishes a shin-on-shin position by pummeling their left shin in front of the opponent's knee while maintaining calf control on the ankle. This dual-leg wedging system prevents knee tie escapes and creates a stable platform for advancing the attack.
Far-Hip Ashi Entry & Standard Heel Hook Setup
After threading the leg through successfully, the defender achieves far-hip ashi position and typically applies posterior knee pressure to expose the heel for an outside heel hook. However, this conventional approach becomes problematic when the opponent plants their foot and externally rotates the knee.
Opposite Hip Ashi Transition Technique
When standard heel hook mechanics fail due to solid foot placement, the defender pivots the leg entanglement to the opposite side and repositions by propping on their elbow. From this angle adjustment, capturing the secondary leg and transitioning to back-side 50/50 position creates clearer heel exposure opportunities.
Opponent Sit-Down Response & Position Naming
When the opponent sits down rather than maintaining their posture, the dynamic shifts to what practitioners refer to as 'opposite hip ashi' or the traditional 'honey stick' position. From this configuration, the defender gains significant leverage advantages while remaining mindful of the opponent's outside heel hook counter-threat.
Opposite hip Ashi heel hook from a shin on shin variation - technique breakdown & match analysis
Key Takeaways
- •Introduction & Positional Framework
- •Butterfly Guard Defense & Grip Establishment
- •Shin-On-Shin Positioning & Knee Shield Mechanics
- •Far-Hip Ashi Entry & Standard Heel Hook Setup
The debate over inside versus outside positioning will probably never be fully settled but here's a great way to incorporate both. In addition I briefly introduce the Opposite Hip Ashi Garami position which is in my opinion the strongest position from which to perform rotational breaking mechanics. Stay tuned for my next instructional: 'Advanced leglock defenses & counters: part 1 the Double seated leg entanglement game'.
Frequently Asked Questions
What does this video teach about standard shin-on-shin?
This video covers introduction & positional framework, butterfly guard defense & grip establishment, shin-on-shin positioning & knee shield mechanics. It provides detailed instruction from RobertDiggleJJ.
How long does it take to learn standard shin-on-shin?
The basic mechanics can be understood in a single session, but developing reliable execution requires consistent drilling over weeks of practice. This 6-part breakdown helps structure your training by isolating each phase of the technique.
What are the key details for finishing standard shin-on-shin?
When standard heel hook mechanics fail due to solid foot placement, the defender pivots the leg entanglement to the opposite side and repositions by propping on their elbow. From this angle adjustment, capturing the secondary leg and transitioning to back-side 50/50 position creates clearer heel exposure opportunities.