Introduction to Inside Sankaku Leg Configurations
Craig Jones presents three distinct leg positioning methods for the inside sankaku position, each offering different tactical advantages. The instructional breakdown examines the control dynamics, mobility factors, and practical transitions between these three configurations.
Standard Configuration: Balanced Control and Mobility
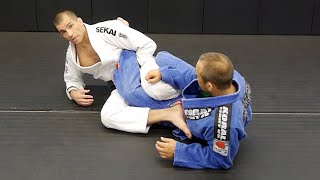
The standard configuration provides equilibrium between opponent hip control and positional mobility. One leg crosses over the opponent's hip while the second leg reinforces the position, with the back heel creating a tight cinch that maximizes hip control for finishing techniques.
Standard Configuration Application and Advantages
This leg arrangement allows practitioners to maintain strong finishing pressure while retaining the ability to follow opponent movement. When opponents turn to defend the heel hook, practitioners can untangle their legs and transition to back control, demonstrating the position's versatility.
High-Leg Position: Maximum Mobility and Quick Entries
The high-leg configuration positions one leg tucked beneath the practitioner's body with the opposite foot placed over top, creating an uncrossed leg arrangement. This setup prioritizes rapid positional transitions and quick leg entry mechanics, allowing practitioners to follow opponents upward into top position.
High-Leg Position Trade-offs
While offering superior mobility and fast entry access, the high-leg position sacrifices hip control intensity compared to the standard configuration. The uncrossed leg arrangement provides less containment of the opponent's hip, allowing greater defensive movement capability.
Lockdown Position: Maximum Hip Containment
The lockdown configuration crosses both legs with the bottom leg's foot tucked behind the opponent's hip rather than on the ground. This arrangement virtually eliminates hip mobility for the opponent, creating an exceptionally tight control mechanism ideal for powerful finishing techniques.
Lockdown Position Limitations
The lockdown position's primary drawback is severely restricted practitioner leg mobility and difficulty following opponent back-turning defensive movements. Tangled leg positioning prevents practitioners from efficiently transitioning to back control when opponents attempt escape.
Transitional Mechanics Between Configurations
Effective transitions between leg configurations rely on controlling opponent hip direction during defensive turning attempts. By directing opponents toward their weaker hip rather than allowing them to hide their heel, practitioners create weightless leg conditions enabling smooth positional adjustments.
Practical Transition: Standard to Lockdown
When opponents position themselves on the incorrect hip, practitioners can move their foot across the opponent's body toward the lockdown position. As opponents shift back to the correct side, the repositioned foot creates the tight lockdown configuration for immediate heavy finishing pressure.
Strategic Configuration Selection Based on Rule Set
Practitioners must select leg configurations according to the legal finishing techniques available in their ruleset. Legal heel hook rulesets favor high-leg positioning for sweeping and passing opportunities, while maximum control rulesets benefit from lockdown or standard configurations optimized for submissions.
Craig Jones - Inside Sankaku Foot Position
Key Takeaways
- •Introduction to Inside Sankaku Leg Configurations
- •Standard Configuration: Balanced Control and Mobility
- •Standard Configuration Application and Advantages
- •High-Leg Position: Maximum Mobility and Quick Entries
In this video we are going to talk about 3 different ways to configure your legs in inside senkaku, the pros and cons of each, and the most reliable way to transition between the different configurations Option 1 - Standard - Great compromise between control and mobility Option 2 - Heist Leg - Great mobility and quick to enter into but not as much control Option 3 - Lockdown - great control but lacks mobility Previous videos: Craig Jones: https://youtu.be/D4WMlC9lM24 https://youtu.be/jTwg3UN9So0 Gordon Ryan https://youtu.be/Pi2241e-7jE Support Links: Patreon: https://www.patreon.com/user?u=66975487 Venmo: https://venmo.com/code?user_id=3461406988960997587 Amazon: Amazon Link https://amzn.to/35nO2LV M1 Finance: https://m1.finance/OISHKrL1BN0T BJJ Fanatics: http://i.refs.cc/h90cAIkh?smile_ref=eyJzbWlsZV9zb3VyY2UiOiJzbWlsZV91aSIsInNtaWxlX21lZGl1bSI6IiIsInNtaWxlX2NhbXBhaWduIjoicmVmZXJyYWxfcHJvZ3JhbSIsInNtaWxlX2N1c3RvbWVyX2lkIjoxNjIyODI4OTd9 Purple belt analysis...dont hate Please subscribe and share!
Frequently Asked Questions
What does this video teach about standard inside sankaku?
This video covers introduction to inside sankaku leg configurations, standard configuration: balanced control and mobility, standard configuration application and advantages. It provides detailed instruction from Less Impressed More Involved BJJ.
How long does it take to learn standard inside sankaku?
The basic mechanics can be understood in a single session, but developing reliable execution requires consistent drilling over weeks of practice. This 10-part breakdown helps structure your training by isolating each phase of the technique.
What are the key details for finishing standard inside sankaku?
When opponents position themselves on the incorrect hip, practitioners can move their foot across the opponent's body toward the lockdown position. As opponents shift back to the correct side, the repositioned foot creates the tight lockdown configuration for immediate heavy finishing pressure.
Related videos

2 saddle entries in to heel hooks/leg locks from butterfly guard for no gi grappling bjj
Fighter Blueprint
Powerful Single Leg X-Guard Sweep (The Assis Sweep) Ashi Garami Fundamentals Online Course
MMA Leech
K-Guard to 50/50 Inside Heel Hook
Tarik BJJ
Legal Heel Hook in the Gi?
JonThomasBJJ
Z-Guard VS. Knee Shield Half Guard
MMA Leech