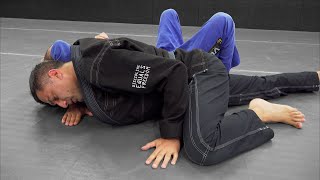
Positioning from Knee on Belly
The instructor emphasizes maintaining a centered knee on belly position to control opponent movement in both directions. By keeping the weight balanced on the left knee, the practitioner can apply consistent pressure whether the opponent escapes left or right. This foundational control prevents the opponent from creating space to defend.
Transitioning to Arm Triangle Setup
From knee on belly, the instructor drives the knee forward and flips the opponent over to initiate the arm triangle. The practitioner must immediately secure the opponent's arm across their own neck while keeping their head elevated. This prevents the opponent from generating power by remaining upright rather than collapsed into the choke.
Hand Positioning and Grip Options
The instructor presents two grip configurations: grabbing the forearms together for stability, or walking the hand far enough to clasp behind the opponent's head. Both positions are valid, but the grip choice depends on how much the opponent is resisting and bridging. The practitioner should avoid closing the right elbow, which allows the opponent to clamp and escape via bridge.
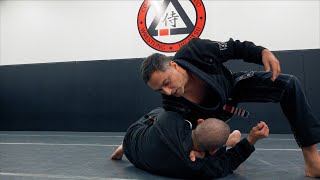
Keeping the Head Elevated During Setup
Maintaining the opponent's head in an elevated position is critical to prevent them from escaping or regaining guard. The instructor demonstrates bringing the left hand up to control the head angle while keeping the right arm extended. This positioning prevents the opponent from bringing their head down, which would nullify the choke.
Finalizing the Grip and Initiating the Choke
Once the practitioner has the proper head position, they walk their body up while grabbing their own forearm for stability. The elbow should remain slightly open to prevent clamping until the final adjustment. The instructor stresses nursing the position incrementally—moving the opponent, dipping down, and re-adjusting until the arm triangle is fully locked.
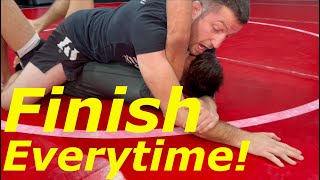
Finishing with the Arm Triangle Lock
The final lock is achieved with the right elbow out, right palm facing up and left palm facing down. If the opponent balls up and prevents the mount escape, the choke can be finished from this position without repositioning. The practitioner should maintain constant pressure while waiting for the tap.
Defending Against Leg Trap and Guard Recovery
The instructor warns that if the opponent captures the practicing leg, they may transition to a lockdown or guard recovery. Rather than attempting to free the leg, the practitioner should stay committed to the choke, as escaping the position allows the opponent to recover guard or take the back. Maintaining choke pressure forces the opponent to abandon defensive hand positioning.
Grip Variations and Body Mechanics
The choice between bicep-and-head control versus a deep gable or butterfly grip depends on body type and positioning. The instructor emphasizes consistent practice with movement—blocking with the chin and body while nestling into position. Taking time with each transition, rather than rushing, allows proper control development.
Partner Resistance and Practice Progression
Training partners should provide realistic resistance throughout the entire technique, not just at the finish. The instructor stresses the importance of asking partners to fight and resist consistently to develop proper mechanics against real opposition. This approach builds timing and adaptability for live rolling scenarios.
Adjusting for Opponent Movement and Escape Attempts
As the opponent bridges, branches, or attempts to move out of position, the practitioner must pick the head up and re-secure control. The instructor demonstrates repositioning the head out of the opponent's escaping motion while maintaining the overall arm triangle framework. Continuous micro-adjustments ensure the choke remains locked despite opponent defense.
Knee on Belly to Arm Triangle!
Key Takeaways
- •Positioning from Knee on Belly
- •Transitioning to Arm Triangle Setup
- •Hand Positioning and Grip Options
- •Keeping the Head Elevated During Setup
This video I teach some details on mounting from knee on belly and going for the arm triangle. Check out the details and you are sure to find something useful! Enjoy! If you have any questions, comments, or suggestions, please comment below. More videos to come! Please like, share, and subscribe!! PLEASE Click this link to SUPPORT the TeachMeGrappling Channel!!! https://www.patreon.com/TeachMeGrappling or https://www.paypal.me/CoachBrianPeterson Your contribution is much appreciated and will help me continue to bring you content! 🙏 www.NextLevelGuy.com The NextLevelGuy Podcast with Coach Brian Peterson has been released!! Check it out!
Related Techniques
Frequently Asked Questions
What does this video teach about arm triangle choke — from knee on belly?
This video covers positioning from knee on belly, transitioning to arm triangle setup, hand positioning and grip options. It provides detailed instruction from TeachMeGrappling Coach Brian.
How long does it take to learn arm triangle choke — from knee on belly?
The basic mechanics can be understood in a single session, but developing reliable execution requires consistent drilling over weeks of practice. This 10-part breakdown helps structure your training by isolating each phase of the technique.
What are the key details for finishing arm triangle choke — from knee on belly?
Training partners should provide realistic resistance throughout the entire technique, not just at the finish. The instructor stresses the importance of asking partners to fight and resist consistently to develop proper mechanics against real opposition. This approach builds timing and adaptability for live rolling scenarios.