Introduction: Why the Kimura Fails
The Kimura is often one of the first submissions taught in jiu-jitsu, yet many practitioners struggle to finish it against skilled opponents. This gap between theory and execution typically stems from missing critical details rather than poor instruction. This guide breaks down the exact setup and finish mechanics to make the Kimura reliable against any opponent.
Hand Placement: The Foundation
The Kimura's effectiveness relies on positioning two arms against one. Success begins when the opponent's hands are on the floor, creating a pathway to control the arm. If hands remain elevated on the chest, the Kimura becomes inaccessible.
The Torpedo Method: Breaking Hand Contact
Use blade hand strikes underneath the opponent's wrists to dislodge their hands from the body. Rather than forcing a single action, follow the hands wherever they move—referred to as the 'torpedo method'—using leg pressure to prevent them from re-establishing contact on the chest. Maintain consistent blocking until hands reach the mat.
Head Positioning and Hip Escape Setup
Once hands are pinned to the floor with chest-to-chest contact, push the opponent's head to one side while inserting the attacking shoulder underneath. This positioning prevents the opponent from blocking the hip escape. If the head is centered, use both a push and armpit insertion before opening the legs slightly and rotating onto the attacking hip.
Hooking the Arm Correctly
Rather than immediately grabbing the wrist, which alerts the opponent to escape, hook high on the shoulder and armpit. This high hook prevents the opponent from ripping the elbow free. Gluing the elbow tightly to the body ensures the arm cannot be extracted before securing the wrist grip.
Grip Lock and Bicep Adjustment
Secure the wrist with a thumb-down grip for maximum strength and control. If the opponent has longer arms or the attacker has shorter reach, slide the bicep down the opponent's tricep to establish proper leverage. Once locked, perform a small swivel to align the bodies.
Breaking Hand Pressure: The Elbow-Hip Method
When the opponent drops their weight to pin the hand to the mat, use alternating elbow and hip movements to progressively lift the hand off the ground. The hip movement toward the opponent's hand creates the pressure needed to break contact. Continue this rhythm until the hand lifts and the left leg can hook over the opponent's back.
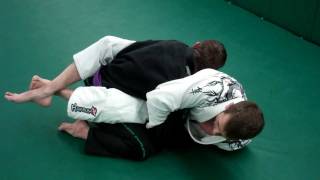
Achieving Finishing Position
After breaking hand pressure, hook the leg over the opponent's back and swivel the head to three o'clock, positioning perpendicular to the opponent. This orientation allows a pushing motion rather than pulling, which is mechanically stronger. Glue the opponent's elbow to the chest and push the wrist toward their back.
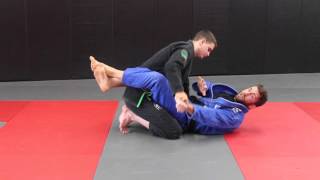
The Finish: Push Over Pull
Execute the submission by pushing the wrist toward the opponent's back while using body rotation for additional pressure. Pushing is mechanically stronger than pulling and requires minimal additional force when all elements are properly aligned. This combination of elbow pressure, body position, and controlled pushing produces the tap.
Finish the Kimura Every Time! Jiu Jitsu Tutorial
Key Takeaways
- •Introduction: Why the Kimura Fails
- •Hand Placement: The Foundation
- •The Torpedo Method: Breaking Hand Contact
- •Head Positioning and Hip Escape Setup
Join My Online Academy to Improve Your Jiu Jitsu FAST!!! https://academy.mattarroyo.com/ Struggling to finish the kimura? You’re not alone—and in this video, BJJ black belt and UFC veteran Matt Arroyo breaks down exactly how to finish the kimura lock with precision, control, and confidence—every single time. Whether you’re training in Gi or NoGi, this kimura tutorial will show you: ✅ Why most kimuras fail (and how to fix it) ✅ How to apply the kimura from top side control, guard, and north-south ✅ Crucial kimura grip details to prevent escapes ✅ How to finish the kimura even when your opponent defends ✅ Kimura traps that lead to back takes and arm locks This isn’t just a technique—it’s a kimura system that works at every belt level. ⸻ 💪 Who This Is For: • White belts looking to add a powerful submission to their game • Blue belts struggling to finish kimuras against resisting opponents • Advanced grapplers who want more control and setup options
Related Techniques
Frequently Asked Questions
What does this video teach about striking to kimura?
This video covers introduction: why the kimura fails, hand placement: the foundation, the torpedo method: breaking hand contact. It provides detailed instruction from Matt Arroyo Jiu Jitsu .
How long does it take to learn striking to kimura?
The basic mechanics can be understood in a single session, but developing reliable execution requires consistent drilling over weeks of practice. This 9-part breakdown helps structure your training by isolating each phase of the technique.
What are the key details for finishing striking to kimura?
After breaking hand pressure, hook the leg over the opponent's back and swivel the head to three o'clock, positioning perpendicular to the opponent. This orientation allows a pushing motion rather than pulling, which is mechanically stronger. Glue the opponent's elbow to the chest and push the wrist toward their back.