The Submission Formula Foundation
Rather than attacking immediately from mount position, the instructor emphasizes breaking the opponent's alignment first. Attempting an armbar against an opponent with proper base, posture, and structure will fail. The submission formula requires a systematic approach: break alignment, access levers, create wedges, and only then apply the finishing technique.
Breaking Posture Through Distraction
The instructor demonstrates two methods to break posture: direct pressure on the head or attacking an alternate target like a cross choke to draw the opponent's defensive attention. This redirection opens structural vulnerabilities, particularly the elbow. The key principle is that defending one attack leaves other areas exposed for exploitation.
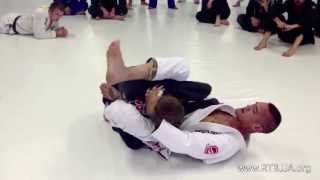
Accessing the Lever and Transitioning to S-Mount
By breaking posture, the elbow opens slightly, allowing the attacker to place their hip behind it as a lever. The practitioner rotates their heel and slides into S-mount position, creating the foundational geometry needed for the armbar. This transition marks the beginning of alignment destruction.
Building Wedges and Positioning
From S-mount, the instructor creates multiple wedges: one with the upper body, another with the lower body, and a third by wedging the arm underneath. Bringing the shin across the opponent's face further breaks their posture while establishing solid base. However, these steps alone are insufficient to fully destroy alignment.
Completing Alignment Destruction
The final steps involve accessing levers to extend the arm, applying wrist rotation and shoulder compression with strong wedges, and positioning the feet for maximum force production. The opponent's base becomes cosmetic, their structure collapses, and their posture is completely broken. This three-point dominance ensures they cannot effectively defend or escape.
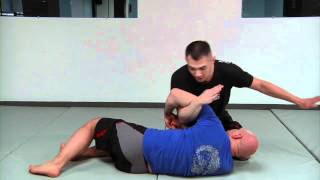
Removing Slack and Applying the Fulcrum
The attacker removes slack by pulling the opponent's arm away from their body and pulling the shoulder, creating full tension on the shoulder joint. The heels are curled and feet positioned against the opponent's biceps and ground to establish base. Minimal pressure combined with maximized force production creates an overwhelming mechanical advantage.
Preventing Premature Submissions
Attempting an armbar against an opponent with intact alignment results in excessive work and higher failure rates. Even when entry seems opportunistic, the instructor recommends stopping to complete the alignment-breaking sequence first. Following the complete formula dramatically increases success probability regardless of entry point.
Recovering Alignment from Suboptimal Positions
If the initial entry lacks alignment breakdown, the practitioner should immediately access levers and break posture to achieve proper positioning before attempting the finish. Creating strong wedges and separating the opponent's arm from their body are essential intermediate steps. Only after complete alignment destruction should the final fulcrum be applied.
Finishing with Mechanical Certainty
With full alignment destruction and all formula elements in place, the submission becomes nearly inevitable. The attacker applies strong fulcrum pressure with minimal bridging, having eliminated the opponent's force production entirely. Following the complete formula from setup through finish minimizes failure risk and maximizes control throughout the technique.
The Tightest Armbar From Mount, Step by Step with Rob Biernacki
Key Takeaways
- •The Submission Formula Foundation
- •Breaking Posture Through Distraction
- •Accessing the Lever and Transitioning to S-Mount
- •Building Wedges and Positioning
Rob Biernacki shows how to apply a super-tight armbar from mount. From The Submission Formula at https://www.grapplearts.com/submissionformula
Related Techniques
Frequently Asked Questions
What does this video teach about royler's armbar?
This video covers the submission formula foundation, breaking posture through distraction, accessing the lever and transitioning to s-mount. It provides detailed instruction from Stephan Kesting.
How long does it take to learn royler's armbar?
The basic mechanics can be understood in a single session, but developing reliable execution requires consistent drilling over weeks of practice. This 9-part breakdown helps structure your training by isolating each phase of the technique.
What are the key details for finishing royler's armbar?
If the initial entry lacks alignment breakdown, the practitioner should immediately access levers and break posture to achieve proper positioning before attempting the finish. Creating strong wedges and separating the opponent's arm from their body are essential intermediate steps. Only after complete alignment destruction should the final fulcrum be applied.