Introduction
Garrett Goldsberry from North Jersey Mixed Martial Arts Academy demonstrates the bread cutter choke from side control. This instructional covers traditional setups and defensive counters to help practitioners secure the collar grip against resisting opponents.
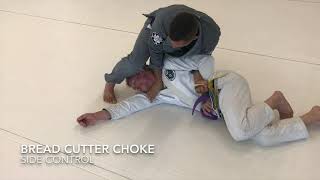
Fundamental Position and Arm Placement
The instructor establishes side control with the top arm positioned across the opponent's body. Proper arm placement is essential for controlling the opponent and setting up the subsequent collar grip, whether through natural positioning or active hip switching.
Capitalizing on the Escape Attempt
The bread cutter choke is most effectively set when the opponent initiates a reverse underhook escape or attempts to achieve back positioning. As the opponent moves, the instructor reaches through with the near-side hand, establishing armpit-to-armpit contact and obtaining palms-in collar grip from behind.
Traditional Finish from Top Position
Once the collar grip is secured with thumbs inside, the instructor pulls across the body while maintaining connection. The finish is executed by bringing the head to the opponent's head and dropping the hip downward, driving weight through the grip with the head positioned behind the hand.
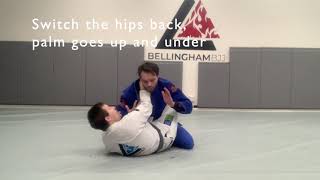
Alternative Grip Through Armpit Entry
From the same side control position, the instructor can alternatively dig through the armpit with knuckles inward to secure the collar. This variation allows for a smooth transition into a kesekatami grip, followed by a shoulder-heavy hold before switching hips for the final squeeze.
Frame Defense Against Blocking
When opponents actively defend the collar grip by blocking hands and elbows, the instructor creates a frame on the opponent's neck with the near-side arm. This frame maintains positional control and forces the opponent into a compromised neck position, making the collar grip inevitable as they attempt to escape.
Timing the Collar Capture
As the opponent shifts or turns toward the instructor while their hands are being blocked, they naturally walk into the secured collar grip. The instructor simultaneously pins with the shoulder while executing a controlled chop motion to isolate the neck, resulting in an immediate tight choke.
Complete Execution Summary
The bread cutter choke requires establishing arm placement across the body, reading opponent escape timing, and securing the four-finger collar grip. The finish combines proper head positioning, hip drive, and frame pressure to ensure submission effectiveness against both compliant and resisting opponents.
Bread Cutter Choke From Side Control
Key Takeaways
- •Introduction
- •Fundamental Position and Arm Placement
- •Capitalizing on the Escape Attempt
- •Traditional Finish from Top Position
Watch as we go over the bread cutter choke from side control position. Enjoy!
Related Techniques
Frequently Asked Questions
What does this video teach about bread cutter choke?
This video covers introduction, fundamental position and arm placement, capitalizing on the escape attempt. It provides detailed instruction from Garrett Goldsberry.
How long does it take to learn bread cutter choke?
The basic mechanics can be understood in a single session, but developing reliable execution requires consistent drilling over weeks of practice. This 8-part breakdown helps structure your training by isolating each phase of the technique.
What are the key details for finishing bread cutter choke?
As the opponent shifts or turns toward the instructor while their hands are being blocked, they naturally walk into the secured collar grip. The instructor simultaneously pins with the shoulder while executing a controlled chop motion to isolate the neck, resulting in an immediate tight choke.
Related videos

Brutally Tight Bread Cutter Choke Finishing Detail in BJJ
Chewjitsu
Sneaky Bread Cutter Choke | Fundamental Jiu Jitsu | Performance Martial Arts Academy
Performance Martial Arts Academy
Guard: Palm Up Palm Up choke
Bellingham BJJ

BJJ - X Choke from Mount | Palm Up / Palm Down
Focused Fight Team

Ferro Academy BJJ Step Over Choke from knee on belly and side control.#sidechoke#bjj
Sickness Ferro