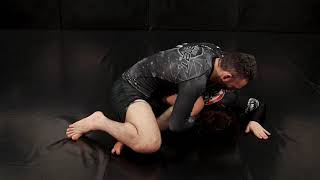
Closed Guard Positioning Fundamentals
The instructor establishes that fighting for closed guard against a resisting opponent often requires unnecessary effort. Instead, the rubber guard provides superior control and access to submissions from alternative positions. When the practitioner does achieve closed guard with their opponent's posture broken and hand on the mat, this creates an ideal setup for the technique sequence.
Initiating the Escape and Meat Hook Setup
From closed guard, the practitioner moves to the side while simultaneously clearing space with the elbow. This immediate space creation is essential before establishing the meat hook grip. The instructor emphasizes this preparation phase as a critical foundational element of the entire sequence.
Controlling Space and Hip Movement
After securing the meat hook position, the practitioner must dominate the space created and prevent the opponent from regaining it. Sequential hip movements—using either foot-on-hip pressure or ground-based leverage—maintain this advantage. The practitioner avoids gripping the wrist directly, instead focusing on space control as the primary objective.
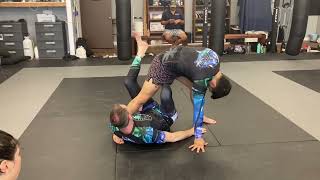
Transitioning to the Inside Position
The knee is driven forward with the practitioner draping over the ankle—not the knee—to achieve the inside position. This transition requires precision in foot placement and body alignment. The instructor recommends drilling this positional transition multiple times until the movement becomes comfortable and automatic.
Deception and Posture Control Strategy
The practitioner maintains the meat hook position while signaling compliance to the opponent, allowing them to believe their pressure is succeeding. This psychological element causes the opponent to relax into the established position, unknowingly playing directly into the submission sequence. Early space dominance ensures the technique remains effective regardless of the opponent's response.
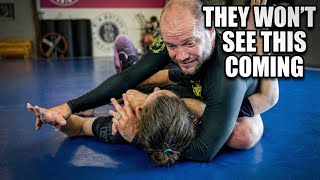
Defending Against Posture Recovery and Hand Fights
When the opponent attempts to posture up or pull their head away, the practitioner immediately engages in a hand fight for grip control. The thumb placement must be secured tightly to prevent the opponent from creating space. The practitioner must never allow the grip to open during setup sequences, as this creates positioning advantages for the opponent.
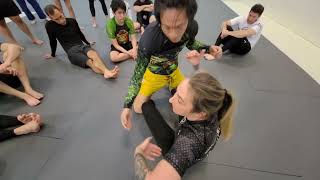
Knee Peeling Mechanics and Frame Control
Once the thumb grip is secured, the practitioner frames the opponent and begins peeling the knee backward toward their body. This frame serves as positional control rather than aggressive maneuvering. The frame prevents the opponent from escaping while creating the angular advantage necessary for the submission finish.
Adapting to Opponent Resistance Patterns
The technique contains two primary defensive variations based on the opponent's response: if they tighten to the inside, the practitioner pivots the knee to the opposite side; if they open the wrist space, the foot comes through for the submission. The instructor emphasizes adapting to resistance rather than forcing movement, ensuring the practitioner always follows the path of least resistance.
Pivoting Versus Forcing: The Efficiency Principle
A critical distinction exists between pivoting the knee and forcing it through resistance. When the opponent fights the inside position, the practitioner circles to win the inside space through a smooth pivot rather than aggressive pressure. This subtle distinction transforms the technique from a strength-based attack into an efficient, leverage-based submission that functions regardless of the opponent's physical resistance.
10th Planet 101 - Rubber Guard (Triangle Choke & Inside Position)
Key Takeaways
- •Closed Guard Positioning Fundamentals
- •Initiating the Escape and Meat Hook Setup
- •Controlling Space and Hip Movement
- •Transitioning to the Inside Position
Bmac discusses the KEY DEETS to help maintain a strong Rubber Guard and prevent yourself from getting crushed. The Meathook to set up the triangle choke & controlling the inside space. Check out our full courses available at the link below! https://bmac.mykajabi.com/store Join this channel to get access to Members Only Perks such as: - Weekly Live Classes - Members Only Chat - Exclusive Members Only Videos - Access to the PGF Archive - Custom Badges and Emojis and more! https://www.youtube.com/channel/UCr7VU0Cnef4AhQk7Pe_9nTA/join
Related Techniques
Frequently Asked Questions
What does this video teach about mud dog control?
This video covers closed guard positioning fundamentals, initiating the escape and meat hook setup, controlling space and hip movement. It provides detailed instruction from Brandon Mccaghren.
How long does it take to learn mud dog control?
The basic mechanics can be understood in a single session, but developing reliable execution requires consistent drilling over weeks of practice. This 9-part breakdown helps structure your training by isolating each phase of the technique.
What are the key details for finishing mud dog control?
The technique contains two primary defensive variations based on the opponent's response: if they tighten to the inside, the practitioner pivots the knee to the opposite side; if they open the wrist space, the foot comes through for the submission. The instructor emphasizes adapting to resistance rather than forcing movement, ensuring the practitioner always follows the path of least resistance.
Related videos
Rubber Guard Basic Path- Mike Dewitt Jr
Superhero Jiu Jitsu Academy

Rubber Guard Cradle | Weird Jiu-Jitsu Position
Knight Jiu-Jitsu
Mounted Rubber Guard - 10th Planet Jiu Jitsu
Brandon Mccaghren
10th Planet Fundamentals Half Guard Stomp & Super Stomp 2 of 2 Heather
10th Planet Denver Jiu Jitsu
Ways to use Mini Stomp, 10th Planet Orange Park Jiu Jitsu
10th Planet Orange Park