Technical Mount VS S-Mount Differences??? (For Beginners)
0
Standard S-Mount·TeachMeGrappling Coach Brian·Added by Admin
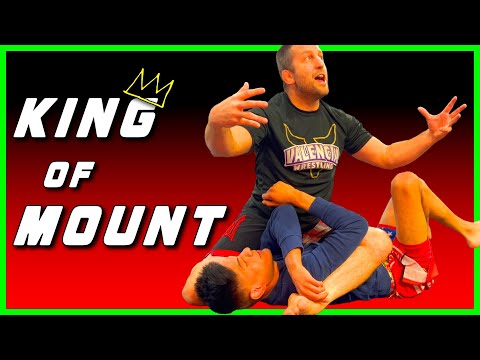
This video I teach the simple difference of when I use the technical mount and s-mount. Check out the details and you a…
Translation: standard S-mount
The Standard S-Mount positions one leg swung up with the foot alongside the opponent's head, the other knee remaining by the hip, with the top fighter's hips angled to create the S-shape. [1] The standard S-mount provides immediate armbar access — the top fighter can fall back for the armbar with the head-side leg already in position to clamp over the face. [1],[2] The S-mount also provides submissions options including the mounted triangle and wrist locks. [2],[3]
The standard S-mount is the baseline version of this advanced mount variant. [1]
Developed in advanced BJJ competition. [1]
Used in high-level BJJ competition. [1]
No images yet for this technique.
Sign in to suggest an image.
This video I teach the simple difference of when I use the technical mount and s-mount. Check out the details and you a…
No instructional courses yet for this technique.
Sign in to suggest a course.
Risk of injury to the person this technique is applied to
Top positions enable pressure and striking; rib compression risk under heavy pressure
Skill level needed to execute this technique reliably
Whether this technique is allowed under major competition rule sets
Mastering Jujitsu (Renzo Gracie & John Danaher, 2003)
Alias sources — [1] Jiu-Jitsu University (Ribeiro, 2008) [2] Mastering Jujitsu (Gracie & Danaher, 2003) [3] Mastering Jujitsu (Gracie & Danaher, 2003)
Effectiveness sources — [1] Jiu-Jitsu University (Ribeiro, 2008)
Standard katakana transliteration of Western martial arts terminology (外来語) — used in Japanese MMA, boxing, and BJJ communities
Alias sources — [1] Jiu-Jitsu University (Ribeiro, 2008) [2] Mastering Jujitsu (Gracie & Danaher, 2003) [3] Mastering Jujitsu (Gracie & Danaher, 2003)
Effectiveness sources — [1] Jiu-Jitsu University (Ribeiro, 2008)
base stability, heavy hips, ride ability
heavier build with strong hips for pressure
hip adductors, core, glutes, quadriceps
Coach Brian emphasizes that S-mount works best when your opponent is flat on their back—tuck your leg in tight. Use technical mount when your opponent is on their side, as S-mount positioning on a turned opponent compromises your balance and makes you vulnerable to escape.
Keep your foot positioned to prevent your opponent's frame escape—if your leg hangs down, they can capture it. By positioning your foot correctly, you make it much harder for them to shrimp or escape, even though some movement is still possible.
Coach Brian stresses that in S-mount, you want to be tucked under your opponent's elbow with good control, using your toe in the back for stability. This tight positioning gives you really good control and sets up submissions like the armbar.
The Standard S-Mount positions one leg swung up with the foot alongside the opponent's head, the other knee remaining by the hip, with the top fighter's hips angled to create the S-shape. The standard S-mount provides immediate armbar access — the top fighter can fall back for the armbar with the head-side leg already in position to clamp over the face.
The standard S-mount is the fundamental S-mount configuration, developed as the optimal mount position for armbar finishes in BJJ. It represents a key position in the mount-to-armbar transition sequence.
IBJJF: legal — Legal, mount scores 4 points — highest-scoring position; IJF: legal — Legal, osaekomi (pin) — 10-19 seconds scores waza-ari, 20 seconds scores ippon; ADCC: legal — Legal, mount scores 2 points; Unified MMA: legal — Legal dominant position; UWW: legal — Legal, back exposure scores points, pin ends match by fall; FIAS Sport Sambo: legal — Legal, pin scores points
Danger rating 3/10. Moderate — top positions enable pressure and striking; rib compression risk under heavy pressure
The standard setup chain: Pass the Guard → Settle Weight → Control Arms → Threaten Submissions.
Standard counters include: Bridge (Upa) — explosive hip elevation to off-balance the top player / Elbow-Knee Escape (Shrimp) — create space by driving elbow to knee and hip-escaping / Frame — establish forearm frames to prevent the top player from settling weight.
Common variants: Low mount (hips heavy on the opponent's belly, grapevines in for sta…); High mount (knees under the armpits, arms isolated for submissions); S-mount (one knee high under the armpit, other leg across for arm …); Technical mount (one leg hooked, one knee posted, modified for back-take t…).
Used in high-level BJJ competition.
Top errors to watch for: Not advancing the knee far enough past the shoulder — the knee must reach the head for proper S-mount / Posting the foot too far from the opponent — keep the base foot close for stability / Not controlling the arm before falling back for the armbar — the arm must be gripped before committing / Falling back for the armbar without pinching the knees — the knees must squeeze the arm during the armbar.
The Standard S-Mount is also known as Sutandādo S Maunto, Classic S-Mount, Basic S-Mount, Foot-Under-Head Mount.