Foundation: Structure Over Strength
The body fold takedown succeeds through proper structural positioning rather than muscular force. Any deviation from the correct technique will require excessive strength to control the opponent. The instructor emphasizes this principle as fundamental to efficient execution.
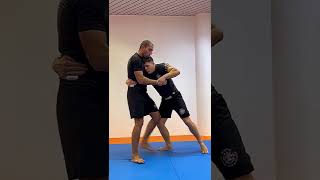
Clinch Positioning: The Crosshairs
Proper hand placement occurs at the opponent's crosshairs—where the forward arm aligns with the forward leg. The instructor places his ear on the chest at this precise point, avoiding both high and low positioning that creates structural weaknesses. This alignment prevents the opponent from generating effective defensive angles.
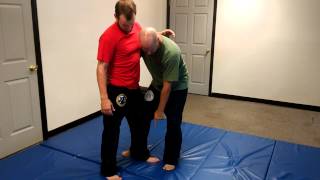
Hip Lock Mechanics
The double-unders clinch must lock the hip line at the tailbone to prevent the opponent from pushing their hips backward. When correctly positioned, no amount of backward hip pressure will separate the clinch. This structural lock is the key differentiator between strength-dependent and structure-dependent technique.
Grip Application: Monkey Grip
The monkey grip—thumb pointing downward toward the wrist—is the only acceptable grip for this technique. C-clamps and gable grips create flared elbows that compromise structural integrity. The monkey grip maintains a tight frame that resists the opponent's backward pressure.
Arm Extension and Weight Distribution
Rather than pulling the opponent inward, the instructor extends his arms downward toward the ground, maintaining a straight-arm structure. This approach prevents elbow bending that would lift away from the tailbone. Adding weight downward restricts the opponent's ability to step backward.
Establishing Downward Pressure
The instructor demonstrates a controlled tantrum—a slight upper-body shake that adds weight through the opponent's feet. This technique prevents the opponent from easily retreating backward while maintaining structural control. The weight distribution is continuous and downward throughout the clinch.
Two-Part Execution Method
The takedown should be practiced in two distinct phases: the takedown itself, followed by post-takedown positioning into mount. Separating these phases prevents ending with the opponent's feet in front of the instructor, which would put him in an inferior position. This methodical approach ensures control throughout the entire sequence.
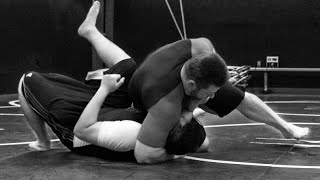
Entry Mechanics: Arms Down and Head Forward
The instructor drives his arms downward toward his hips while simultaneously moving his head forward, with the nose traveling before the toes. This coordinated movement generates momentum for the takedown while maintaining structural integrity. The opponent is released into an uncontrolled fall.
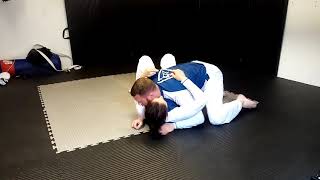
Post-Takedown Hip Recovery
After taking the opponent down, the instructor immediately brings his hips back underneath his body by imagining knees with toes pointing backward. This positioning prevents falling forward onto the opponent and protects against impact injuries. The final position is a controlled stand-through with hips underneath the torso.
Hand Placement and Head Control
During the stand-through transition, one hand controls the back of the opponent's neck to keep the head down without relying on strength. This structural control prevents the opponent from bridging or escaping while the instructor repositions. The emphasis remains on positional dominance rather than muscular pressure.
The Body Fold Takedown: Structure Over Strength
Key Takeaways
- •Foundation: Structure Over Strength
- •Clinch Positioning: The Crosshairs
- •Hip Lock Mechanics
- •Grip Application: Monkey Grip
Body fold takedown from double unders - structure-based control to mount for BJJ. No strength required, focuses on proper positioning and weight distribution for a reliable takedown to mount position. 00:00 Introduction to the Body Fold Takedown 00:32 Common Mistakes and How to Avoid Them 01:34 Establishing the Double Unders Clinch 03:11 Executing the Takedown 03:47 Rear Breakfall Technique 04:27 Maintaining Control After the Takedown 05:51 Final Tips and Conclusion 🎯 Take our free BJJ Journey Score: https://www.thebjjproject.com/ 📕 Check out our BJJ Essential Guides here: https://www.thebjjproject.com/bjjessentialguides 🧳 The BJJ Journey Suitcase. All the instructionals you need, and nothing you don't: https://www.thebjjproject.com/bjj-suitcase 🖤 Professor Chris 'Bones' Burns: https://www.thebjjproject.com/coach-profile-chris-burns 🐐 Join our Community: https://www.facebook.com/groups/1065666348593946 🥋 Uke: https://www.instagram.com/willfeyen
Frequently Asked Questions
What does this video teach about body fold takedown?
This video covers foundation: structure over strength, clinch positioning: the crosshairs, hip lock mechanics. It provides detailed instruction from The BJJ Project.
How long does it take to learn body fold takedown?
The basic mechanics can be understood in a single session, but developing reliable execution requires consistent drilling over weeks of practice. This 10-part breakdown helps structure your training by isolating each phase of the technique.
What are the key details for finishing body fold takedown?
After taking the opponent down, the instructor immediately brings his hips back underneath his body by imagining knees with toes pointing backward. This positioning prevents falling forward onto the opponent and protects against impact injuries. The final position is a controlled stand-through with hips underneath the torso.
Related videos

Safe Clinch to Body Fold Takedown
Team Daruma Dojo
Gracie Combatives lesson 14: Body Fold Takedown
Andrew Campbell
Clinch & Body Fold Takedown
White Tiger Martial Arts Academy
M.G.C. Self-Defense Lesson #14: Body Fold Takedown
Modesto Judo Club
Body Fold Takedown Entry Details Gracie Jiu Jitsu Self Defense Short
Peter Mettler Martial Arts