Prerequisites
This instruction covers two essential techniques required for brown stripe certification: the clinch and the body fold takedown. Leg kicks, leg checks, and counter techniques are covered separately in class instruction and will not be addressed in this guide.
Clinch Setup
As the opponent initiates a punch, the defender positions both hands at forehead level with elbows extended outward for protection. The defender must maintain clear vision throughout—eyes remain up and forward, with no ducking or head movement that obstructs sight lines.
Forward Entry
The defender moves directly into the opponent while maintaining the high guard position. As soon as arm contact is established, the defender immediately transitions into the clinch configuration.
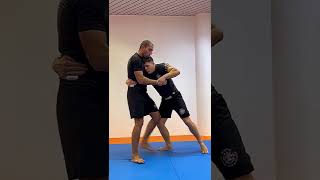
Clinch Position
The defender wraps both arms around the opponent's torso with the head positioned against the opponent's chest. The rear arm reaches around the back and the opposite hand grasps the wrist, creating a locked position. One foot frames in front of the opponent while the other frames behind.
Hip Engagement
The defender drives the hips tight against the opponent's body to prevent separation or backward movement. This hip connection is critical for control and prevents the opponent from creating distance to escape.
Clinch Execution Sequence
The complete clinch sequence begins with punch defense, moves into the opponent, and establishes the locked clinch position. This is the specific clinch variation required for brown stripe certification and must not be confused with other clinch variations.
Drop Level and Transition
From the secured clinch position, the defender rapidly lowers their center of gravity by bending the knees while maintaining upper body contact. This drop initiates the transition into the body fold takedown.
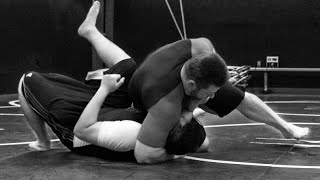
Takedown Execution
As the defender rises from the lowered position, the shoulder and head drive forward and upward while pulling the opponent's upper body inward. The opponent's body bends backward and breaks at the torso, creating the conditions for the takedown.
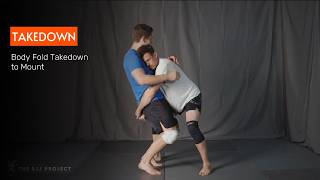
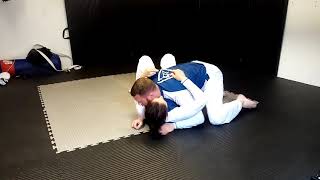
Completion to Mount
The defender drives the opponent straight down to the ground, following with immediate control into the mount position. The sequence—clinch, drop level, stand, and drive—completes the body fold takedown.
Clinch & Body Fold Takedown
Key Takeaways
- •Prerequisites
- •Clinch Setup
- •Forward Entry
- •Clinch Position
Rotation 3 - Intermediate - Clinch (brown stripe) - TSP program
Frequently Asked Questions
What does this video teach about body fold takedown?
This video covers prerequisites, clinch setup, forward entry. It provides detailed instruction from White Tiger Martial Arts Academy.
How long does it take to learn body fold takedown?
The basic mechanics can be understood in a single session, but developing reliable execution requires consistent drilling over weeks of practice. This 9-part breakdown helps structure your training by isolating each phase of the technique.
What are the key details for finishing body fold takedown?
As the defender rises from the lowered position, the shoulder and head drive forward and upward while pulling the opponent's upper body inward. The opponent's body bends backward and breaks at the torso, creating the conditions for the takedown.
Related videos
The Body Fold Takedown: Structure Over Strength
The BJJ Project

Safe Clinch to Body Fold Takedown
Team Daruma Dojo
Gracie Combatives lesson 14: Body Fold Takedown
Andrew Campbell
M.G.C. Self-Defense Lesson #14: Body Fold Takedown
Modesto Judo Club
Body Fold Takedown Entry Details Gracie Jiu Jitsu Self Defense Short
Peter Mettler Martial Arts