Hand Positioning and Initial Grip
The fundamental requirement for the bridge and roll escape is maintaining hands in a close, tight position throughout the technique. The practitioner grabs the opponent's hip with the top hand, keeping it snug to force the opponent to place a hand on the floor when bridged.
The Bridge and Hand Trap
After the opponent posts a hand, the escaping player bridges upward and immediately traps that posted hand by pulling it in tight. The leg on the same side blocks the opponent's escape by positioning the foot to prevent them from resetting their base.
Head Position and Elbow Drive
When pushing off both feet, the escaping player's elbow drives upward to elevate the opponent's head while the arms move the head to the side. Critically, the practitioner must look upward rather than down, as this head position prevents the opponent from applying pressure and allows defensive framing.
Defensive Frame and Backward Movement
While looking up at the ceiling, the escaping player frames across the opponent's body and walks the hands backward, creating distance. This upward gaze prevents the opponent from obtaining a dominant grip and allows the escaper to bench themselves away rather than backing into the opponent.
Body Mechanics and Core Engagement
The escape relies on pushing away from the opponent with the entire body rather than using a rounded back. Shoulders remain retracted and the head stays elevated throughout the backward movement to maintain structural integrity.
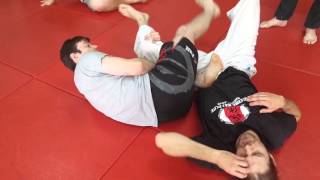
Dynamic Execution Under Pressure
During live grappling, the practitioner quickly secures the opponent's hip, bumps them to elicit a hand post, then immediately traps that hand and initiates the bridge. The foot is kept trapped between the heel and buttocks to prevent the opponent's escape.
Head Pressure and Separation
By looking upward, the escaper uses head pressure to tighten the opponent's grip area while simultaneously benching away. This prevents the opponent from settling their back to the floor and forces entry into closed guard positioning.
Common Errors and Arm Safety
Practitioners are cautioned against techniques that isolate the arm after the bump, such as overlocking, as these create vulnerability to underhooks at higher levels. The preferred method keeps hands to the inside, protecting both arms throughout the entire escape sequence.
Final Position and Grip Control
After bridging and rolling, the escaper ends in closed guard with both hands framing across the opponent's chest and the head maintained high. This position prioritizes safety and control over aggressive positioning, particularly important when already behind on points.
Bridge and Roll Escape by Travis Stevens
Key Takeaways
- •Hand Positioning and Initial Grip
- •The Bridge and Hand Trap
- •Head Position and Elbow Drive
- •Defensive Frame and Backward Movement
BRIDGE AND ROLL ESCAPE https://www.bjjfanatics.com This video explains the Bridge and Roll Escape BJJ Technique. Travis Stevens is an Olympic Silver Medalist Judoka and a Black Belt in BJJ from John Danaher. He is one of the most successful American grapplers in history. This is an excerpt from his newest release, BJJ Basics available exclusively from BJJFanatics.com. BJJ Fanatics was started by a pair of black belts (Bernardo Faria & Michael Zenga) who feel that nothing is more important than improving your BJJ skills as much as possible in the least amount of time. Their aim was to create a shop for BJJ Students who don’t look at BJJ as a sport – but as a lifestyle. 15% OFF On All Of Our BJJ Instructional Videos - Just Use The Coupon Code: FANATICSYOUTUBE Website: https://www.bjjfanatics.com Youtube: https://www.youtube.com/channel/UCAqme-CE-yLm01BV5nUjPPA Facebook Group: https://www.facebook.com/groups/733553463659020/ Instagram: https://www.instagram.com/bjj.fanatics/?hl=en . For the best fightwear, check out https://www.kojofightwear.com/ and use code " YTD15 " to get 15% off your first order.
Related Techniques
Frequently Asked Questions
What does this video teach about bridge and roll kesa?
This video covers hand positioning and initial grip, the bridge and hand trap, head position and elbow drive. It provides detailed instruction from BJJ Fanatics.
How long does it take to learn bridge and roll kesa?
The basic mechanics can be understood in a single session, but developing reliable execution requires consistent drilling over weeks of practice. This 9-part breakdown helps structure your training by isolating each phase of the technique.
What are the key details for finishing bridge and roll kesa?
Practitioners are cautioned against techniques that isolate the arm after the bump, such as overlocking, as these create vulnerability to underhooks at higher levels. The preferred method keeps hands to the inside, protecting both arms throughout the entire escape sequence.
Related videos

Why Your Bridge and Roll Doesn't Work in BJJ • BJJ with Matt Thornton
SBG PDX & Vancouver BJJ and MMA Videos
The Kesa Gatame Kill System
The Grappling Academy
Mount Escape to Straight Knee Lock
welcomematstevescott
Third Law BJJ Naples, Florida Bridge and Shrimp techniques
Team Third Law Academy #2
Fundamentals of the butterfly sweep (Lachlan Giles)
Absolute MMA St Kilda - Melbourne