Overview of the Double Leg Takedown
The double leg takedown is a fundamental MMA technique broken into three mechanical phases: the level change, the penetration shot, and the lift. Understanding and executing each phase correctly is essential for landing the technique reliably in competition.
Level Change Mechanics
The level change involves dropping one's own level by bending the knees while maintaining a straight back, positioning the torso underneath the opponent's center of mass located one to two inches below the navel. This positioning leverages physics to make the subsequent lift significantly easier and reduces injury risk to the lower back.
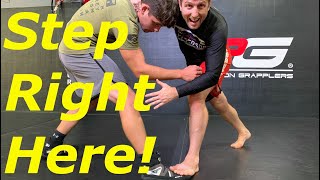
Penetration Shot Execution
After the level change, the practitioner takes a deep step forward with the front leg, positioning the knee between the opponent's legs, followed immediately by the rear leg. The goal is to get as deep and tight as possible to the opponent's knees and hips, with the head kept tight to the ribs to prevent guillotine submissions.
Separation of Level Change and Penetration
The level change and penetration shot must occur as two distinct, sequential movements rather than one combined diagonal motion. Combining these phases reduces depth, prevents proper positioning underneath the opponent, and inadvertently assists the opponent's defensive sprawl response.
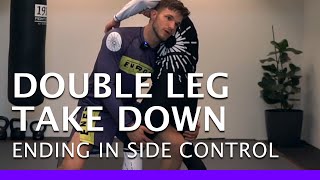
The Lift and Running Takedown
The most energy-efficient completion involves immediately sprinting forward while lifting the opponent, which requires the rear leg to be positioned underneath the body. As forward momentum carries the opponent upward, the practitioner scoops their own hips underneath the opponent to facilitate elevation and control.
Passing the Guard During Takedown Completion
Once the opponent is elevated, the practitioner tilts the opponent's body leftward using head positioning while driving the arms rightward to clear the legs. This coordinated movement allows the takedown to finish directly into side control, eliminating the need for a separate guard pass.
Common Beginner Mistakes
Two critical errors undermine the takedown: pausing after the penetration step, which allows the opponent time to sprawl defensively, and attempting to lift statically rather than running the opponent down. Continuous forward momentum and hip positioning generate leverage efficiency while minimizing the muscular effort required.
MMA Takedown- How to do a double leg take down
Key Takeaways
- •Overview of the Double Leg Takedown
- •Level Change Mechanics
- •Penetration Shot Execution
- •Separation of Level Change and Penetration
In this video I brake down the technique behind the double leg take down for MMA. The double leg take down can be broken down into 3 steps: - The level change - The penetration shot - The lift The video also covers set ups for the double leg take down. (Setting the take down up with offensive punches & reacting to your opponent punches.) Please feel free to comment if you have any questions.
Related Techniques
Frequently Asked Questions
What does this video teach about double leg takedown?
This video covers overview of the double leg takedown, level change mechanics, penetration shot execution. It provides detailed instruction from ArmBarCombatMedia.
How long does it take to learn double leg takedown?
The basic mechanics can be understood in a single session, but developing reliable execution requires consistent drilling over weeks of practice. This 7-part breakdown helps structure your training by isolating each phase of the technique.
What are the key details for finishing double leg takedown?
Once the opponent is elevated, the practitioner tilts the opponent's body leftward using head positioning while driving the arms rightward to clear the legs. This coordinated movement allows the takedown to finish directly into side control, eliminating the need for a separate guard pass.