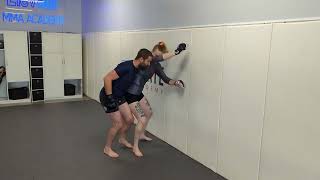
Preventing Control in the Clinch
When an opponent establishes an over-and-under clinch, the defender should take the side with the underhook and form a C-shape with the hand. Rather than staying tall and pushing downward, the practitioner lowers their level and frames to create separation from the cage.
Securing Elbow Position
After framing and lowering level, the defender pumps the opponent's grip off, then immediately places their elbow inside to prevent the opponent from regaining the underhook. This position provides superior control and opens options for takedowns or cage escape.
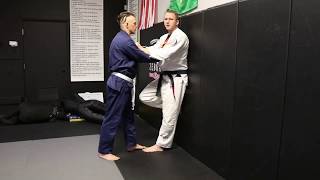
Hand Positioning in Control
The defender maintains an underhook with one hand while keeping the elbow inside with the other. This two-hand configuration establishes dominant control in the clinch against the cage.
Hand Formation and Frame
The practitioner should focus on creating a C-shaped hand frame positioned inside, avoiding reliance on strength alone. This mechanical advantage allows smaller practitioners to control larger opponents effectively.
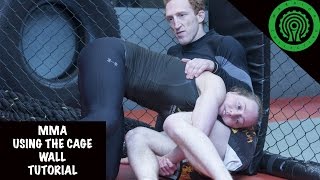
Escape Options from Dominant Position
From the established clinch control, the defender has multiple escape routes: pushing the opponent away, pulling laterally, or transitioning to a position that prevents the back from touching the cage wall.
Responding to Takedown Attempts
If the opponent attempts a double-leg takedown, the defender lowers their level and turns to reposition. Maintaining frame control prevents the opponent from advancing the takedown or forcing the back into the cage.
Stepping Pattern for Cage Escape
When escaping with an overhook, the defender steps with the outside leg while simultaneously driving the other leg into the opponent's side while pushing and pulling. This coordinated stepping pattern creates space and distance from the cage.
Drilling the Control Sequence
Practitioners should focus on the progression: fighting for position, lowering level, maintaining frame pressure, and executing either push-pull escapes or continued positional control. Repetition develops the timing and sensitivity needed for effective cage management.
Wall wresting for MMA(basics) and how to get off the cage!
Key Takeaways
- •Preventing Control in the Clinch
- •Securing Elbow Position
- •Hand Positioning in Control
- •Hand Formation and Frame
George Hickman shows how to successfully get off of the cage
Related Techniques
Frequently Asked Questions
What does this video teach about wall-cage clinch?
This video covers preventing control in the clinch, securing elbow position, hand positioning in control. It provides detailed instruction from Hickman Brothers.
How long does it take to learn wall-cage clinch?
The basic mechanics can be understood in a single session, but developing reliable execution requires consistent drilling over weeks of practice. This 8-part breakdown helps structure your training by isolating each phase of the technique.
What are the key details for finishing wall-cage clinch?
When escaping with an overhook, the defender steps with the outside leg while simultaneously driving the other leg into the opponent's side while pushing and pulling. This coordinated stepping pattern creates space and distance from the cage.