Series Approach to Wall Takedowns
Wall takedowns function as a reactive series rather than a fixed sequence, with different opponent reactions opening different pathways for the attacker. The instructor emphasizes running the same fundamental series repeatedly, allowing the top player to adapt based on defensive responses. Success depends on reading opponent behavior and transitioning between techniques fluidly.
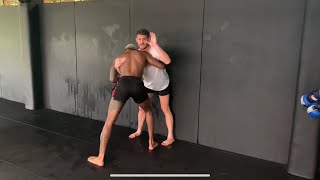
Underhook Setup and Foot Displacement
The underhook serves as the primary control position, with the secondary arm positioned flexibly (underhook, overhook, bicep, or wrist control). The critical objective is removing the opponent's feet from the wall, where they naturally hide for defensive stability. This can be accomplished through pulling, striking, or pummeling to force foot movement and create takedown opportunities.
Outside Position Entry and Ankle Lock Mechanics
From underhook control, the attacker steps into outside position by pointing the toe over the opponent's knee and sliding the shin down to create Achilles-on-Achilles contact. The attacker pulls their own ankle toward their buttock while maintaining weight distribution favoring the opponent's far leg. Both the lift and rotational spin are essential for completing the takedown.
Knee Block Counter to Weighted Leg Defense
Skilled opponents defend by deliberately loading weight on the near leg, which prevents effective ankle control. When this occurs, the attacker shifts from ankle lock to knee block, placing the knee in the crook of the opponent's knee while maintaining grip on the lat or waist. The spin and takedown proceed with knee block leverage instead of ankle lift.
Outside Trip and Shuck to Back Control
When the opponent remains standing after the outside trip, they expose themselves to back control opportunities. The attacker's grip on the opponent's arm (the 'wizard') becomes critical defensively, as removing it allows the attacker to shuck forward with a shoulder bump. If the wizard remains but loosens, continued forward pressure on the mat forces the opponent down or opens the path to back take.
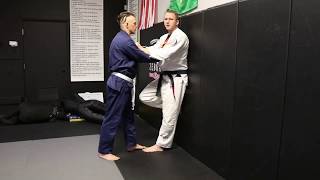
Inside Position Setup and Knee-Hip Twist
When outside position proves unavailable, the attacker transitions to inside position, preferring an over-under clinch grip with bicep grip as an alternative. The attacker blocks with the knee and hip simultaneously, then twists the entire body to rotate the opponent. This inside knee position provides the same defensive advantages of controlling the opponent's grip.
Hip Toss Variation from Inside Position
When the opponent steps over the inside leg block, the attack shifts to a hip-throw finish rather than a knee block pull. The attacker allows the step, then pops through on the hips to complete the throw. This variation maintains continuity against opponents who specifically counter the knee block.
Grip Control and Back Control Transitions
Regardless of whether the attack develops through outside or inside position, the opponent's arm control (wizard) remains the key to transitioning to back control and ultimately mat returns. As the opponent feels the rotational pressure developing, their grip naturally loosens, enabling the shuck to back position. Once back control is achieved, finishing techniques follow standard back-take principles.
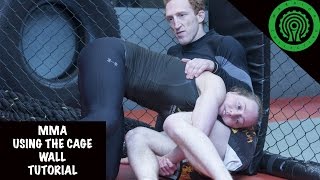
Wall Scrape Defense and Mid-Mat Repositioning
Opponents may defend by pressing their shoulder to the wall and scraping the attacker off during the shuck. The attacker counters by sealing their body between the opponent's body and the wall, then kicking off the wall to drive the opponent into the center of the cage. This repositioning creates multiple finishing options away from the wall's defensive properties.
MMA Wall Takedowns From Clinch
Key Takeaways
- •Series Approach to Wall Takedowns
- •Underhook Setup and Foot Displacement
- •Outside Position Entry and Ankle Lock Mechanics
- •Knee Block Counter to Weighted Leg Defense
this is a series, our opponent can block one but if we keep cycling through we will have success
Related Techniques
Frequently Asked Questions
What does this video teach about wall-cage clinch?
This video covers series approach to wall takedowns, underhook setup and foot displacement, outside position entry and ankle lock mechanics. It provides detailed instruction from Elevate MMA Academy.
How long does it take to learn wall-cage clinch?
The basic mechanics can be understood in a single session, but developing reliable execution requires consistent drilling over weeks of practice. This 9-part breakdown helps structure your training by isolating each phase of the technique.
What are the key details for finishing wall-cage clinch?
Regardless of whether the attack develops through outside or inside position, the opponent's arm control (wizard) remains the key to transitioning to back control and ultimately mat returns. As the opponent feels the rotational pressure developing, their grip naturally loosens, enabling the shuck to back position. Once back control is achieved, finishing techniques follow standard back-take principles.