Introduction to Position Before Submission
The instructors introduce the core principle of the MMA Trinity Series: establishing dominant position before pursuing submissions. This foundational concept, though frequently taught in beginner classes, is critical for submission success. Without proper positioning, practitioners will lose submissions and expose themselves to counterattacks.
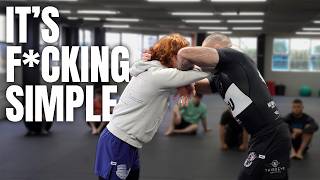
The Guillotine Choke: Common Mistakes
When executing a guillotine from striking, practitioners often grab the submission without securing positional control. This error allows the opponent to pass to side control or defend with a Von Flue choke. The mistake stems from prioritizing the submission over body positioning.
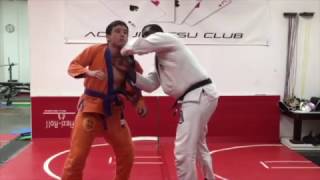
Guillotine Choke: Correct Positioning
The proper setup requires positioning the hips and legs on the outside of the opponent's hips before applying the choke. This external leg positioning prevents the opponent from passing to the side and maintains control throughout the submission. The practitioner can pull guard or block a takedown attempt while finishing the technique.
Rear Naked Choke: The Positioning Error
From top position with the opponent turtled, rushing the rear naked choke without securing control allows the opponent to escape to their side and initiate a scramble. The initial dominant position is wasted by neglecting to establish hooks or back control before the submission attempt.
Rear Naked Choke: Establishing Back Control
Before attacking the choke, the top grappler must secure one or two hooks and maintain seatbelt control with one arm across the opponent's body. This control prevents the opponent from escaping to their side. Once established, the practitioner can transition to attacking the rear naked choke with the opposite arm.
Back Control: Hook Transition and Leg Lock
To solidify back control, the top leg enters between the opponent's legs to facilitate a roll. The bottom leg remains as a hook while the top leg can either hook in or lock beneath the opponent's legs in a figure-four position. This configuration prevents escape attempts and guarantees choke completion.
Armbar from Mount: Position Setup
The armbar from mount position requires establishing an S-mount before attempting the submission. The near knee drags to the opponent's head while the far leg collects the extended arm. This positioning immobilizes the opponent's shoulders and eliminates escape space.
Armbar from Mount: Pressure and Control
After achieving S-mount position, the grappler maintains substantial body weight on the opponent's sternum while pinching the knees and feet together. This additional pressure restriction prevents shoulder movement and arm extraction. Only after these positional elements are secured should the practitioner execute the armbar.
The Secret to Locking Up Submissions: Position First!
Key Takeaways
- •Introduction to Position Before Submission
- •The Guillotine Choke: Common Mistakes
- •Guillotine Choke: Correct Positioning
- •Rear Naked Choke: The Positioning Error
You've probably heard the expression in BJJ "position before submission," which stresses the importance of not rushing a choke or lock attempt. In this episode of the MMA Grappling Trinity, Coach Vince 'The Anomaly' shares 5 examples of how to get into proper position before going for the submission: 1. Guillotine 2. Rear Naked Choke 3. Armbar (from Mount) 4. Traingle 5. Kimura (from Closed Guard) Vince 'The Anomaly'►https://www.instagram.com/vincetheanomaly Subscribe to FIGHTTIPS►http://bit.ly/1APnzvw FOLLOW: Facebook | http://bit.ly/fightTIPSFacebook Twitter | http://bit.ly/fightTIPSTwitter Instagram | http://bit.ly/fightTIPSInstagram
Related Techniques
Frequently Asked Questions
What does this video teach about from prone control?
This video covers introduction to position before submission, the guillotine choke: common mistakes, guillotine choke: correct positioning. It provides detailed instruction from fightTIPS.
How long does it take to learn from prone control?
The basic mechanics can be understood in a single session, but developing reliable execution requires consistent drilling over weeks of practice. This 8-part breakdown helps structure your training by isolating each phase of the technique.
What are the key details for finishing from prone control?
The armbar from mount position requires establishing an S-mount before attempting the submission. The near knee drags to the opponent's head while the far leg collects the extended arm. This positioning immobilizes the opponent's shoulders and eliminates escape space.
Related videos

BJJ Black Belt and former UFC fighter show law enforcement control techniques.
Gard Defense Solutions

Women's Self-defense Technique - Man Pinning Both Wrists in Mount Position
GracieBreakdown
Takedowns For BJJ Are Easy Once You Understand This
Josh Saunders
Standing BJJ Submissions & Takedown Options | Texas BJJ
Aces Jiu Jitsu Club
How to play seated open guard (BJJ Analysis)
Less Impressed More Involved BJJ