Establishing Head Control Prerequisites
The fundamental objective is to elevate the opponent's head past their legs and create forward lean. If the opponent maintains strong posture, the instructor must manipulate their positioning—sometimes by pushing to provoke a reactive pull response. Understanding these natural body mechanics allows the practitioner to set up the snap down effectively.
Gi vs No-Gi Grip Variations
While the gi provides additional grip options, the snap down technique remains equally accessible in no-gi situations. The core mechanics remain consistent across both contexts, with the primary difference being available grip points rather than fundamental execution.
Head Control Grip: The Skull Base
Rather than gripping the neck alone—which allows the opponent to resist with neck strength—the practitioner should target the area where the skull base meets the neck. This precise grip point, moved approximately one to two inches from a standard neck grip, dramatically reduces the opponent's ability to lift their head and creates superior control comparable to Muay Thai clinch mechanics.
Arm Positioning and the Leading Hand Problem
When reaching for the head, the trailing arm should lead rather than the leading arm, with the elbow positioned low. This positioning prevents the opponent from executing a successful underhook or low-level takedown. If the practitioner can defend against low-level attacks, leading with the elbow becomes acceptable.
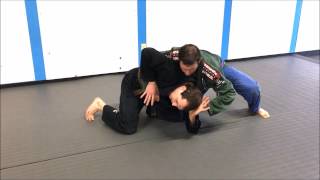
Hook Placement: Inside vs Outside Control
The outside hook is utilized for lifting and opening, while the inside hook serves to pull the opponent downward. Optimal control requires getting the hook as deep as possible on the opponent's head, positioning the practitioner's head inside the opponent's arms rather than outside.
The Snap Down Direction and Leg Sprawl
The snap down motion travels backward rather than straight down, combined with a leg sprawl to maximize control and prevent the opponent from recovering position. The pulling angle depends on riding position; when the front leg is positioned in front, that leg determines the snap direction while the rear leg sprawls back for support.
Transitioning to Front Headlock Position
Once on the ground, the controlling hand transitions from the head grip to the chin, establishing a chin-strap with the elbow blocking and the shoulder driving into the shoulder blades. The opposite hand cups the back of the arm to prevent the opponent from grabbing the practitioner's leg or blocking further advancement.
Hip Positioning and Mobility
The practitioner must post the back leg to maintain mobility and apply forward pressure. Remaining on both knees restricts movement, while posting one leg enables the practitioner to transition through multiple positions and maintains pressure into the opponent's shoulder blades.
Arm Control and the Back-Arm Pin
The rear arm must be controlled by the practitioner's hand, positioned to prevent the opponent from gripping the leg or creating defensive space. This arm control, combined with shoulder pressure, keeps the opponent compressed and unable to escape or transition to guard position.
Advancing to the Spiral Ride
From front control, the practitioner reaches across the opponent as if retrieving something from their far hip pocket, establishing a hook on the far shoulder while the hand position creates a spiral ride control. This wrestling-derived position is highly secure and resistant to reversal, allowing seamless transitions to submissions or positional advancement.
The Snap Down part 1( getting to the front head and turtle position)
Key Takeaways
- •Establishing Head Control Prerequisites
- •Gi vs No-Gi Grip Variations
- •Head Control Grip: The Skull Base
- •Arm Positioning and the Leading Hand Problem
Frequently Asked Questions
What does this video teach about standard snap roll?
This video covers establishing head control prerequisites, gi vs no-gi grip variations, head control grip: the skull base. It provides detailed instruction from Still Rolling.
How long does it take to learn standard snap roll?
The basic mechanics can be understood in a single session, but developing reliable execution requires consistent drilling over weeks of practice. This 10-part breakdown helps structure your training by isolating each phase of the technique.
What are the key details for finishing standard snap roll?
The rear arm must be controlled by the practitioner's hand, positioned to prevent the opponent from gripping the leg or creating defensive space. This arm control, combined with shoulder pressure, keeps the opponent compressed and unable to escape or transition to guard position.