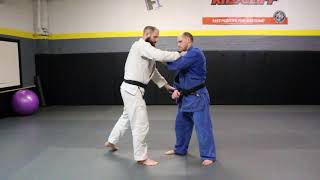
Establishing the Armpit Grip Foundation
In ai-yotsu, the instructor demonstrates the fundamental armpit grip by capturing the opponent's sleeve and collar pocket rather than using a standard lapel grip. This positioning creates a stable control point that prevents the opponent from easily reaching the instructor's collar, even when facing longer-armed opponents. The grip pocket sits in a natural pocket on the gi, making it mechanically superior to conventional grips.
Comparing Grip Stability in 50/50 Situations
When both competitors grip each other in a standard collar-and-sleeve exchange, the instructor shows why the armpit grip offers defensive advantages. By controlling the opponent's shoulder and maintaining upright posture, the instructor prevents the opponent from reaching higher on the collar. This creates an asymmetrical advantage where the opponent cannot easily counter while the instructor maintains dominant control.
The Armpit Grip Against Long-Armed Opponents
For opponents with significant reach or arm length, the armpit grip becomes especially valuable by eliminating access points to the neck. The instructor demonstrates how grabbing in the armpit pocket allows them to extend their arm fully while blocking the opponent's collar access. This grip negates the physical advantage of longer limbs through superior positioning rather than strength.
Tightness and Control Mechanics
The instructor emphasizes that the armpit grip creates a tighter, more stable connection than traditional grips, allowing them to lead the opponent's movement with minimal effort. When pulling from this position, the opponent naturally follows, making it easier to elevate their arm or break their posture. The grip's mechanical tightness directly translates to superior control for technique execution.
Setting Up Osoto Gari with the Armpit Grip
From the secured armpit grip, the instructor initiates osoto gari by pushing the opponent's shoulder or chest, allowing the opponent to naturally shift their weight back. By releasing and re-gripping the lapel, the instructor resets the position before executing the throw. This rhythm of push, release, and grip adjustment creates optimal positioning for a powerful osoto gari.
Breaking the Opponent's Counter Grip
When the opponent attempts to grip the instructor's lapel defensively, the instructor demonstrates two methods of breaking this grip by driving laterally in either direction. Breaking the grip inward collapses the opponent's posture, while breaking it outward creates space on the opposite side. Each break is executed immediately to prevent the opponent from establishing stable control.
Creating Space for Uchi Mata Entry
After breaking the opponent's defensive grip by driving them backward, the instructor steps back to create separation while maintaining control. This directional movement opens a gap on the opposite side, allowing the instructor to transition into an uchi mata setup. The space creation is methodical, relying on timing and grip manipulation rather than explosive movement.
Uchi Mata Execution from the Armpit Grip
From the established spacing and broken opponent grip, the instructor enters uchi mata with the armpit grip still controlling the opponent's arm. Because the opponent's arm is already blocked and positioned, entry is significantly more stable than from a standard grip. The opponent cannot post effectively to defend, making the throw mechanically sound and difficult to counter.
Use the Armpit Grip to Dominate Ai-Yotsu and Hit Strong Uchi Mata & Osoto
Key Takeaways
- •Establishing the Armpit Grip Foundation
- •Comparing Grip Stability in 50/50 Situations
- •The Armpit Grip Against Long-Armed Opponents
- •Tightness and Control Mechanics
🥋 The Armpit Grip Secret: How Japanese Judoka Dominate Ai-Yotsu Most people think that in ai-yotsu (same stance), you should immediately take the standard sleeve-and-collar grips. But top Japanese judoka know that if you start normally, the opponent gets the exact same grips — and the position becomes 50/50. So instead, we use a different sequence: 1️⃣ Control their right collar before they grab yours If you reach for the opponent’s right collar the normal way, your own collar becomes exposed and they’ll grab it first. That’s why Japanese players often use the armpit grip — grabbing the seam near the armpit for stability and control. 2️⃣ The armpit grip makes their high grip impossible From this grip: • your arm blocks their reach • your posture stays strong • you can control the distance without getting gripped This instantly shifts the exchange from 50/50 to a dominant position. 3️⃣ Build powerful entries: Uchi Mata, Osoto, Seoi Once you shut down their high grip and control the right side: • Uchi Mata becomes cleaner • Osoto becomes heavier • Ippon Seoi Nage becomes easier to launch This is a common sequence used in Japan, but it’s rarely taught overseas. If you master this grip concept, you won’t just react to gripping — you’ll create dominant positions on your terms and hit stronger throws. 📍 Based in New York City? I offer private judo lessons and customized training sessions. 📧 Book a lesson or seminar: https://gunjijudoacademy.carrd.co/ 📲 Follow me for more content: Instagram: https://www.instagram.com/ken_judo_nyc TikTok: https://www.tiktok.com/@ken_judo_nyc Website: https://gunjijudoacademy.carrd.co/ 🔔 Don’t forget to like, comment, and subscribe for more deep-dive judo content! #Judo #Ippon #JudoMindset #bjj #jiujitsu #Ippon #Randori #UchiMata #GunjiJudoAcademy #MartialArts #柔道 #一本 #メンタル #Judoka #gripfighting
Frequently Asked Questions
What does this video teach about standard kenka-yotsu?
This video covers establishing the armpit grip foundation, comparing grip stability in 50/50 situations, the armpit grip against long-armed opponents. It provides detailed instruction from KENJUDO_nyc.
How long does it take to learn standard kenka-yotsu?
The basic mechanics can be understood in a single session, but developing reliable execution requires consistent drilling over weeks of practice. This 8-part breakdown helps structure your training by isolating each phase of the technique.
What are the key details for finishing standard kenka-yotsu?
After breaking the opponent's defensive grip by driving them backward, the instructor steps back to create separation while maintaining control. This directional movement opens a gap on the opposite side, allowing the instructor to transition into an uchi mata setup. The space creation is methodical, relying on timing and grip manipulation rather than explosive movement.
Related videos
Grip Fighting Drills - Basic to Advanced
The Judo Coach
SAME SIDE GRIP ON SLEEVE & LAPEL USING A VARIETY OF THROWS
welcomematstevescott
Secret Technique: kenka yotsu Kumite, how to grip right vs left.
FLUID JUDO JAPAN
Ken Ken Throws
Seiryoku Zenyo
Advanced Judo Grip Fighting: A powerful way to avoid the post arm during grip fighting
Rochester Judo