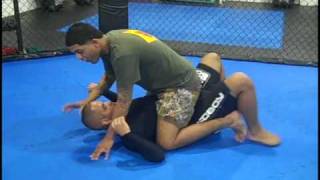
Initial Hook Placement
Begin from the turtle position by securing a single hook over your opponent's calf with your foot. This foundational hook is essential—without it, your opponent remains free to escape. Ensure the hook is deep and controlled before proceeding to the next phase.
Establishing Upper Body Control
Once the leg hook is secured, come over the top with your upper body rather than attempting a traditional jiu-jitsu seat belt grip. Place your hand across your opponent's face and secure your grip, preparing for the finishing pressure.
Hand Positioning and Face Control
Cup your hand across your opponent's face, keeping it positioned across the jaw or nose. This hand placement is critical for applying directional pressure that will force your opponent into compromised positions and limit defensive options.
The Arm Lock Connection
Lock your free arm across your opponent's shoulder, securing a chicken wing position. This creates a vice-like compression that prevents escape and sets up the finishing submission, with particular pressure applied to the shoulder joint.
Spinal Pressure and Positioning
Apply downward pressure along the spine—either at the mid or lower back—while maintaining the face control and arm lock. This compound pressure forces your opponent into a vulnerable position where they cannot effectively defend or generate counter-attacks.
Preventing the Crucifix Counter
Keep your controlling arm tight and maintain pressure to prevent your opponent from inverting into a crucifix position. The key is staying connected with your leg hook while keeping upper body pressure distributed, making it impossible for them to create the angle needed for a reversal.
Finishing the Submission
Once your opponent is fully locked in the position with the leg hook, arm lock, and face control secured, apply finishing pressure by cranking the arm lock and intensifying face pressure. This compound pressure forces submission through the shoulder lock, choke, or cranking mechanism.
Pankration Classics: Minotaur Lock
Key Takeaways
- •Initial Hook Placement
- •Establishing Upper Body Control
- •Hand Positioning and Face Control
- •The Arm Lock Connection
Tom Billinge takes us directly to classic, and mythological martial arts from the Grecian Peninsula. This lock was implemented by Theseus himself to defeat the Minotaur. Always awesome classical and new techniques on our channel, subscribe! Subscribe to WarYoga: https://www.youtube.com/@UCC27JPS-QrqWbnfes9UUdqw Follow us both on Instagram: OdysseyPankration WarYoga Get the red WAR rashguard here: https://www.odysseypankration.store/products/war-rash-guard?variant=47656390164736 See you in the next one
Related Techniques
Frequently Asked Questions
What does this video teach about pankration arm lock?
This video covers initial hook placement, establishing upper body control, hand positioning and face control. It provides detailed instruction from Odyssey Pankration.
How long does it take to learn pankration arm lock?
The basic mechanics can be understood in a single session, but developing reliable execution requires consistent drilling over weeks of practice. This 7-part breakdown helps structure your training by isolating each phase of the technique.
What are the key details for finishing pankration arm lock?
Keep your controlling arm tight and maintain pressure to prevent your opponent from inverting into a crucifix position. The key is staying connected with your leg hook while keeping upper body pressure distributed, making it impossible for them to create the angle needed for a reversal.