Identifying Neutral Side Control
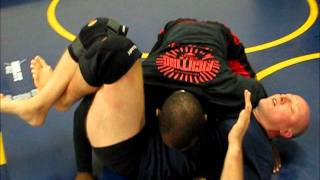
The opponent applies side control without committing excessive weight—he remains balanced in the middle, controlling without taking risk. This neutral position is dangerous because the defender has minimal space to work with, yet the opponent maintains stability without overextending. Understanding this distinction is crucial for developing an effective escape strategy.
Establishing the Initial Frame
The defender positions the bottom arm close to the legs rather than near the head, then windshield-wipes the arm across the opponent's face with controlled pressure. This frame must remain strong to prevent the opponent from attacking the trapped arm or establishing a wristlock. The defender avoids lingering in this position, as prolonged exposure invites submission attempts.
Creating Space and Connecting the Frame
As the opponent gives slightly more room, the defender connects both hands to create a stronger frame for pushing. The goal is not to move the opponent's head, but to push his arm away from the defender's torso, breaking his chest-to-chest control. This frame-and-push sequence opens space necessary for the escape.
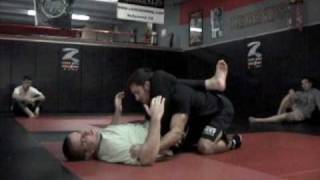
The Bridge and Hook Transition
The defender executes a bridge while simultaneously establishing a hook with the leg underneath the opponent's body. Rather than bridging high and risking a back-take, the defender bridges low and controlled, maintaining a defensive posture. This positions the defender to transition to the next phase of the escape.
Achieving Knee Position and Base
Once the hook is secured, the defender immediately works to get both knees on the mat, establishing a stable base. From the knee position, the defender can either step behind the opponent's leg or continue driving forward. Reaching this position represents the primary goal of the escape sequence.
Managing Arm Danger and Preventing Submissions
Throughout the escape, the trapped arm remains in constant danger of armlock or wristlock attacks if kept in the escape position too long. The defender must balance swift movement with controlled progression, keeping the legs active to prevent the opponent's immediate arm attack. Awareness of this vulnerability prevents desperation and ensures methodical escape execution.
Secondary Frame and Arm Displacement
When the initial frame fails to create sufficient space, the defender introduces a second hand frame, keeping knees tight to the opponent's ribs. The second frame targets the opponent's arm rather than the head, pushing it away from the defender's centerline. This two-hand frame combination increases leverage and opens additional escape pathways.
Controlled Escape Without Desperation
The defender must resist making desperate movements that risk exposing the back or rolling into worse positions. While side control is scored, the defender has time to execute a measured escape without risking high-percentage reversals. Patience and systematic positioning prevent compounding disadvantage into complete control loss.
Maintaining Grip and Progressive Advancement
The defender maintains continuous framing pressure, keeping hands locked even as the opponent attempts to squeeze or defend against the escape. Progressive steps—frame, push, hook, bridge, knee position—must flow in sequence without hesitation. Breaking the opponent's grip on the head while maintaining defensive structure is the final key to successful escape.
Marcelo Garcia: Escaping Side Control
Key Takeaways
- •Identifying Neutral Side Control
- •Establishing the Initial Frame
- •Creating Space and Connecting the Frame
- •The Bridge and Hook Transition
3 Part Lesson -- Marcelo escapes from Side-Mount: When you opponent is holding you down in Side Control with a balanced approach, i.e. they are not laying too heavily/tightly over your centerline and therefore susceptible to a Bridge Sweep/Reversal you may not be able to recover your knee(s) inside to recompose guard due to them monitoring your hip closely with their far knee in Side-Control with Underhook & Head Control (Side-Mount, Cross-Sides (Top), Cross-Face. Protect your far-arm by keeping it strong and bent as a Frame against your opponent's neck/jawline; quickly keep it safe from any variations of Arm-Lock and don't waste any time advancing your defense. Connect your hands together in a joist and rock your legs or pop a bridge to help open up enough space to turn onto your side and pummel an Under-Hook. Apply another bridge coupled with your Under-Hook to make room for a belly-down turn-over entry onto a Single. You can finish the single from your knees, drive to the far-leg for a Cowboy-Double or Barzagar, or come up with the leg and finish from standing. Stay low on your opponent's knee as you turn onto your belly and build up your base before coming up to attack your opponent's Back/Side from the Coyote-Guard/Dog-Fight Position; otherwise, you run the risk of giving up the Mount or arriving on top inside a Triangle. [04:36] Use your near-side arm to help loosen your opponent's Cross-Face (aka Shoulder-of-Justice, et al.) and also prevent your opponent from using two hands to attack your far-arm before wedging it into safety as a Frame. Meanwhile, elevate both of your knees to block an easy path from Side-Control into Mount. If your opponent is keeping heavy against your chest and preventing you from creating enough room to pummel for and Under-Hook and turn onto your side, pummel your opposite hand inside and connect your hands again in a Frame/Joist. Employ a bridge to help push up and turn yourself onto your side, pushing at their biceps and pummeling for an Under-Hook; use the Under-Hook as a jack to throw your opponent away from defending their knee from your Single-Leg Reversal. You can feed your opponent's lapel/belt through their legs to amplify your effect on coming up and finishing the Single. [08:49] Oscillate your Bridge-Escape until a dissonance is generated inside the discursive feedback loop of control for your opponent; in other words, you may need to quake back and forth, alternating between the two major directions of your Bridge-Escape to disrupt your opponent's ability to correctly track, adjust, and retain the Side-Mount Position.
Related Techniques
Frequently Asked Questions
What does this video teach about the jailbreak variation?
This video covers identifying neutral side control, establishing the initial frame, creating space and connecting the frame. It provides detailed instruction from Marcelo Garcia Jiu-Jitsu.
How long does it take to learn the jailbreak variation?
The basic mechanics can be understood in a single session, but developing reliable execution requires consistent drilling over weeks of practice. This 9-part breakdown helps structure your training by isolating each phase of the technique.
What are the key details for finishing the jailbreak variation?
The defender must resist making desperate movements that risk exposing the back or rolling into worse positions. While side control is scored, the defender has time to execute a measured escape without risking high-percentage reversals. Patience and systematic positioning prevent compounding disadvantage into complete control loss.
Related videos
IFAacademy.com - Austin, TX - Escaping Side Control To Guard Or Hip Heist With Submission Options
IFA Academy
10th Planet Counters: Einstein's Triangle Escape
Alder Hampel
How to Escape the Back EVERY TIME | Jiu Jitsu Back Escape System
Matt Arroyo Jiu Jitsu
Powerful BJJ Mount Escape (Tunnel Escape)- Firas Zahabi
Tristar Gym
Mount Survival And Escape Guide
The Grappling Academy