Introduction: The Five Principles of Pin Escapes
Effective pin escapes rely on five fundamental principles that separate successful wrestlers from those who remain trapped. This guide addresses the most common mistakes wrestlers make under pressure and provides systematic solutions.
Principle 1: Direction of Force Over Intensity
The first principle emphasizes that precise effort in the correct direction yields superior results compared to maximum effort applied incorrectly. Under the time constraints of pinning situations, wrestlers often prioritize aggression over technical efficiency, compromising their escape attempts.
The Ineffectiveness of Vertical Bridging
While the head-post bridge serves valuable purposes as a warmup and mobility drill, it fails to address the fundamental problem of pin escape: displacing the opponent's weight. Bridging vertically applies the principle of physics demonstrated by a barbell thrown straight upward—the weight simply returns to its original position.
The Barbell Analogy: Why Vertical Force Fails
A wrestler cannot escape a pin by driving straight upward, regardless of bridge height, because vertical force results in vertical descent. Just as an athlete must laterally offload a failing bench press, pin escape requires horizontal weight displacement rather than vertical elevation.
Lateral Bridging: The Correct Technical Application
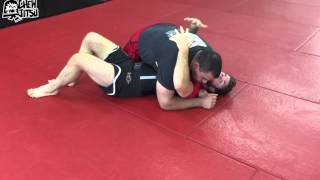
Effective pin escapes utilize side-to-side bridging with minimal hip elevation off the mat. This lateral displacement forces the opponent to post their hand on the mat to maintain control, creating the separation necessary for successful escape.
Execution: Alternating Lateral Pressure
The wrestler alternates weight displacement from one side to the other in continuous sequence as the opponent attempts to maintain the pin. The minimal bridge height combined with lateral momentum prevents the opponent from resettling their weight and forces them to adjust their base.
Practical Application Under Pressure
When thrown into a pin position, the wrestler immediately transitions to lateral bridging rather than attempting maximum vertical elevation. Consistent side-to-side displacement, applied as soon as back contact occurs, provides the most efficient path to escape.
Distinguishing Lateral vs. Vertical Bridge Results
The visual difference between the two approaches demonstrates why lateral bridging succeeds where vertical bridging fails. With vertical bridging, the opponent feels no need to post their hands; with lateral bridging, the opponent is forced to redistribute their base to maintain control.
5 Secrets to Escape Any Pin in Wrestling
Key Takeaways
- •Introduction: The Five Principles of Pin Escapes
- •Principle 1: Direction of Force Over Intensity
- •The Ineffectiveness of Vertical Bridging
- •The Barbell Analogy: Why Vertical Force Fails
Iron Faith Merch ➡️ https://amptstudio.chipply.com/ifwc/ Join the #1 Online Wrestling Academy in the world ➡️ https://www.skool.com/iron-faith-academy Placido's Instagram: https://www.instagram.com/placisantos/ 00:14 Concept #1 Direction Of Force 12:32 Concept #2 Side To Side Control 18:59 Concept #3 Breaking Perpendicular Position 25:06 Concept #4 Dominating Inside Space 29:22 Concept #5 Eliminating Posts/bases of Support
Frequently Asked Questions
What does this video teach about escape against wrestler's pin?
This video covers introduction: the five principles of pin escapes, principle 1: direction of force over intensity, the ineffectiveness of vertical bridging. It provides detailed instruction from Iron Faith Wrestling.
How long does it take to learn escape against wrestler's pin?
The basic mechanics can be understood in a single session, but developing reliable execution requires consistent drilling over weeks of practice. This 8-part breakdown helps structure your training by isolating each phase of the technique.
What are the key details for finishing escape against wrestler's pin?
When thrown into a pin position, the wrestler immediately transitions to lateral bridging rather than attempting maximum vertical elevation. Consistent side-to-side displacement, applied as soon as back contact occurs, provides the most efficient path to escape.