Highest Percentage Rear Mount Escape for Gi and No-Gi
0
Rear Mount Escape·Stephan Kesting
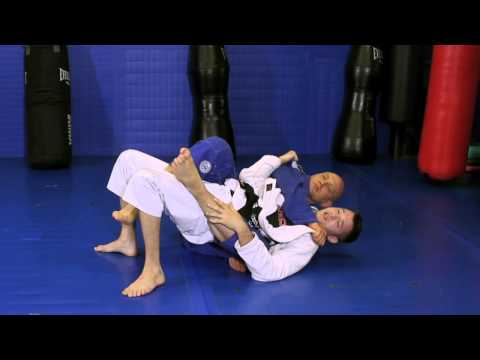
The first rear mount escape you should learn. From the Defense and Escape Gameplan on iOS: https://itunes.apple.com/us/…
後ろ騎乗位逃げ(Ushiro Kijōi Nige)
TraditionalTranslation: rear mount escape
The Rear Mount Escape family covers all techniques for escaping back control when the opponent has established hooks (feet inside the defender's thighs) or a body triangle from behind. [1] Rear mount escape is one of the most important skill sets in grappling because back control is the highest-scoring and most dangerous position — the attacker has access to the rear naked choke while the defender cannot see or effectively counter-attack. [1],[2] Escape strategies include hand fighting (preventing the choke while working to escape), shoulder walking (sliding down and out), scooting and turning (moving the hips to face the opponent), and body triangle-specific escapes. [2],[3]
Rear mount escapes are among the most critical defensive skills in grappling because back control is the most dominant position — the attacker has access to the rear naked choke while the defender cannot see or effectively counter-attack. [1] Ribeiro devotes an entire chapter to surviving and escaping back control, emphasizing that hand fighting to prevent the choke must happen simultaneously with the positional escape. [1] In MMA, back control leads to finish more often than any other position. [2]
Back escape methodology is taught across all BJJ lineages, with the Gracie self-defense curriculum including back escape as a fundamental survival skill. [3] Modern back escape systems have been refined by competitors like Marcelo Garcia, whose shoulder-walking escape method became widely adopted in competition BJJ. [2]
Rear mount escapes are critical in MMA and BJJ competition, as back control leads to the most common submission finishes. [1]
No images yet for this technique.
Sign in to suggest an image.
The first rear mount escape you should learn. From the Defense and Escape Gameplan on iOS: https://itunes.apple.com/us/…
No instructional courses yet for this technique.
Sign in to suggest a course.
Risk of injury to the person this technique is applied to
Back escapes must address choke threat while escaping; urgency increases injury risk
Skill level needed to execute this technique reliably
Whether this technique is allowed under major competition rule sets
Jiu-Jitsu University (Saulo Ribeiro, 2008)
Alias sources — [1] Jiu-Jitsu University (Ribeiro, 2008) [2] Mastering Jujitsu (Gracie & Danaher, 2003)
Effectiveness sources — [1] Jiu-Jitsu University (Saulo Ribeiro, 2008) [2] Mastering Jujitsu (Renzo Gracie & John Danaher, 2003)
Standard Japanese martial arts terminology (kanji/hiragana)
Established Japanese martial arts naming convention — native Japanese term (和語/漢語)
Alias sources — [1] Jiu-Jitsu University (Ribeiro, 2008) [2] Mastering Jujitsu (Gracie & Danaher, 2003)
Effectiveness sources — [1] Jiu-Jitsu University (Saulo Ribeiro, 2008) [2] Mastering Jujitsu (Renzo Gracie & John Danaher, 2003)
explosive hip bridge power, shrimping ability, timing
strong glutes and hip extensors for powerful bridges
glutes, hip extensors, core, quadriceps
The Body Triangle Escape subfamily covers techniques for escaping when the opponent has secured back control with a body triangle — legs locked in a figure-four around the defender's torso rather than using standard hooks. [1] The body triangle is one of the most difficult back controls to escape because the interlocked legs create a powerful compression grip that is harder to clear than standard hooks. [1,2] Body triangle escapes typically involve addressing the locked legs first by prying them apart or adjusting hip angle to relieve the squeeze, then proceeding with standard back escape techniques. [2,3]
The Hand Fighting Escape subfamily covers back escape techniques that prioritise defending against the choke through hand fighting while systematically working to clear hooks and turn to face the opponent. [1] Hand fighting escapes recognise that the primary threat from back control is the rear naked choke, so the first priority is preventing the choke grip while the secondary priority is escaping the position entirely. [1,2] These escapes use two-on-one hand control, peeling grips, and shoulder rotation to manage the choking threat while creating escape opportunities. [2,3]
The Scoot And Turn Escape subfamily covers back escape techniques where the defender slides the hips downward and sideways while turning to face the attacker, using the scooting motion to create the space needed to extract from back control. [1] The scoot creates space between the defender's back and the attacker's chest, while the turn converts that space into a facing position where the defender can establish guard. [1,2] The scoot and turn is one of the most commonly taught back escapes because it works against both hooks and body triangle. [2,3]
The Shoulder Walk Escape subfamily covers back escape techniques where the defender walks the shoulders along the mat, sliding downward and out of the attacker's back control by incrementally shifting the upper body. [1] The shoulder walk uses small, alternating shoulder movements to progressively slide the defender's body downward, eventually allowing them to slip below the attacker's hooks and escape. [1,2] The shoulder walk is particularly effective because it requires minimal explosive movement and can be performed even under heavy back control. [2,3]
Rear mount escapes begin with hand-fighting — stripping the choking hand and controlling the wrists. The primary escape direction is toward the choking arm side (not away from it) to prevent the RNC from being locked. Then clear the hooks one at a time. (Danaher, Back Attacks: Enter the System; Ribeiro, Jiu-Jitsu University)
According to Stephan Kesting, you should prioritize controlling the arm and keep your hands there as long as possible—often you won't need to use your hands on the legs at all. By walking and turning while pinning the thigh, the opponent's hook naturally becomes shallow and harder to maintain.
Stephan Kesting emphasizes not abandoning the basic escape when you meet resistance—instead, make adjustments within that same escape rather than switching to something fancy. The key is to master the fundamentals through repetition and learn how to adapt them to common problems.
The essential pattern is 'walking and turning'—you drive your head to the mat, walk to the side, and turn your hip repeatedly. Kesting stresses that you really need to practice this walking and turning motion, as it's fundamental to making the escape work against resistance.
Yes—Stephan Kesting notes that half guard is 'much better than having him on my back and choking me,' so it's a legitimate positive outcome even if it's not the ideal best-case scenario of reversing to top position.
The Rear Mount Escape family covers all techniques for escaping back control when the opponent has established hooks (feet inside the defender's thighs) or a body triangle from behind. Rear mount escape is one of the most important skill sets in grappling because back control is the highest-scoring and most dangerous position — the attacker has access to the rear naked choke while the defender cannot see or effectively counter-attack.
Rear mount escapes have been developed alongside back control techniques since the earliest grappling systems. BJJ's emphasis on back control as the ultimate dominant position drove the development of the most comprehensive rear mount escape curriculum in any grappling art.
Unified MMA: legal — Legal defensive/transitional technique; IBJJF: legal — Legal; IJF: legal — Legal; ADCC: legal — Legal; UWW: legal — Legal, escape scores 1 point (freestyle), reversal scores 1 point; FIAS Sport Sambo: legal — Legal; NCAA Folkstyle: legal — Legal, escape scores 1 point, reversal scores 2 points
Danger rating 4/10. Moderate — back escapes must address choke threat while escaping; urgency increases injury risk
The standard setup chain: Frame Defence → Trap the Arm → Bridge Explosively → Roll to Top.
Standard counters include: Heavy Hips — maintain low hip pressure and wide base to absorb the bridge / Grapevine — hook legs inside opponent's thighs to neutralize hip movement / Post Hand — post arm on the mat in the direction of the bridge to maintain balance.
Common variants: Bridge and roll (upa) (explosive bridge trapping arm and leg to reverse position); Elbow-knee escape (framing and shrimping to recover guard); Foot drag escape (dragging the opponent's foot with the heel to create spac…); Combination escape (bridging to force a reaction, then shrimping when the opp…).
Rear mount escapes are critical in MMA and BJJ competition, as back control leads to the most common submission finishes.
Top errors to watch for: Turning away from the opponent — turning away exposes the neck; always turn toward the choking arm side / Trying to clear both hooks simultaneously — clear one at a time; bottom hook first / Ignoring the hands to focus on the hooks — the choke is the immediate threat; fight the hands while working the position / Bridging straight up — bridges must be directional (toward the underhook side) to create escape angles.
The Rear Mount Escape is also known as Ushiro Kijōi Nige, Back Mount Escape, Hooks In Escape.