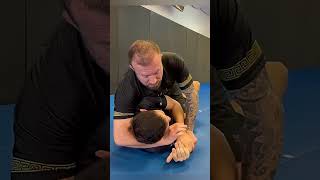
Starting Position
The practitioner begins with both hands cupping the inside of the opponent's thigh. The wrist is positioned underneath the opponent's elbow, establishing a secure grip foundation for the technique.
Hand Configuration
The right hand connects to the left hand, creating a unified control structure. This hand-to-hand connection is essential for generating the compression force needed for the choke.
Step One: Pull to Knee
The first movement involves pulling the opponent's head toward the knee. This action begins to compress the neck while establishing positional dominance.
Step Two: Maintain Tension
Constant tension must be maintained throughout the transition. This prevents the opponent from creating space or escaping the choke.
Step Three: Push and Lift
The final movements combine a pushing action with an upward lift. This two-part motion completes the compression choke by maximizing pressure on the neck.
Compression the life out of your Opponent | Compression Choke | Free Technique | Owen Livesey
Key Takeaways
- •Starting Position
- •Hand Configuration
- •Step One: Pull to Knee
- •Step Two: Maintain Tension
Frequently Asked Questions
What does this video teach about forearm compression short choke?
This video covers starting position, hand configuration, step one: pull to knee. It provides detailed instruction from Owen Livesey.
How long does it take to learn forearm compression short choke?
The basic mechanics can be understood in a single session, but developing reliable execution requires consistent drilling over weeks of practice. This 5-part breakdown helps structure your training by isolating each phase of the technique.
What are the key details for finishing forearm compression short choke?
Constant tension must be maintained throughout the transition. This prevents the opponent from creating space or escaping the choke.
Related videos

JOE BREAKDOWN REAR NAKED CHOKE TECHNIQUE #shorts #mma #ufc
LIFECKECK MMA
Ouch! 3 Most PAINFUL Submissions in BJJ
Matt Arroyo Jiu Jitsu

Choke 'em out with this RNC tip! ✅🥋
Jordan Teaches Jiujitsu
What Do You Call This Choke?
Knight Jiu-Jitsu
Kesa Gatame Deep Dive, Part 5: The Compression Choke
Cheat Code Jiu Jitsu