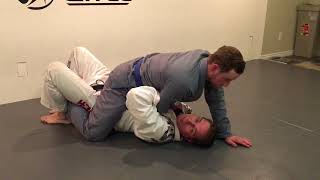
Foundation: Bridge vs. Hip Escape
The bridge and hip escape are fundamental but often confused techniques in side control escapes. The instructor emphasizes that understanding the distinction between these two movements is essential for developing proper escaping mechanics. Many practitioners perform a hybrid version without fully committing to either technique, which significantly reduces effectiveness.
The Critical Prerequisite: Head Position
Before attempting any bridge, the practitioner must be able to look toward their opponent. If the opponent's shoulder controls the jaw, bridging becomes impossible. The ability to maintain head mobility is the non-negotiable first requirement for successful escape execution.
Loading for Maximum Bridge Height
Proper bridge mechanics require loading the toes and pulling the head back to open the chest. The feet should be positioned under the hips rather than directly beneath the body to maximize upward displacement. This positioning allows the hips to achieve maximum elevation and creates optimal conditions for the subsequent hip escape.
The Hip Escape Sequence
Once the bridge creates space, the practitioner executes a hip escape by sliding the knee toward the opponent's elbow while the arm creates clearance. The elbow-to-knee connection must be maintained as the practitioner recovers to full guard. This synchronized movement completes the escape chain.
Arm Position Strategy and Risk Assessment
While conventional wisdom dictates keeping the arm inside to avoid submissions, the outside arm position is not inherently dangerous if the practitioner recognizes and blocks threats like the far-side armbar. Awareness of potential attacks allows the practitioner to defend reactively rather than rely solely on static positioning.
Head Control Through Guard Recovery
Establishing guard automatically neutralizes head control threats because the guard position forces the opponent to release the head to defend against submissions. Once the guard is secured, the opponent's arm—previously used for head control—becomes vulnerable to attacks, incentivizing them to retreat to a safer position.
Triangle Defense and Head Placement
The practitioner should maintain upper-head positioning rather than placing the head in the opponent's hip to avoid triangle entrapment. If the opponent posts their foot defensively, applying hip pressure forces them back into a neutral position, re-establishing favorable conditions for the escape.
Perfect Practice Over Partial Success
Practitioners who succeed against lower-level opponents using imperfect technique reinforce poor habits that fail against higher-ranked competitors. Consistent, deliberate practice of proper mechanics—bridging with full commitment, maintaining head position, and executing synchronized movements—is essential for skill retention and progression against advanced opponents.
Master the BRIDGE-Shrimp Combo!
Key Takeaways
- •Foundation: Bridge vs. Hip Escape
- •The Critical Prerequisite: Head Position
- •Loading for Maximum Bridge Height
- •The Hip Escape Sequence
This video I work with my guys on coordinating the bridge-shrimp combination to escape. Check out the details and you are sure to find something useful! Enjoy! If you have any questions, comments, or suggestions, please comment below. More videos to come! Please like, share, and subscribe!! PLEASE Click this link to SUPPORT the TeachMeGrappling Channel!!! https://www.patreon.com/TeachMeGrappling or https://www.paypal.me/CoachBrianPeterson To purchase TMG or PG Merchandise go to... https://www.petersongrapplers.com/shop Your contribution is much appreciated and will help me continue to bring you content! 🙏 www.NextLevelGuy.com The NextLevelGuy Podcast with Coach Brian Peterson has been released!!
Related Techniques
Frequently Asked Questions
What does this video teach about shrimp to full guard?
This video covers foundation: bridge vs. hip escape, the critical prerequisite: head position, loading for maximum bridge height. It provides detailed instruction from TeachMeGrappling Coach Brian.
How long does it take to learn shrimp to full guard?
The basic mechanics can be understood in a single session, but developing reliable execution requires consistent drilling over weeks of practice. This 8-part breakdown helps structure your training by isolating each phase of the technique.
What are the key details for finishing shrimp to full guard?
The practitioner should maintain upper-head positioning rather than placing the head in the opponent's hip to avoid triangle entrapment. If the opponent posts their foot defensively, applying hip pressure forces them back into a neutral position, re-establishing favorable conditions for the escape.
Related videos

The First 3 Mount Escapes You Need To Know in BJJ
Brandon Mccaghren
3 Most Common BJJ Shrimping Mistakes
Stephan Kesting

Basic Shrimp Mount Escape
KODA Academy of Martial Arts

Running Escape from Side Control – BJJ White Belt Tip | Thibodaux Jiu Jitsu
Jiu Jitsu | Next Generation Martial Arts Thibodaux
Trap & Roll Basics
Grapplers Elite