Foundation: Shoulder Blade Control
The primary objective in side control is maintaining constant pressure on the opponent's shoulder blades to keep them flat against the mat. Any escape attempt—whether turning into the practitioner or away—requires the opponent to lift their shoulder blades off the surface. Understanding this principle forms the foundation for all positional control variations.
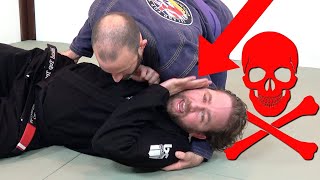
Common Mistake #1: Over-Reliance on Crossface
While the crossface is a valuable control tool, excessive fixation on it alone permits the opponent to rotate onto their side, reducing pressure and enabling escape techniques like the shrimp. Crossface pressure must be complemented by additional control mechanisms to prevent positional deterioration.
Common Mistake #2: Elbow-Knee Pinching
Tightly pinching the opponent's hips with the elbow and knee in isolation provides insufficient force to prevent shrimping escapes. When the opponent initiates hip displacement, this technique alone cannot generate enough pressure to maintain control.
Chest Pressure as Core Control Mechanism
The practitioner should distribute their entire body weight across their chest, extending through the thoracic spine with the chin tucked. By dynamically shifting chest weight in response to the opponent's escape attempts, the practitioner can keep shoulder blades pinned regardless of which arm configuration is employed.
Defending the Top Arm Frame
When the opponent frames with their top arm, positioning directly over their shoulder allows downward pressure to drive their shoulder back into the mat. If weight is positioned too far back, the opponent can create leverage to escape, making perpendicular weight distribution critical for neutralizing the frame.
Countering the Neck Frame
When the opponent secures a frame on the neck, the practitioner should move to an over-top position with their arm while maintaining chest pressure. This repositioning allows progression toward north-south control while keeping the opponent's shoulders pinned throughout the transition.
Managing the Hip Frame
When the opponent frames on the top hip, the practitioner's knee can easily follow during shrimping movements, maintaining pressure. The more threatening scenario occurs when the frame is positioned on the ribcage, requiring the practitioner to shift their hip and distribute weight across their ribcage side while elevating the opponent's elbow.
Universal Application Across Positions
Shoulder blade control principles extend beyond side control to all pinning positions, including half guard and mount transitions. Maintaining deleveraged positions through chest pressure creates maximum positional security across grappling scenarios.
Transition to Mount via Chest Pressure
When progressing from side control toward mount, the practitioner maintains heavy chest pressure as the priority while using their top hand to push the opponent's leg down. This creates access for the top knee to advance toward mount position while threatening arm traps that further limit the opponent's defensive options.
Arm Trap Completion and Control
Once the top knee achieves a high position to trap the opponent's arm, multiple submission and control threats emerge simultaneously. From this configuration, the practitioner can either push the opponent's wrist upward to feed it to their top hand or pin it against the opponent's hip, creating a position with significantly reduced escape options.
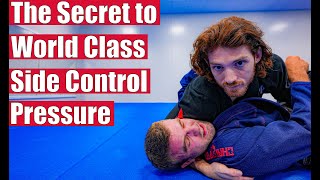
The Secret to a World Class Side Control
Key Takeaways
- •Foundation: Shoulder Blade Control
- •Common Mistake #1: Over-Reliance on Crossface
- •Common Mistake #2: Elbow-Knee Pinching
- •Chest Pressure as Core Control Mechanism
This video I overview the key aspects of a strong side control. I focus primarily on the key principle of using your chest weight to pin your opponents shoulders to the mat. Not only does this have a huge effect in side control but in all pinning positions in general strong chest pressure is so powerful. More content on my website at https://www.jonthomasbjj.com/collections Kimonos https://www.vitalkimonos.com 0:00 Core Goal of Side and Common Mistakes 1:10 Chest Pinning Mechanic 2:25 Countering The Neck Frame 3:57 Countering The Hip Frame 5:07 Chest Pressure and Mount Transition 8:04 Countering The Underhook 8:52 Closing Principles
Related Techniques
Frequently Asked Questions
What does this video teach about chest-to-chest side control?
This video covers foundation: shoulder blade control, common mistake #1: over-reliance on crossface, common mistake #2: elbow-knee pinching. It provides detailed instruction from JonThomasBJJ.
How long does it take to learn chest-to-chest side control?
The basic mechanics can be understood in a single session, but developing reliable execution requires consistent drilling over weeks of practice. This 10-part breakdown helps structure your training by isolating each phase of the technique.
What are the key details for finishing chest-to-chest side control?
When progressing from side control toward mount, the practitioner maintains heavy chest pressure as the priority while using their top hand to push the opponent's leg down. This creates access for the top knee to advance toward mount position while threatening arm traps that further limit the opponent's defensive options.
Related videos
BJJ Positioning: Securing Side Control
BJJCANADA.CA: REVIEWS, NEWS, AND MORE.
Side Control - Dealing with Frames and Establishing a Chest to Chest Pin
Fox Den Martial Arts

Setting A Crossface - A Crucial Skill of Half Guard Passing by John Danaher
BJJ Fanatics
The Secret to a World Class Side Control
JonThomasBJJ
How to Make Side Control BRUTAL with the Crossface
Stephan Kesting