Introduction to Back Clinch & Rear Sit-Out
This technique provides an effective takedown method when an attacker commits to a lead-hand strike. The practitioner capitalizes on the opponent's overextension by transitioning into a rear clinch and controlling position. This variation builds upon fundamental distance management principles covered in basic head-to-chest takedown instruction.
Level Change and Hip Control
As the opponent commits to the strike, the defender lowers their level and steps inward with hip contact, similar to initiating a double-leg takedown. The key distinction is hugging the opponent's hip rather than gripping the leg. This positioning establishes the foundation for transitioning to the rear clinch.
Head Positioning and Armpit Placement
The defender drives the crown of their head directly into the opponent's armpit to prevent counter-attacks. Maintaining an elevated head position is critical—dropping the head creates vulnerability to a standing guillotine choke. Proper head placement against the armpit neutralizes this defensive option while generating pressure for clinch establishment.
Circling to Rear Clinch
Using continuous forward pressure, the defender circles around the opponent's body while maintaining hip contact. Once positioned behind, the defender secures a belt-line grip with both hands at the opponent's midsection. This rear clinch position controls the opponent's center of gravity and prevents escape.
Leg Placement for the Sit-Out
The defender positions their lead leg directly behind the opponent's corresponding leg, establishing foot-to-foot contact. The leg placement need not be ankle-to-ankle but must remain directly behind the opponent's foot for maximum mechanical advantage. This positioning enables the sweeping action required for the takedown.
The Leaning and Dragging Motion
The defender leans opposite to the placement leg while driving the opponent's body toward the mat with a twisting motion. This action mimics dragging the opponent down while simultaneously tripping them with the positioned leg. The combined pressure from the clinch, body lean, and leg placement forces the opponent onto their back.
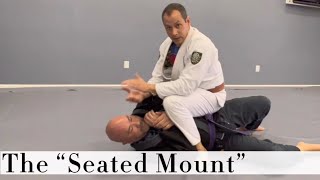
Hand Post and Transition to Mount
As the opponent falls, the defender posts their free hand on the mat to establish leverage and control their own descent. This hand post is essential—it prevents both fighters from scrambling and allows the defender to maintain positional advantage. The posted hand enables rapid transition into full mount position.
Completing Full Mount Position
Using the hand post as a base, the defender steps their leg over the opponent's body into a dominant full mount position. This transition occurs before the opponent can establish defensive positioning or reverse the takedown. The defender now controls the match from a position of maximum striking and submission leverage.
Common Errors and Defensive Considerations
Practitioners should note that this technique specifically targets lead-hand strikes and wild haymakers. If the opponent throws a backhand or collar-hand strike instead, a head-to-chest takedown becomes the appropriate response. Understanding opponent strike selection ensures proper technique application and prevents defensive scrambles.
Back Clinch & Rear Sit Out
Key Takeaways
- •Introduction to Back Clinch & Rear Sit-Out
- •Level Change and Hip Control
- •Head Positioning and Armpit Placement
- •Circling to Rear Clinch
Frequently Asked Questions
What does this video teach about standard seated rear mount?
This video covers introduction to back clinch & rear sit-out, level change and hip control, head positioning and armpit placement. It provides detailed instruction from P3 Martial Arts.
How long does it take to learn standard seated rear mount?
The basic mechanics can be understood in a single session, but developing reliable execution requires consistent drilling over weeks of practice. This 9-part breakdown helps structure your training by isolating each phase of the technique.
What are the key details for finishing standard seated rear mount?
Using the hand post as a base, the defender steps their leg over the opponent's body into a dominant full mount position. This transition occurs before the opponent can establish defensive positioning or reverse the takedown. The defender now controls the match from a position of maximum striking and submission leverage.