Grip Variations
Ura nage is executed effectively with either a lapel grip or sleeve grip. The practitioner should experiment with both variations to determine which works best for their body type and style.
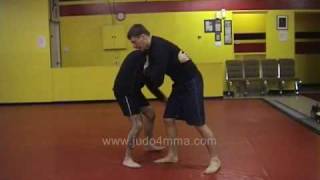
Entry and Hip Placement
Upon the opponent's entry, the thrower closes distance quickly using two deliberate steps—never jumping, as airtime creates vulnerability to leg attacks. The hips must be lowered and positioned to block the opponent's forward momentum.
Hand Positioning and Grip Mechanics
The lapel-side hand pulls the opponent forcefully toward the thrower while the rear hand wraps around the hip as deeply as possible. Both hands work in coordination to draw the opponent's center of gravity forward.
Back Arch and Timing
The thrower arches the back maximally while looking upward, allowing gravity to assist the lift. The rotational turn is executed as the final movement, maintaining the opponent's backward trajectory as long as possible before rotating.
Power Enhancement with Leg Drive
Additional power is generated by explosively raising the back leg, which elevates the opponent higher and facilitates a more controlled throw.
Counter to O Soto Gari
When the opponent initiates o soto gari, the thrower pushes away with the lapel hand, then releases the sleeve grip and transitions to the hips. A quick inward turn displaces the opponent's attacking leg with the knee, preventing potential injury to the opponent's joint.
Distance Management in Counter
Proper spacing is maintained during the counter, allowing the thrower to push the opponent away effectively before re-engaging and changing grips for the turn-in.
Lifting the Attacking Leg
In this variation, the thrower lifts the opponent's own attacking leg (the o soto leg) upward to complete the ura nage, using the opponent's momentum against them.
Follow-Up Application
Ura nage serves as an effective follow-up technique after executing the thrower's own o soto gari attempt, creating a seamless combination when the initial attack is countered.
Ura nage [English]
Key Takeaways
- •Grip Variations
- •Entry and Hip Placement
- •Hand Positioning and Grip Mechanics
- •Back Arch and Timing
Ura nage basics and one of my favourite variations
Frequently Asked Questions
What does this video teach about standard ura nage?
This video covers grip variations, entry and hip placement, hand positioning and grip mechanics. It provides detailed instruction from Camaleao Judo.
How long does it take to learn standard ura nage?
The basic mechanics can be understood in a single session, but developing reliable execution requires consistent drilling over weeks of practice. This 9-part breakdown helps structure your training by isolating each phase of the technique.
What are the key details for finishing standard ura nage?
In this variation, the thrower lifts the opponent's own attacking leg (the o soto leg) upward to complete the ura nage, using the opponent's momentum against them.