Introduction to Half Guard Mistakes
Half guard can be employed both defensively when the guard is being passed and offensively as a sweeping and submission tool. This lesson identifies four critical mistakes that undermine half guard effectiveness at all skill levels.
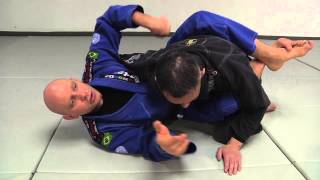
Mistake #1: Flat Back Position
Positioning flat on the back severely limits offensive options and allows the opponent to apply crushing weight pressure. The practitioner must instead angle to the side and curl upward, creating space and reducing the opponent's leverage while enabling active movement.
Body Alignment: The Hip Contact Principle
Proper half guard positioning requires curling tightly under the opponent's center of gravity, with the ear positioned near the opponent's hip. This compressed spacing dramatically increases control and mobility compared to maintaining distance from the opponent.
Mistake #2: Losing Top-Side Control of the Trapped Leg
At least one limb—ankle, calf, foot, or leg—must maintain constant contact over the opponent's trapped leg to prevent guard passage. Even momentary loss of this contact allows the opponent to advance to side control or mount position, eliminating half guard effectiveness.
Mistake #3: Neglecting Grip Fighting
Superior leg and body positioning can be negated if the opponent secures an underhook and cross-face grip. The practitioner must continuously fight for favorable grips—controlling the bicep and wrist while preventing the opponent from flattening the back or establishing deep positional control.
Upper Body Grip Strategy
Effective grip fighting involves controlling the inside line with underhooks at high or low positions, or alternatively applying an overhook. These grips must be continuously contested and adjusted based on the specific technique being executed.
Mistake #4: Lacking Exit Strategies
Practitioners must develop multiple escape routes from half guard when offensive techniques are unsuccessful or the opponent demonstrates superior positional defense. Predetermined transitions prevent scrambling desperation and maintain control of the exchange.
Exit Strategy #1: Guard Transition via Leg Switch
The practitioner can transition from inside-leg hooks to outside-leg hooks while maintaining top-side contact, then push away to re-establish closed or open guard. This method preserves positional control while shifting the mechanical advantage.
Exit Strategy #2: Butterfly Guard Conversion
Hip displacement combined with single butterfly hook insertion creates the half-butterfly position, enabling aggressive sweeping and back-taking opportunities. This transition is particularly effective against opponents maintaining lighter upper body pressure.
Summary: Four Pillars of Half Guard Mastery
Half guard proficiency requires proper body positioning on the side and curled underneath the opponent, constant leg control over the trapped limb, continuous grip fighting to prevent flattening, and developed exit strategies to other guard positions. Mastering these four fundamentals produces dramatic improvements in half guard effectiveness.
4 Mistakes That Kill Your Half Guard
Key Takeaways
- •Introduction to Half Guard Mistakes
- •Mistake #1: Flat Back Position
- •Body Alignment: The Hip Contact Principle
- •Mistake #2: Losing Top-Side Control of the Trapped Leg
Stephan Kesting from http://www.beginningbjj.com shares the four most common mistakes grapplers make in the half guard. Get your free copy of Stephan's book 'a Roadmap for Brazilian Jiu-jitsu' at the link above for more details about the half guard and the other major variations of the guard position in BJJ and Grappling. http://youtu.be/f2x1oi2NW5U
Related Techniques
Frequently Asked Questions
What does this video teach about grinding elbow from half guard?
This video covers introduction to half guard mistakes, mistake #1: flat back position, body alignment: the hip contact principle. It provides detailed instruction from Stephan Kesting.
How long does it take to learn grinding elbow from half guard?
The basic mechanics can be understood in a single session, but developing reliable execution requires consistent drilling over weeks of practice. This 10-part breakdown helps structure your training by isolating each phase of the technique.
What are the key details for finishing grinding elbow from half guard?
Hip displacement combined with single butterfly hook insertion creates the half-butterfly position, enabling aggressive sweeping and back-taking opportunities. This transition is particularly effective against opponents maintaining lighter upper body pressure.
Related videos
How to Stop the Elbow Grind vs Thighs in Closed Guard
Stephan Kesting
Elbow Lever from Half Guard
South Boston BJJ
The Importance Of Picking The Elbows From Mount by Jason Scully
The Grapplers Guide by Jason Scully

MR.FREE CD & Knife Tru Arm MAGIC on TV 5 (SOK SAB BAY)
CHAN PANHA (MRFREE)
![BERGEK feat CUT ZUHRA - SOK TOP 2 [Official Video Music]](https://img.youtube.com/vi/HOygZp3EA-c/mqdefault.jpg)
BERGEK feat CUT ZUHRA - SOK TOP 2 [Official Video Music]
Alamsyah Project