Foundation: The Three-Point Control System
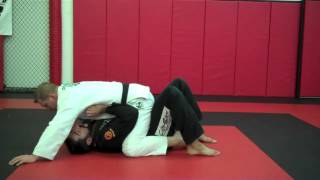
The armbar from guard position depends entirely on three elements: the opponent's head, their elbow, and the practitioner's hip. These three points must work in concert to execute a successful armbar. Mastering their relationship is essential before attempting advanced variations.
Why Traditional Two-on-One Grips Fail at Advanced Levels
Beginners often use a two-on-one grip on the elbow and wrist, which works against untrained opponents. However, this grip provides no head control, allowing the opponent to posture upward and escape. Without controlling the head, the elbow naturally drifts away from the hips, collapsing the entire position.
Dual Control: Head and Elbow Positioning
Successful armbar setup requires simultaneous control of both the opponent's head and elbow. The practitioner must pull the elbow toward their centerline while driving the opponent's head downward. The ideal position places the opponent's forehead directly over their own elbow, maximizing control and stability.
The Minimum Requirement: Elbow Inside the Hip
At minimum, the opponent's elbow must be brought inside the practitioner's hip. If the elbow remains outside the hip, the practitioner cannot generate sufficient angle to complete the armbar, even against weaker opponents. This positioning is non-negotiable for reliable armbar execution.
Establishing the Top Leg Lock
Once the elbow is positioned inside the hip, the practitioner throws their top leg over the opponent's arm to create a leg lock. This lock prevents the elbow from escaping outward by pinning it against the inner thigh and hamstring. The top leg lock maintains positional control while the practitioner adjusts their base.
Securing Position Before the Finish
With the top leg lock engaged, the practitioner lifts their lower back off the mat and repositions their legs into the final armbar configuration. This transition ensures maximum control and prevents the opponent from escaping. Only after securing this position should the practitioner attempt the finish.
The Critical Pivot Turn
The practitioner pivots perpendicular to the opponent, achieving at least a 90-degree angle to their body. This pivot is essential for generating downward pressure on the opponent's head and isolating the arm. The pivot turn represents the gateway from positional control to submission execution.
Finishing Options: Bottom or Top Position
Once the proper angle is achieved, the practitioner can finish the armbar either from the bottom or by rolling the opponent on top. Both finishing methods are viable depending on the opponent's resistance and position. The choice between them should be made based on what the opponent's body position allows.
BJJ Moves: Arm Bar From Guard by John Danaher
Key Takeaways
- •Foundation: The Three-Point Control System
- •Why Traditional Two-on-One Grips Fail at Advanced Levels
- •Dual Control: Head and Elbow Positioning
- •The Minimum Requirement: Elbow Inside the Hip
ARM BAR FROM GUARD BY JOHN DANAHER // In this BJJ Moves video, John Danaher demonstrates one of the best Jiu Jitsu Techniques and goes into detail on the arm bar. Here John is showing some of his trademark details on the arm bar position. This position is heavily favored by many of his students and members of the Danaher Death Squad. This is a BJJ Move off of his instructional series "Arm Bar: Enter The System." John Danaher is arguably the most infamous Brazilian Jiu Jitsu Instructor on the planet. Some of his students include Gordon Ryan, Garry Tonon, Georges St. Pierre, and Nicky Ryan. To learn more from John Danaher visit https"//bjjfanatics.com. BJJ Fanatics was started by a pair of black belts (Bernardo Faria & Michael Zenga) who feel that nothing is more important than improving your BJJ skills as much as possible in the least amount of time. Their aim was to create a shop for BJJ Students who don’t look at BJJ as a sport – but as a lifestyle. Youtube: https://www.youtube.com/channel/UCAqm... Facebook Group: https://www.facebook.com/groups/73355... Instagram: https://www.instagram.com/bjj.fanatic... 15% OFF On All Of Our BJJ Instructional Videos - Use Coupon Code: FANATICSYOUTUBE Website: http://bjjfanatics.com . For the best fightwear, check out https://www.kojofightwear.com/ and use code " YTD15 " to get 15% off your first order.
Related Techniques
Frequently Asked Questions
What does this video teach about standard shoulder walk?
This video covers foundation: the three-point control system, why traditional two-on-one grips fail at advanced levels, dual control: head and elbow positioning. It provides detailed instruction from BJJ Fanatics.
How long does it take to learn standard shoulder walk?
The basic mechanics can be understood in a single session, but developing reliable execution requires consistent drilling over weeks of practice. This 8-part breakdown helps structure your training by isolating each phase of the technique.
What are the key details for finishing standard shoulder walk?
The practitioner pivots perpendicular to the opponent, achieving at least a 90-degree angle to their body. This pivot is essential for generating downward pressure on the opponent's head and isolating the arm. The pivot turn represents the gateway from positional control to submission execution.
Related videos
The Tie Up Mount Escape Variation with James Foster Brazilian Jiu Jitsu
Submissions101
9) Shoulder Strike
Rocky Mountain Tai Chi
Side Control Escapes | Brazilian Jiu Jitsu Techniques | CVBJJ Online
CVBJJ Online
Coaching a BJJ Student through a Mount Escape to Sweep
Chewjitsu
Tai Chi Walking for Beginners | How To Do Tai Chi Walking
Ann Swanson Wellness