Judo Sumi Gaeshi (Sacrifice Throw) Tutorial
0
Sacrifice Throw·Stuart Tomlinson
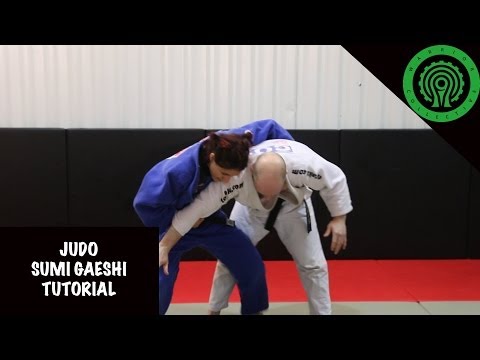
Olympian and Judo Black Belt Sophie Cox Head Instructor of Fighting Fit Judo Club in Manchester is filmed here by the Wa…
Translation: Sacrifice technique
Sacrifice throws (sutemi waza) are techniques where the thrower deliberately falls to the ground while executing the throw, using their own bodyweight, falling momentum, and the element of surprise to complete the technique. [1] Judo classifies sacrifice throws into two categories: ma sutemi waza (rear sacrifice throws where the thrower falls on their back) and yoko sutemi waza (side sacrifice throws where the thrower falls to their side). [1],[2] Sacrifice throws are high-risk, high-reward techniques — the thrower gives up their standing position to attempt the throw, meaning a failed sacrifice throw leaves them in bottom position; however, successful sacrifice throws often produce spectacular ippon-scoring projections that catch opponents completely off-guard. [2],[3] The most famous sacrifice throws — tomoe nage (circle throw), sumi gaeshi (corner reversal), and ura nage (rear throw) — are among the most visually stunning techniques in all martial arts. [3]
Sacrifice throws are part of the original Kodokan judo curriculum established by Jigoro Kano, representing the most tactically creative category of nage waza. [1] Tomoe nage gained worldwide fame through martial arts cinema (it is the iconic 'stomach throw' seen in countless films) and remains one of judo's most recognised techniques. [1],[2] In competition judo, sacrifice throws have produced some of the most spectacular ippon throws in Olympic and World Championship history. [2],[3] Kani basami (scissors throw) was banned from IJF judo competition in 1980 after causing several serious knee injuries, though it remains legal in sambo and some BJJ competitions. [3]
Sacrifice throws are extremely effective when used with proper timing, particularly against forward-driving opponents who are difficult to throw with standing techniques. [1] In competition judo, sacrifice throws like tomoe nage and sumi gaeshi regularly produce ippon at the highest levels, including Olympic finals. [2] The element of surprise makes sacrifice throws particularly effective in the early stages of a match or when the opponent is not expecting a ground-level attack. [3]
Sacrifice throws derive from classical jujutsu techniques adopted into Kodokan judo by Jigoro Kano. [1] Kyuzo Mifune, widely considered the greatest judo technician of all time, was famous for his mastery of sutemi waza, particularly against larger opponents. [1],[2] Modern competition judo continues to see sacrifice throws at the highest level, and the techniques have been adopted into BJJ, sambo, and MMA. [2]
No images yet for this technique.
Sign in to suggest an image.
Olympian and Judo Black Belt Sophie Cox Head Instructor of Fighting Fit Judo Club in Manchester is filmed here by the Wa…
Sumi Gaeshi is the best sacrifice throw you can do in judo! It has so many elements to it that work in Tori's favor. Fro…
No instructional courses yet for this technique.
Sign in to suggest a course.
Risk of injury to the person this technique is applied to
High — sacrifice throws carry risk for both fighters; the thrower risks landing in bottom position if the technique fails, while the thrown opponent faces high-amplitude landing impact; in competition, failed sacrifice throws in judo can score against the thrower if they land on their own back
Skill level needed to execute this technique reliably
Whether this technique is allowed under major competition rule sets
Kodokan Judo (Jigoro Kano, 1986)
Description sources — [1] Kodokan Judo (Kano, 1986) on sutemi waza classification [2] Best Judo (Inokuma & Sato, 1979) [3] Canon of Judo (Mifune, 1956) on sacrifice throwing principles
History sources — [1] Kodokan Judo (Kano, 1986) [2] Judo Formal Techniques (Otaki & Draeger, 1983) [3] IJF competition rule changes
Effectiveness sources — [1] Kodokan Judo (Kano, 1986) [2] Olympic and World Championship judo records [3] Tactical analysis of sacrifice throw timing
Official Kodokan ground technique classification system
Description sources — [1] Kodokan Judo (Kano, 1986) on sutemi waza classification [2] Best Judo (Inokuma & Sato, 1979) [3] Canon of Judo (Mifune, 1956) on sacrifice throwing principles
History sources — [1] Kodokan Judo (Kano, 1986) [2] Judo Formal Techniques (Otaki & Draeger, 1983) [3] IJF competition rule changes
Effectiveness sources — [1] Kodokan Judo (Kano, 1986) [2] Olympic and World Championship judo records [3] Tactical analysis of sacrifice throw timing
comfort with falling (the thrower must willingly go to the ground), explosive leg power (the foot on the hip drives the opponent overhead), strong pulling grip (loading the opponent's weight), timing sensitivity
lighter/more agile fighters (sacrifice throws are often used by smaller judoka against larger opponents), flexible back (rolling motion in ma sutemi waza)
hip flexors (driving the foot into the opponent), core (rolling and rotation), forearms (grip maintenance during the fall), glutes (bridging in ura nage)
Sacrifice throws require the attacker to fall to the ground to execute the throw — high commitment, no recovery if they fail. The sacrifice gives up standing position in exchange for throwing power. (Kano, Kodokan Judo; judo and wrestling texts)
Stuart Tomlinson emphasizes pulling the arm that's around the back while going onto your back to ensure you get the full lift and rotation needed for the technique.
Hook your leg to drive your partner's leg over the top, which helps maintain control throughout the sacrifice throw.
Sacrifice throws (sutemi waza) are techniques where the thrower deliberately falls to the ground while executing the throw, using their own bodyweight, falling momentum, and the element of surprise to complete the technique. Judo classifies sacrifice throws into two categories: ma sutemi waza (rear sacrifice throws where the thrower falls on their back) and yoko sutemi waza (side sacrifice throws where the thrower falls to their side).
Sacrifice throws are part of the original Kodokan judo curriculum established by Jigoro Kano, representing the most tactically creative category of nage waza. Tomoe nage gained worldwide fame through martial arts cinema (it is the iconic 'stomach throw' seen in countless films) and remains one of judo's most recognised techniques.
IJF: legal — Legal throwing technique; IBJJF: legal — Legal at all belt levels; UWW: legal — Legal in both freestyle and Greco-Roman; Unified MMA: legal — Legal throwing technique; ADCC: legal — Legal; FIAS Sport Sambo: legal — Legal; FIAS Combat Sambo: legal — Legal
Danger rating 6/10. Moderate-high — sacrifice throws carry risk for both fighters; the thrower risks landing in bottom position if the technique fails, while the thrown opponent faces high-amplitude landing impact; in competition, failed sacrifice throws in judo can score against the thrower if they land on their own back
The standard setup chain: Create Forward Pressure → Load Their Weight → Drop and Place → Elevate and Redirect → Control the Landing → Scramble to Top.
Standard counters include: Step Over — when the opponent sits down for tomoe nage, simply stepping over their legs neutralises the throw / Hip Drop — dropping the hips backward to resist the forward pull / Grip Strip — releasing the grips to deny the opponent the connection needed to load weight / Counter-throw — using the opponent's downward motion as kuzushi for a counter technique.
Common variants: Tomoe nage (circle throw) (the most famous sacrifice throw; falling backward with a …); Sumi gaeshi (corner reversal) (butterfly hook sacrifice throw from clinch; hooking the t…); Ura nage (rear throw) (bridging backward while lifting the opponent, slamming th…); Tani otoshi (valley drop) (dropping to the side behind the opponent's legs, tripping…); Yoko guruma (side wheel) (a lateral sacrifice throw rotating the opponent sideways); Kani basami (scissors throw) (jumping to scissor the opponent's legs; banned in IJF jud…).
Sacrifice throws produce some of the most spectacular scores in judo competition — tomoe nage and sumi gaeshi ippon finishes are highlights of major international tournaments. At the Olympic level, sacrifice throws have decided gold medal matches in multiple weight categories.
Top errors to watch for: Using sacrifice throws as a first attack — sacrifice throws work best when the opponent is pushing forward; naked sac… / Foot placement too low on tomoe nage — placing the foot on the stomach or below the belt line results in the opponent… / Not committing to the fall — half-committed sacrifice throws leave the thrower in an awkward position without generat… / Pulling the opponent's arms instead of their body weight — the pull must load the opponent's weight onto the thrower'….
The Sacrifice Throw is also known as Sutemi Waza, Sacrifice Technique, Sacrifice Throw.