Defense Hierarchy Against Takedowns
The sprawl operates as part of a layered defensive system against shot attempts. The primary line of defense is head and body positioning, followed by arm placement to control the opponent's entry. If an opponent penetrates these initial defenses, the sprawl becomes the final defensive mechanism to prevent leg takedowns.
Check Sprawl on the Feet
The check sprawl is a reactive defense performed while standing that converts defense into offensive opportunity. The defender uses the knee-side hand to protect against knee grabs while simultaneously checking the opponent's penetration. This technique allows the defender to maintain awareness of which leg the opponent is targeting.
Deep Sprawl Mechanics
A proper deep sprawl involves a downward and upward motion rather than a flat extension that leaves the defender out of position. The defender drives their hip to crush either the opponent's shoulder or head, generating significant weight transfer. Immediately after impact, the defender breaks the opponent's legs backward to maximize pressure and control.
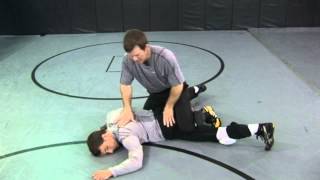
Recovery and Counter-Attack Positioning
Proper sprawl recovery requires the defender to rise with a high lunge motion while maintaining body alignment to execute counter-attacks. The lower body remains twisted while the upper body squares up, positioning the defender to either continue defending or transition to offense. This positioning prevents the opponent from recovering and forces them to redirect their approach.
Hip Torque and Weight Distribution
The sprawl's effectiveness depends on generating rotational torque from the hips rather than relying solely on hand placement. Even without arm involvement, the twisted lower body and squared upper body create substantial crushing pressure on the opponent. This hip rotation acts like a baseball bat swing, displacing the opponent and disrupting their forward momentum.
Active vs. Passive Sprawl Philosophy
The sprawl is an active defensive technique that punishes the opponent's commitment to the shot by forcing them out of position. When executed properly, the sprawl displaces the opponent and requires them to recover, allowing the defender to maintain control and pursue counter-attacks. The sprawl's success depends on creating positional disadvantage for the shot-taker rather than merely stopping their entry.
Heavy Hips Principle
Heavy hips represent a critical element of sprawl mechanics involving dropping weight downward rather than floating it upward. The defender generates impact force by driving their hip mass into the opponent, creating pain and disruption on contact. This weighted approach is essential whether the sprawl is executed standing or on the ground, distinguishing an effective sprawl from an ineffective one.
Timing and Hand Integration
Hand placement in the sprawl follows a three-step timing sequence: establishing head/body position first, followed by arm placement, and finally hand action if needed. The motion forms a circular pattern rather than linear or angular movements. This sequential timing allows the defender to use hands as a final refinement rather than the primary defensive mechanism.
How to Sprawl Hard and Stop the Takedown
Key Takeaways
- •Defense Hierarchy Against Takedowns
- •Check Sprawl on the Feet
- •Deep Sprawl Mechanics
- •Recovery and Counter-Attack Positioning
How to sprawl and stop the takedown by champion wrestler Nick Ugoalah. Here's more about training for wrestling by Nick Ugoalah https://www.grapplearts.com/physical-conditioning-mental-training-for-combat-sport/
Related Techniques
Frequently Asked Questions
What does this video teach about sprawl?
This video covers defense hierarchy against takedowns, check sprawl on the feet, deep sprawl mechanics. It provides detailed instruction from Stephan Kesting.
How long does it take to learn sprawl?
The basic mechanics can be understood in a single session, but developing reliable execution requires consistent drilling over weeks of practice. This 8-part breakdown helps structure your training by isolating each phase of the technique.
What are the key details for finishing sprawl?
Heavy hips represent a critical element of sprawl mechanics involving dropping weight downward rather than floating it upward. The defender generates impact force by driving their hip mass into the opponent, creating pain and disruption on contact. This weighted approach is essential whether the sprawl is executed standing or on the ground, distinguishing an effective sprawl from an ineffective one.