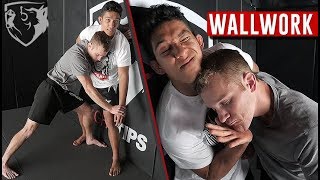
Introduction & Reference Position
Dean Barthelemy, MMA coach at Roger Grace Academy, demonstrates the standard wall walk clinch position and its application in cage control. This foundational position effectively closes escape routes and forces the opponent into predictable movement patterns. Understanding this reference point is essential before attempting takedown transitions.
Opponent Escape Mechanics
When trapped in the wall clinch, the opponent must transition through predictable stance changes to escape. The opponent rotates from a split stance in one direction, squares their hips, and shifts to a split stance in the opposite direction to scoot their hips away from the cage. This transitional moment between the square and split stance creates a critical window for the attacking wrestler.
Timing the Double Leg Takedown
As the opponent squares their hips to facilitate escape, the attacker immediately releases leg pressure and drops into a double leg position. This technique capitalizes on the opponent's weight distribution shift during their transition. Timing the drop to coincide with the squaring motion maximizes control and minimizes defensive resistance.
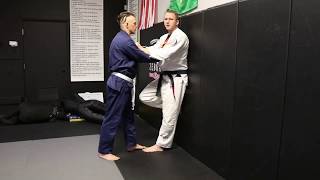
Hand Positioning & Leg Control
Once in the double leg position, the attacker secures control by either closing their hands behind the opponent's legs or controlling the knees. Barthelemy prefers gripping the back of the legs rather than clasping hands, as this grip provides more positional flexibility for subsequent transitions. Consistent pressure maintains control throughout the takedown execution.
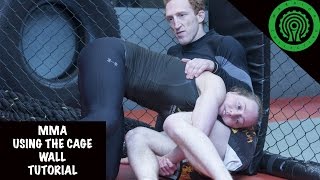
Squat Position & Hip Drive
The attacker transitions into a squat position while dragging the opponent's legs inward between their own legs. This hip-driven movement pulls the opponent off the cage wall and toward the attacker's body. The squat position allows for both striking opportunities and smooth transitions to ground control positions.
Ground Control & Striking
After establishing control on the ground, the attacker can immediately transition to striking from top position. From half guard or full control, the attacker maintains offensive pressure while the opponent must defend. In MMA contexts, controlling the opponent and landing strikes takes priority over traditional jiu-jitsu position advancement.
Late Timing Adjustment - Rotation Option
If the attacker's timing is slightly delayed during the opponent's escape attempt, a rotational adjustment allows for continued control. By rotating toward the opponent's continuing movement and collapsing their knee, the attacker can still complete the takedown and establish top position. This variation demonstrates the technique's adaptability to real-time combat scenarios.
Post-Takedown Control & Offense
Once on the ground, the attacker maintains control while establishing a strategic offensive advantage through strikes and arm positioning. By controlling both the opponent's movement and their defensive arms, the attacker ensures they maintain more offensive options than the opponent has defensive counters. This systematic approach emphasizes dominant positioning in MMA competition.
MMA Cage Wall Training - Wall Control & Takedowns with Dean Barthelemy
Key Takeaways
- •Introduction & Reference Position
- •Opponent Escape Mechanics
- •Timing the Double Leg Takedown
- •Hand Positioning & Leg Control
| MMA Cage Wall Training - Wall Control & Takedowns | In the 3rd video of a series, Roger Gracie Academy MMA Coach Dean Barthelemy continues the MMA Cage Wall Training with some drills for wall control and takedowns off of the cage. If you love great martial arts content like this SUBSCRIBE to Warrior Collective here: https://www.youtube.com/channel/UCpLH5tDGl_QiRJ1eDUTLFxQ?sub_confirmation=1 To start this series of Dean Barthelemy MMA Cage Wall Videos from the beginning head here: https://www.youtube.com/watch?v=vjPnsDqsb6Q&t=96s For more on Mixed Martial Arts head to this playlist: https://www.youtube.com/watch?v=5_ZJThSlQtk&list=PLdsrTklg8AVHEOWABnrh4nthzpN5LqqHZ JOIN US FOR A ONCE IN A LIFETIME MARTIAL ARTS TRAINING CAMP IN SINGAPORE!! https://www.warriorcollective.co.uk/2019/09/evolve-mma-one-championship-training-camp/ Thanks for watching, I hope you enjoyed watching this MMA Cage Wall Training video, please like, share and don't forget to SUBSCRIBE to Warrior Collective for more great videos each week!! WELCOME TO THE BEST ONLINE MARTIAL ARTS RESOURCE IN THE WORLD www.warriorcollective.co.uk JOIN THE WARRIOR COLLECTIVE COMMUNITY INSTAGRAM - https://www.instagram.com/warriorcollective/?hl=en FACEBOOK - https://www.facebook.com/warriorcolle... TWITTER - https://twitter.com/Warriorcollect WARRIOR COLLECTIVE COURSES - https://www.warriorcollective.co.uk/product-category/digital-download/ #mma #cagewall #warriorcollective
Frequently Asked Questions
What does this video teach about standard wall walk clinch position?
This video covers introduction & reference position, opponent escape mechanics, timing the double leg takedown. It provides detailed instruction from Stuart Tomlinson.
How long does it take to learn standard wall walk clinch position?
The basic mechanics can be understood in a single session, but developing reliable execution requires consistent drilling over weeks of practice. This 8-part breakdown helps structure your training by isolating each phase of the technique.
What are the key details for finishing standard wall walk clinch position?
If the attacker's timing is slightly delayed during the opponent's escape attempt, a rotational adjustment allows for continued control. By rotating toward the opponent's continuing movement and collapsing their knee, the attacker can still complete the takedown and establish top position. This variation demonstrates the technique's adaptability to real-time combat scenarios.