Introduction and Equipment Overview
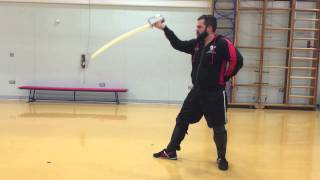
Instructor Andy Madelmo introduces longsword fundamentals, noting that proper technique can be practiced with minimal equipment. A standard wooden dowel approximately 48 inches in length serves as an effective training tool for beginners learning basic cutting mechanics.
Proper Grip: The Handshake Method
The correct grip employs a handshake position rather than a hammer grip, with the dominant hand positioned on top at approximately 45 degrees to the handle. The bottom fingers provide primary control by locking the weapon into the palm's natural groove, while the top fingers remain relaxed. This configuration creates a rigid, stable structure essential for generating power and maintaining control during engagement.
Two-Handed Grip and Hand Positioning
Both hands should remain positioned close together during initial training to establish proper structure and control. The bottom hand braces from underneath, creating a unified grip that prevents unwanted movement and generates consistent power through the weapon.
Guard Position and Arm Alignment
The high guard position places the weapon above the head with arms maintained nearly straight but not locked, creating approximately 89 degrees of extension. This positioning keeps the blade forward of the hands, providing superior hand protection and enabling power transfer through proper body mechanics rather than reliance on muscular effort alone.
Stance and Lower Body Foundation
The foundational stance positions the dominant leg rearward with feet approximately shoulder-width apart and a slight knee bend combined with a forward hip hinge. This configuration provides spring tension and forward pressure while maintaining balance and readiness for engagement.
Fundamental Movement Principle: Arms Before Feet
Unlike throwing mechanics where stepping precedes the motion, longsword technique requires the arms and weapon to move first, establishing defensive coverage before closing distance. This critical sequencing ensures the blade protects the body as the practitioner advances, preventing exposure to incoming threats during the approach.
Longsword - 01- Introduction and Basics
Key Takeaways
- •Introduction and Equipment Overview
- •Proper Grip: The Handshake Method
- •Two-Handed Grip and Hand Positioning
- •Guard Position and Arm Alignment
Frequently Asked Questions
What does this video teach about standard military sabre cut?
This video covers introduction and equipment overview, proper grip: the handshake method, two-handed grip and hand positioning. It provides detailed instruction from Historical Weapons Guild.
How long does it take to learn standard military sabre cut?
The basic mechanics can be understood in a single session, but developing reliable execution requires consistent drilling over weeks of practice. This 6-part breakdown helps structure your training by isolating each phase of the technique.
What are the key details for finishing standard military sabre cut?
The foundational stance positions the dominant leg rearward with feet approximately shoulder-width apart and a slight knee bend combined with a forward hip hinge. This configuration provides spring tension and forward pressure while maintaining balance and readiness for engagement.
Related videos

Infantry Sword Exercise Manual, 1817, by Henry Angelo
Academy of Historical Fencing

Can You Use a Single-Handed Sword with TWO Hands?
Skallagrim
Military sabre guards lesson 2
Academy of Historical Fencing
Military Sabre Fencing - Grips and Disarms
scholagladiatoria
British Military Sabre Instruction - Cut 3 and 4
Espada Negra