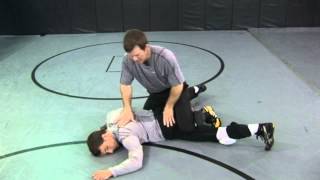
Foundation: Head Control as Priority
When defending bottom side control, head control is the most critical defensive principle. The defender must prioritize keeping the opponent's hands away from the head and maintaining a tight elbow position on the near side. This foundational posture prevents the opponent from establishing the crossface grip that would otherwise deteriorate the defender's position.
Understanding the Crossface Threat
The crossface occurs when the opponent grabs across the defender's head, forcing the defender to look away and severely limiting escape options. Once the near arm becomes pinned—whether through knee pressure, foot switches, or the defender reaching around the opponent's back—the position becomes increasingly difficult to escape. Preventing this pinning sequence is essential to maintaining viable escape pathways.
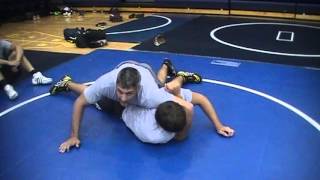
Defensive Framing Mechanics
The defender uses their wrist bones rather than hand pressure to create frames against the opponent's arm. The head must remain pressed to the floor to maintain maximum defensive depth, as lifting it creates vulnerability to crossface control. This framing principle applies regardless of which blocking method the defender employs.
First Defense: Tight Elbow Hook
The defender's near arm creates a hook with the elbow drawn tight to the body, using the wrist bone as a frame against the opponent's arm. If the opponent attempts to pummel through this position, the defender must simultaneously pummel to maintain the blocking angle. This method keeps the defender's hand completely free while maintaining structural integrity.
Second Defense: C-Grip on the Bicep
The defender's far hand forms a C-grip by locking the thumb into the crook of the opponent's arm, providing superior control and preventing the opponent's arm from slipping downward. The thumb placement is critical—without it, the opponent can easily escape the grip. This two-handed approach combines the tight elbow with bicep control for maximum blocking effectiveness.
Managing Pummeling Exchanges
When the opponent attempts to pummel their hand through the defender's guard, the defender must use both hands in combination—the hook and the C-grip working together. The defender can alternate between these two blocking techniques depending on the opponent's movement and positioning. Maintaining this dual-hand defense requires active engagement but dramatically increases escape opportunities.
Integration with Escape Sequences
Successful crossface blocking directly enables multiple escape routes, including the knee-elbow escape and the underhook escape. By keeping the head free and preventing near-arm pinning, the defender creates the space necessary to execute these transitions. Head control defense serves as the prerequisite that makes all subsequent escapes viable.
Prevention Over Recovery
Consistently blocking the crossface and defending the near arm prevents the position from deteriorating, making escape far easier than attempting recovery from a fully controlled position. The defender should never allow the opponent free access to the head or allow the near arm to be pinned beneath the opponent's legs. This proactive defense fundamentally changes the difficulty level of escaping bottom side control.
Side Control Bottom - Blocking Cross Face / Defending Near Arm
Key Takeaways
- •Foundation: Head Control as Priority
- •Understanding the Crossface Threat
- •Defensive Framing Mechanics
- •First Defense: Tight Elbow Hook
Frequently Asked Questions
What does this video teach about standard crossface block?
This video covers foundation: head control as priority, understanding the crossface threat, defensive framing mechanics. It provides detailed instruction from Darragh O Conaill BJJ.
How long does it take to learn standard crossface block?
The basic mechanics can be understood in a single session, but developing reliable execution requires consistent drilling over weeks of practice. This 8-part breakdown helps structure your training by isolating each phase of the technique.
What are the key details for finishing standard crossface block?
Successful crossface blocking directly enables multiple escape routes, including the knee-elbow escape and the underhook escape. By keeping the head free and preventing near-arm pinning, the defender creates the space necessary to execute these transitions. Head control defense serves as the prerequisite that makes all subsequent escapes viable.