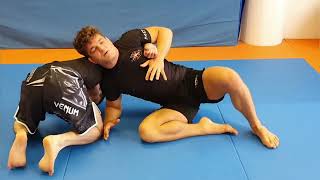
Positioning for the Whizzer
Two practitioners kneel facing each other, with one establishing a wrestling seatbelt grip (an underhook around the opponent's waist). The other immediately counters by securing an overhook, known as a whizzer. Both athletes position their hands on the mat with legs entangled, establishing the foundation for the technique.
The Dogfight Position
Both practitioners elevate their outside leg while maintaining grounded hand positions, creating what is called the dogfight position. This stance resembles a four-legged table with two feet and two hands on the mat. The whizzer applicant must control the opponent's posture while preventing them from improving their position or executing a sweep.
Applying Whizzer Pressure
The whizzer applicant pulls the overhook upward and forward while turning their head and driving their shoulder into the opponent's armpit, simultaneously rotating their hips. This coordinated pressure prevents the opponent from driving forward effectively. The technique relies on proper mechanical advantage rather than muscular force alone.
Destabilizing the Base
The whizzer applicant shifts their body weight onto the opponent's right hand by elevating the inside leg and maintaining base integrity. This weight distribution causes the opponent's support hand to collapse, forcing them to drop to their shoulder. The opponent remains trapped in half guard as they fall, maintaining the whizzer control.
The Uchi Mata Sequence
When the opponent fights back to their knees and reinstates pressure, the whizzer applicant steps close with their inside leg, initiating the uchi mata (inside thigh sweep) position. This drill is performed in sets of three repetitions, with role reversal afterward. Proper leg placement is critical—raising the inside knee too early compromises the technique's effectiveness.
Defending Against the Whizzer Escape
When trapped with the whizzer during a sweep attempt, the defending athlete should immediately secure the opponent's leg with a half guard hook. The defending athlete frames with both hands—one under the opponent's leg and one on their waist—before rolling through the sweep. Proper hip positioning underneath the opponent's center of gravity is essential for successful rolling.
Avoiding Arm Entrapment
If the whizzer applicant leaves their arm extended between the defender's legs during the roll, they risk exposure to an armbar submission. The defender should keep their head down and body tight to prevent the arm from extending. If caught in this vulnerable position, the defender can escape by removing their arm before the trap closes and using a head shrug to create space.
The Leg Drag Guard Pass
After successfully rolling through the whizzer sweep, the whizzer applicant executes a hip escape while controlling the opponent's leg, positioning their knee behind the opponent's leg. This pin eliminates the opponent's hip mobility and prevents escape. The position transitions seamlessly into a leg drag style guard pass.
Attacking a Persistent Whizzer
If the opponent refuses to release their whizzer overhook during the escape sequence, the defending athlete can circle their body and step over the opponent's head, converting the extended arm into an armbar opportunity. This attack only succeeds if the opponent maintains their grip. Skilled practitioners will release the whizzer to avoid this consequence, making awareness of the threat tactically valuable.
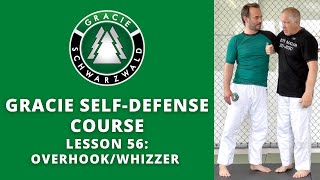
The Whizzer Defined
The whizzer is technically an overhook applied with specific mechanical pressure against an opponent's wrestling seatbelt or underhook. The technique involves wrapping the overhook tightly around the opponent's torso while maintaining integrated hip and shoulder rotation. Proper force application through coordinated body mechanics—not isolated arm strength—generates the whizzer's effectiveness.
Whizzer BASICS for EVERYONE!
Key Takeaways
- •Positioning for the Whizzer
- •The Dogfight Position
- •Applying Whizzer Pressure
- •Destabilizing the Base
This video I breakdown the basics of the whizzer and uchi mata from the dogfight position. Check out the details and you are sure to find something useful! Enjoy! If you have any questions, comments, or suggestions, please comment below. More videos to come! Please like, share, and subscribe!! PLEASE Click this link to SUPPORT the TeachMeGrappling Channel!!! https://www.patreon.com/TeachMeGrappling or https://www.paypal.me/CoachBrianPeterson Your contribution is much appreciated and will help me continue to bring you content! 🙏 www.NextLevelGuy.com The NextLevelGuy Podcast with Coach Brian Peterson has been released!! Check it out!
Frequently Asked Questions
What does this video teach about standard whizzer kimura?
This video covers positioning for the whizzer, the dogfight position, applying whizzer pressure. It provides detailed instruction from TeachMeGrappling Coach Brian.
How long does it take to learn standard whizzer kimura?
The basic mechanics can be understood in a single session, but developing reliable execution requires consistent drilling over weeks of practice. This 10-part breakdown helps structure your training by isolating each phase of the technique.
What are the key details for finishing standard whizzer kimura?
If the opponent refuses to release their whizzer overhook during the escape sequence, the defending athlete can circle their body and step over the opponent's head, converting the extended arm into an armbar opportunity. This attack only succeeds if the opponent maintains their grip. Skilled practitioners will release the whizzer to avoid this consequence, making awareness of the threat tactically valuable.